OpenRTM-aist Case Study on Raspberry Pi
Introduction
Raspberry Pi is a single-board computer with an ARM processor developed by the Raspberry Pi Foundation in the UK.
The Raspberry Pi is very convenient because it runs normal Linux (Debian, Fedora, Arch Linux) and FreeBSD for ARM regardless of the size of the embedded board, and can also compile on the board. Currently, for the storage device, the SD card can be used. It is inexpensive and has a large capacity. Also, the main board price is very low, about 3,000 yen. Also, since basic I/O is provided and can be connected to various external devices, various applications such as robot control and measurement with sensors are conceivable.
Specifications
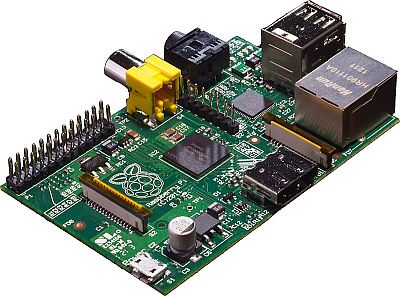
The appearance of one type of Raspberry Pi is shown below.
The Raspberry Pi has three basic types (Model A, Model B, Model Zero), and there are multiple models for each basic type. Please refer to the following Wikipedia link for details.
- From Wikipedia: http://en.wikipedia.org/wiki/Raspberry_Pi
The specifications of typical models are shown below.
| CENTER:Specification | |||
| 3 Model B | 3 Model B + | 4 Model B (4G) | |
| Target Price | $ 35 | $ 35 | $ 55 |
| SoC | Broadcom BCM2837 | Broadcom BCM2837B0 | Broadcom BCM2711 |
| CPU | ARM Cortex-A53 1.2GHz | ARM Coretex-A53 1.4GHz | ARM Coretex-A72 1.5GHz |
| GPU | Broadcom VideoCore IV | Broadcom VideoCore VI | |
| Memory (SDRAM) | 1GB (GPU sharing) | 4GB (GPU sharing) | |
| USB 2.0 port | 4 (Integrated USB hub) | 4 | 2 |
| USB 3.0 port | CENTER:- | 2 | |
| Video output | Composite RCA (PAL & NTSC), HDMI (rev 1.3 & 1.4), MIPI DSI | Composite RCA (PAL/NTSC), micro-HDMI (up to 4kp60) 2.0 x 2, MIPI DSI | |
| Audio output | 3.5mm jack, I2S, HDMI | 3.5mm jack, I2S, micro HDMI | |
| Storage | SD memory card / MMC / SDIO card slot | ||
| Network | 10/100 Mbps Ethernet (RJ45) | Gigabit Ethernet over USB 2.0 (maximum throughput 300Mbps) (RJ45) | Gigabit Ethernet (RJ45) |
| Low-level peripherals | 8 × GPIO, UART, I2C, SPI and two chip select, + 3.3V, + 5V, ground | ||
| Power supply | 2.5A (12.5W) | 3A (15W) | |
| Power source | 5V/microUSB or GPIO | 5V/USB Type-C or GPIO | |
| Size | 85.0mm x 56.5mm | 85.0mm x 56.0mm | |
See the above Wiki for more details.
Overview of this book
Using the I/O extension platform PiRT-Unit developed by AIST makes it possible to use external I/O relatively easily.
OpenRTM-aist (C++, Python, Java) can also be compiled and executed on the board, so even though it is an embedded board, it can be used in almost the same way as a normal Linux PC development process.
This section describes how to build an environment for developing and executing RT components with OpenRTM-aist, know-how for convenient use, how to control mobile robots, and how to use I/O.
Preparation of SD card
(G)Introduction
This section explains installation of the execution environment for running RTC for Raspberry Pi (hereinafter referred to as RPI RTC).
The following installation procedure assumes Windows environment. If you are using a non-Windows environment please refer to the following site etc.
Here, we download the OS image from the Raspberry Pi official site and explain about various setups. The rough procedure to make OpenRTM available on Raspberry Pi is as follows.
- Write the OS image to the SD card
- Basic Setup of the OS
- Installing OpenRTM-aist
- Component execution test
In addition, since OpenRTM - aist installation and image where Kobuki component has already been installed are prepared here, the following procedure can be skipped.
(G)Capacity of SD card
The SD card you need is at least 2GB, but 4GB or more is required for actual use. Be sure to prepare an SD card of 4GB or more.
(G)Image download
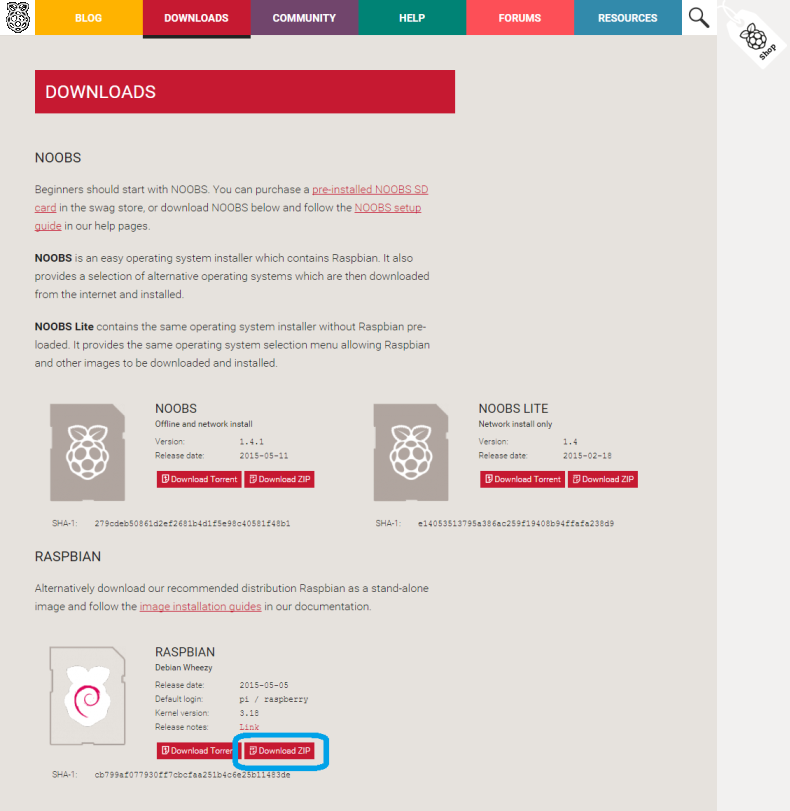
Download OS Raspbian "wheezy" for Raspberry Pi from the following site. Raspbian is a Debian-based Linux distribution for RaspberryPi.
- Raspbian Wheezy: http://www.raspberrypi.org/downloads Download Raspbian
Please unzip the downloaded file YYYY-MM-DD-wheezy-raspbian.zip. YYYY-MM-DD-wheezy-raspbian.img file of 2GB size should be expanded.
 $ ls -al
 total 4752840
 drwxr-xr-x  4 n-ando  staff         136  5 18 13:30 .
 drwxr-xr-x  9 n-ando  staff         306  5 18 13:30 ..
 -rw-r--r--  1 n-ando  staff  1939865600  2  9 12:44 2013-02-09-wheezy-raspbian.img
 -rwxr-xr-x  1 n-ando  staff   493587826  5  7 21:08 2013-02-09-wheezy-raspbian.zip
If it can not be deployed successfully, the download may fail and the file may be broken. Please delete the corrupted file and try downloading again.
(G)Write image
The expanded yyyy-mm-dd-hweezy-raspbian.img is called an image file, and the state of the disk started by Raspbian is extracted byte by byte from the beginning to the end of the disk. You can not use this file simply by copying it to SD card! !
Please write it to the SD card as described below.
(G)Writing images (Windows)
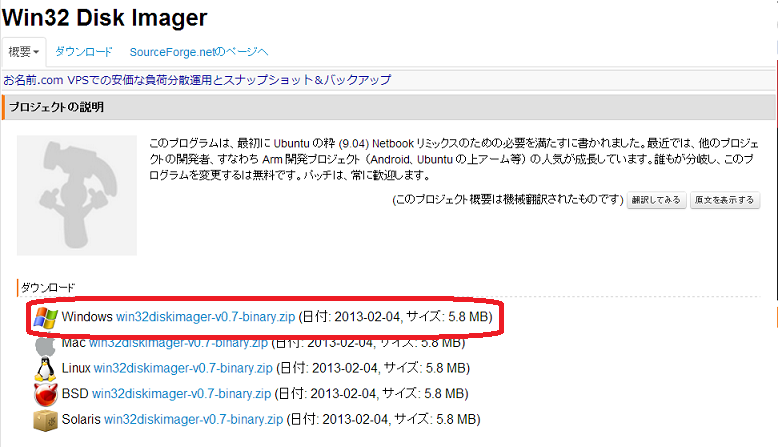
In Windows, you can write images by using the tool called Win32 DiskImager. Download the image data writing tool Win32DiskImager binary from the following site.
- Win32DiskImager: http://sourceforge.jp/projects/sfnet_win32diskimager/ Download Win32 DiskImager
Extract the downloaded file (win32diskimager-vX.X-binary.zip).
* Because Win32 DiskImager does not support double-byte characters, YYYY-MM-DD-wheezy-raspbian.zip decompresses to halfway pathname where double-byte characters and spaces are not included Please give me.
Insert the SD card used by Raspberry Pi into the PC and start Win32 DiskImager.
* Since SD card needs to be recognized as a drive, format it in FAT32 format beforehand
Specify the drive of the SD card in Raspbian image file (YYYY-MM-DD-wheezy-raspbian.img), "Drive" which decompressed to "Image File" and click "Write" button.
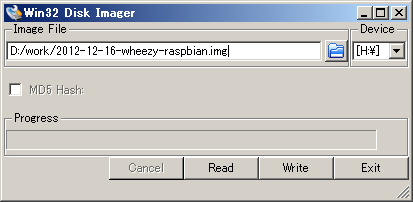
The preparation of the SD card is now complete. When writing is completed, install the SD card in the Raspberry Pi and turn on the power.
(G)Writing images (Linux)
On Linux, you can read and write images using the dd command. The dd command is installed by default on most UNIX based operating systems.
After inserting the SD card, check the kernel message with the dmesg command.
 $ dmesg
   : Omission
 [333478.822170] sd 3:0:0:0: [sdb] Assuming drive cache: write through
 [333478.822174]  sdb: sdb1 sdb2
 [333478.839563] sd 3:0:0:0: [sdb] Assuming drive cache: write through
 [333478.839567] sd 3:0:0:0: [sdb] Attached SCSI removable disk
 [333479.094873] EXT4-fs (sdb2): mounted filesystem with ordered data mode
 [333527.658195] usb 1-1: USB disconnect, address 2
From this message, check the device name of the SD card. In this example sdb seems to be the device name of the SD card. Let's look under/dev/.
 ls -al /dev/sd*
 brw-rw---- 1 root disk 8,  0 May  7 17:28 /dev/sda
 brw-rw---- 1 root disk 8,  1 May  7 17:28 /dev/sda1
 brw-rw---- 1 root disk 8,  2 May  7 17:28 /dev/sda2
 brw-rw---- 1 root disk 8,  5 May  7 17:28 /dev/sda5
 brw-rw---- 1 root disk 8, 16 May 18 14:19 /dev/sdb
 brw-rw---- 1 root disk 8, 17 May 18 14:19 /dev/sdb1
 brw-rw---- 1 root disk 8, 32 May 18 14:19 /dev/sdc
Since sda is mostly a system disk, do not touch absolute.
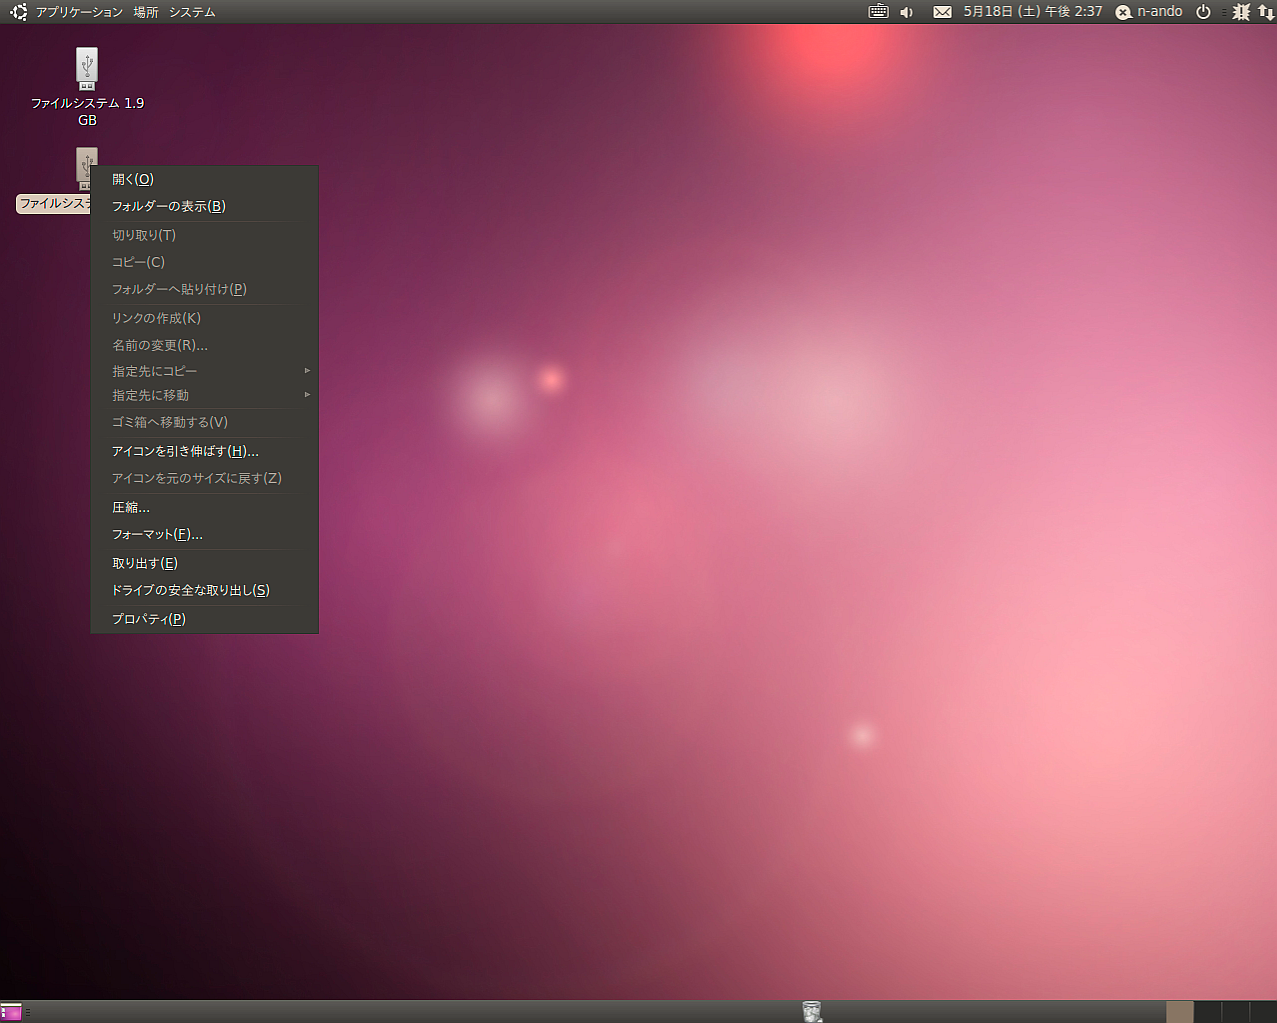
Depending on the distribution, if there is a mountable file system in the SD card, there seem to be a case where it is mounted automatically. In that case, unmount the disk. (In Ubuntu, a folder of the file system mounted on the desktop appears, please remove it by right click, otherwise unmount with the umount command.)
dd if = Image file of = Device file of SD card bs = 1M Enter the command and execute it. However, since writing to the device file requires administrator (root) privilege, please use sudo.
 $ unzip  2013-02-09-wheezy-raspbian.zip
 Archive:  2013-02-09-wheezy-raspbian.zip
   inflating: 2013-02-09-wheezy-raspbian.img
 $ sudo dd if=2013-02-09-wheezy-raspbian.img of=/dev/sdb bs=1M
 1850+0 records in
 1850+0 records out
 1939865600 bytes (1.9 GB) copied, 201.543 s, 9.6 MB/s
During execution, you can check whether the writing is performed correctly by executing the iostat command on another terminal or the like. (In the latest distribution, it may not be installed by default.debian / ubuntu allows you to use the iostat command with apt-get install sysstat.)
 $ iostat -mx 1
  avg-cpu:  %user   %nice %system %iowait  %steal   %idle
            0.00    0.00    0.00   50.25    0.00   49.75

 Device:         rrqm/s   wrqm/s     r/s     w/s    rMB/s    wMB/s avgrq-sz avgqu-sz   await  svctm  %util
 sda               0.00     0.00    0.00    1.00     0.00     0.00     8.00     0.00    0.00   0.00   0.00
 sdb               0.00  1856.00    0.00   78.00     0.00     9.14   240.00   143.40 1855.85  12.82 100.00
Looking at the item of sdb, we can see that the writing speed of 9.14 MB/sec has come up. If you have a speed of about 6 MB/sec for class 6 SD card and 10 MB/sec for class 10 SD card, you can think that it is being written without problem. Depending on distribution, it may be mounted automatically when writing is finished. In that case, please unmount and then remove the SD card.
(G)Writing images (Mac OS X)
Mac OS X also writes using the dd command like Linux. However, on Mac, it is mounted automatically when you insert an SD card, you can not write to the SD card with the dd command while mounting, you need to unmount (remove from OS).
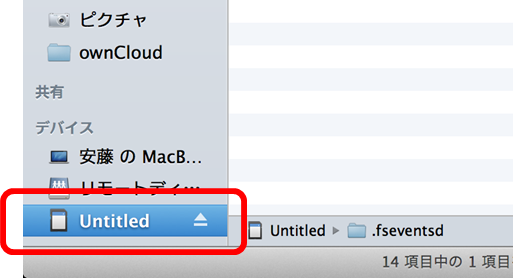
When inserting the SD card, an SD card icon will appear in the Finder as shown. Please be careful not to push eject button as you intend to unmount.
The volume name of the SD card is Untitled here. Remember the volume name. When you enter the df command from the command prompt, the following message is displayed.
 $ df -k
 Filesystem                        1024-blocks      Used Available Capacity   iused    ifree %iused  Mounted on
 /dev/disk0s2                        500000000 437664508  62079492    88% 109480125 15519873   88%   /
 devfs                                     194       194         0   100%       679        0  100%   /dev
 map -hosts                                  0         0         0   100%         0        0  100%   /net
 map auto_home                               0         0         0   100%         0        0  100%   /home
 /dev/disk1s1                            57288     18992     38296    34%       512        0  100%   /Volumes/Untitled
The lowest /Volumes/Untitled is the mount point of the SD card. Remember the device name of the leftmost SD card /dev/disk1s1. Unmount this SD card. Use the command diskutil and enter diskutil umount <mount point>.
 $ diskutil umount /Volumes/Untitled
 Volume (null) on disk1s1 unmounted
 $ df -k
 Filesystem                        1024-blocks      Used Available Capacity   iused    ifree %iused  Mounted on
 /dev/disk0s2                        500000000 437664716  62079284    88% 109480177 15519821   88%   /
 devfs                                     194       194         0   100%       679        0  100%   /dev
 map -hosts                                  0         0         0   100%         0        0  100%   /net
 map auto_home                               0         0         0   100%         0        0  100%   /home
You can see that /Volumes/Untitled disappears and the SD card is unmounted. Then write the image using the dd command. dd if=image file of=/dev/rdisk1bs=1m. of=/dev/rdisk1 is the device name which takes the last s1 of the device file /dev/disk1s1 that you remembered earlier and also appended r to disk before the device is.
Since this command accesses the device file, it can not be executed unless it is an administrator (root). Execute as follows using sudo.
 $ sudo dd if=2013-02-09-wheezy-raspbian.img of=/dev/rdisk1 bs=1m
 1850+0 records in
 1850+0 records out
 1939865600 bytes transferred in 302.377337 secs (6415380 bytes/sec)
 $
While writing, you can see if the writing is performed correctly by looking at "Disk operation" in "Activity monitor". If you have a speed of about 6 MB / sec for class 6 SD card and 10 MB / sec for class 10 SD card, you can think that it is being written without problem.
When the writing is completed, it will automatically mount again, so press the eject button on the Finder this time to remove the SD card.
Initial setting of Raspberry Pi
(G)Launch Raspberry Pi
Please connect HDMI monitor, keyboard, network to Raspberry Pi.
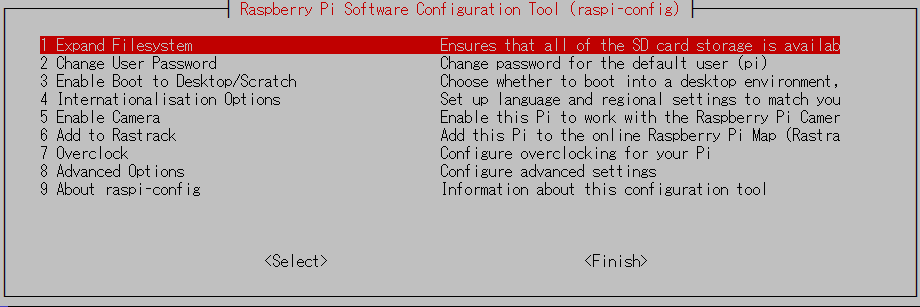
After inserting the SD card and turning on the power to Raspberry Pi for the first time, the following setting screen (raspi-config) is displayed after the display screen of various drivers is displayed.
Note that raspi-config will not be displayed when operating from the PiRT-Unit serial console described below. You can initialize by logging in with the following user name and password and executing the raspi-config command.
- ID' : pi
- Password'' : raspberry
 Debian GNU/Linux 7.0 rtunit0 ttyAMA0

 rtunit0 login: pi
 Password:
 Last login: Sat Feb  9 03:40:44 UTC 2013 on ttyAMA0
 Linux rtunit0 3.6.11+ #371 PREEMPT Thu Feb 7 16:31:35 GMT 2013 armv6l

 The programs included with the Debian GNU/Linux system are free software;
 the exact distribution terms for each program are described in the
 individual files in /usr/share/doc/*/copyright.

 Debian GNU/Linux comes with ABSOLUTELY NO WARRANTY, to the extent
 permitted by applicable law.

 NOTICE: the software on this Raspberry Pi has not been fully configured. Please run 'sudo raspi-config'
 $ raspi-config
(G)Setting items
The contents of each item are shown below. Please set each item as necessary.
| 1 Expand Filesystem | Extend the partition of the SD card to be used.In the initial state, since you are not using the whole SD card, please extend it unless there is a particular reason. |
| 2 Change User Password | Change the password of the initial setting user "pi" Please change to the user's easy-to-understand password. |
| 3 Enable Boot to Desktop/Scratch | It is the setting of the screen at the time of starting, and the default is the console use. Set it if you want to change to GUI usage. |
| 4 Internationalisation Options | "Locale", "Time zone", "Keyboard layout" settings. |
| I1 Change Locale | Set the locale, please set the keyboard layout to [ja_JP.ECU-JP ECU-JP] etc. If necessary, installation of Japanese fonts seems to be necessary. |
| I2 Change Timezone | Set the time zone When using in Japan, set [Asia]-[Tokyo]. |
| I3 Change Keyboard Layout Set the keyboard layout to match your keyboard | Make keyboard settings. Please set it as Japanese keyboard etc. as necessary. |
| 5 Enable Camera | Please set it when camera module is connected. |
| 6 Add to Rastrack | Registering with Rastrack |
| 7 Overclock | Overclocking |
| 8 Advanced Options | Other options. We will only cover items necessary for PiRT-Unit environment here. |
| A6 SPI | To use SPI, set it to Enable. (Disable by default) |
| A7 I2C | To use I2C, set it to Enable. (Disable by default) |
| 9 About raspi-config | Information about this tool is displayed. |
After setting the above items, please select [Finish] with [Tab] key and execute. Raspberry Pi main unit restarts, various settings become effective.
After rebooting, wait for command input and execute "startx", the Raspbian desktop screen will be displayed.
To terminate, please stop using the following command, then unplug the power from the main unit.
$ sudo halt
(G)Wireless LAN settings
By inserting and setting a wireless LAN dongle in Raspberry Pi 's USB, you can wirelessize Raspberry Pi. It is convenient when installing it in a mobile robot.
(G)edit/etc/network/interfaces
First edit/etc/network/interfaces as follows.
$ sudo vi /etc/network/interfaces
Rewrite the following two places.
 iface wlan0 inet manual
         ↓
 iface wlan0 inet dhcp
wpa-roam /etc/wpa_supplicant/wpa_supplicant.conf
↓
wpa-conf /etc/wpa_supplicant/wpa_supplicant.conf(G)Edit /etc/wpa_supplicant/wpa_supplicant.conf
Next, register the ESSID and key of the wireless LAN.
 $ sudo bash
 # cd /etc/wpa_supplicant
 # wpa_passphrase ESSID pass >> wpa_supplicant.conf
Enter the ESSID of the wireless LAN for SSID and the wireless LAN key for pass. Be careful to use >> (append) instead of > when redirecting. I think that the result is as follows.
 ctrl_interface=DIR=/var/run/wpa_supplicant GROUP=netdev
 update_config=1
 network={
         ssid="OpenRTM"
         #psk="4332221111"
         psk=142914b76be167767055ff945898baaaf83c42b3ad3b99afb0ae531e8fb15e5e
 }
Depending on the wireless LAN access point settings, additional configuration may be necessary. An example is shown below.
 ctrl_interface=DIR=/var/run/wpa_supplicant GROUP=netdev
 update_config=1
 network={
         ssid="OpenRTM"
         proto=WPA2
         key_mgmt=WPA-PSK
         pairwise=TKIP CCMP
         group=TKIP CCMP
         #psk="4332221111"
         psk=142914b76be167767055ff945898baaaf83c42b3ad3b99afb0ae531e8fb15e5e
 }
Finally, initialize the interface.
 # ifdown wlan0
 # ifup wlan0
 Internet Systems Consortium DHCP Client 4.2.2
 Copyright 2004-2011 Internet Systems Consortium.
 All rights reserved.
 For info, please visit https://www.isc.org/software/dhcp/
  : Omission
 DHCPREQUEST on wlan0 to 255.255.255.255 port 67
 DHCPOFFER from 192.168.11.1
 DHCPACK from 192.168.11.1
 bound to 192.168.11.26 -- renewal in 34810 seconds.
If you can not connect to the wireless LAN here, please review the settings in /etc/network/interfaces, /etc/wpa_supplicant/wpa_supplicant.conf.
 # ifconfig wlan0
 wlan0     Link encap:Ethernet  HWaddr XX:XX:XX:XX:XX:XX
           inet addr:192.168.11.26  Bcast:192.168.11.255  Mask:255.255.255.0
           UP BROADCAST RUNNING MULTICAST  MTU:1500  Metric:1
           RX packets:1218 errors:0 dropped:0 overruns:0 frame:0
           TX packets:21 errors:0 dropped:0 overruns:0 carrier:0
           collisions:0 txqueuelen:1000
           RX bytes:250608 (244.7 KiB)  TX bytes:4506 (4.4 KiB)
Illegally, IP address was assigned to wireless LAN wlan0. 無事、無線LAN wlan0 に IPアドレスが割り振られました。
(G)Remotely connect with host name
When you operate Raspberry Pi with remote login with ssh, if you do not allocate a fixed IP address, you usually need to consult the Raspberry Pi's IP address in the console and connect.
So install the service called avahi compatible with Bonjour. Bonjour is a service to automatically search and use services on the network advocated by Apple. If you use avahi, you can also access Raspberry Pi allocating IP address by DHCP by host name.
(G)Setting the host name
Select and set a host name that does not conflict with other host names.
$ sudo vi /etc/hostname
Write the host name in /etc/hostname in the first line. The initial value is raspberrypi. In addition, rewrite the portion of 127.0.1.1 raspberrypi in /etc/hosts to the host name you decided above.
$ sudo vi /etc/hosts
(G)Installation of avahi-daemon
Install the avahi daemon with the following command.
 $ sudo apt-get update
 $ sudo apt-get install avahi-daemon
I will try pinging my host. Use the host name followed by .local.
$ ping myhost.local
If ping is returned in this way, avahi is almost correctly set.
(G)Installing Bonjour (Windows only)
In order to access RaspberryPi with avahi set from PC, avahi or Bonjour must also be installed on the PC side.
On Linux, you can use it by installing avahi-daemon like RaspberryPi. Also Bonjour is installed by default on Mac, so you do not need to do anything in particular.
On Windows, Bonjour is not installed by default. The easiest way to install Bonjour is to install iTunes.
If you really do not want to install iTunes, you can also extract BonjourSetup.exe by unpacking the downloaded iTunesSetup.exe in an archiver application or the like.
Bonjour is also included in the following Apple Bonjour printing service. (The version seems to be slightly older than what is shipped with iTunes.)
Currently Applie does not distribute Bonjour for Windows alone, but there are also some sites redistributing things that were once distributed. (However, it seems that you can get only the old version.) Below are Bonjour download sites other than Apple site. Please use at your own risk.
- BonjourSetup.exe (v1.0.6.2)
- Bonjour64Setup.exe (v1.0.6.2)
- Apple Bonjour SDK (Login to Apple developer is required)
(G)Bonjour does not work well
Bonjour may not work well if the firewall is running. In that case, please open UDP port 5353 or turn off the firewall.
(G)Installation of TeraTerm
In order to login via ssh from Windows to RaspberryPi, you need to install the ssh client. There are many clients available on Windows, but here we introduce Tera Term.
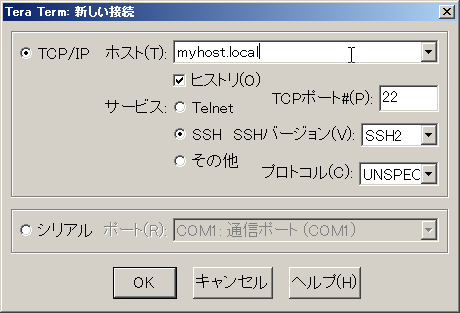
- Tera Term Connection via TeraTerm
After installing TeraTerm, when starting up, a connection dialog will appear. Enter the host name+.Local set earlier in the "Host" text box and press OK. If the password has not been changed,
- ID: pi
- Password: raspberry
You can login with. In addition, Linux and Mac open a terminal window
$ ssh pi@myhost.local
How to use xfinder
Since Raspberry Pi has no way to know the IP address etc. in the headless state (state where monitor and keyboard are not connected), it is a bit difficult to perform initial setting. It is possible to connect the monitor and the keyboard first, set the host name and know the IP address from the host name via Avahi as described above, but this method can not be used for Raspberry Pi which is not set at all .
(G)What is xfinder
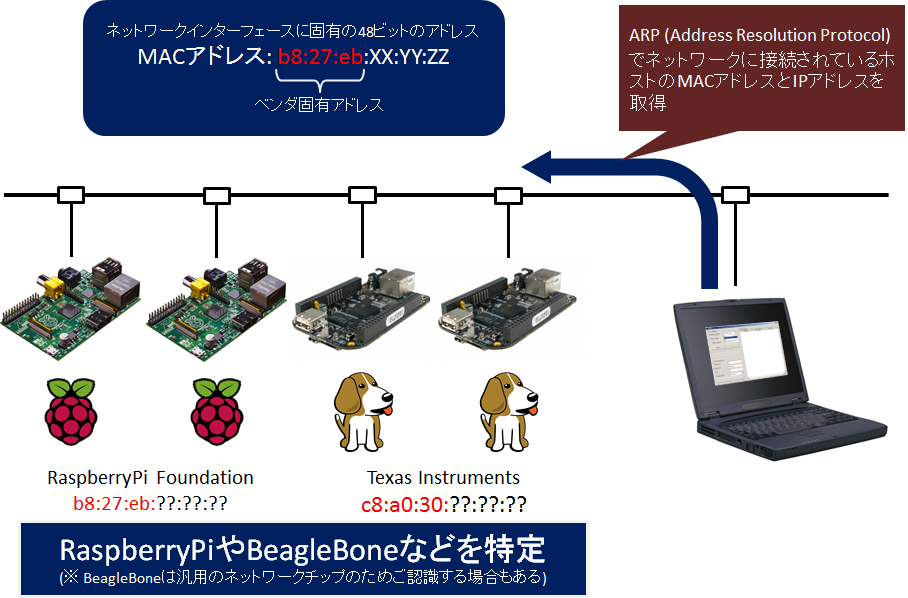
xfinder is a tool for indexing and logging IP addresses from MAC (Media Access Control) addresses of Ethernet interfaces mounted on CPU boards such as Raspberry Pi and BeagleBone.
A 48-bit unique address (MAC (Media Access Control) address) is allocated to the Ethernet interface, and its high-order 24 bits are unique addresses of vendors (companies developing network devices, etc.). In Ethernet, it is necessary to know each other's MAC address in order to transmit and receive packets, and it is possible to use a protocol called ARP (Address Resolution Protocol) to check the MAC address from the IP address. In xfinder, by finding a pattern of a specific MAC address connected on the network, it is possible to check the IP address of a headless system such as Raspberry Pi, support login by ssh etc. to facilitate setting and development I will.
xfinder is an executable file which can be used as two types of command line tool (CUI mode) and graphical user interface tool (GUI mode). This section explains how to use xfinder in GUI mode.
(G)Download xfinder
You can download xfinder from the following location.
(G)Use xfinder (GUI mode)
How to use xfinder is the following three steps.
- Scan the network and find Raspberry Pi etc.
- Check the Raspberry Pi found by scanning
- Log in with TeraTerm etc. terminal software and work
(G)Start-up
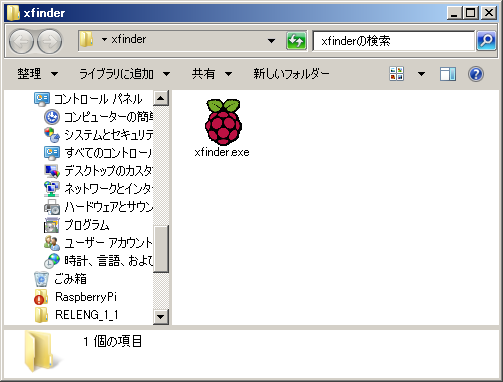
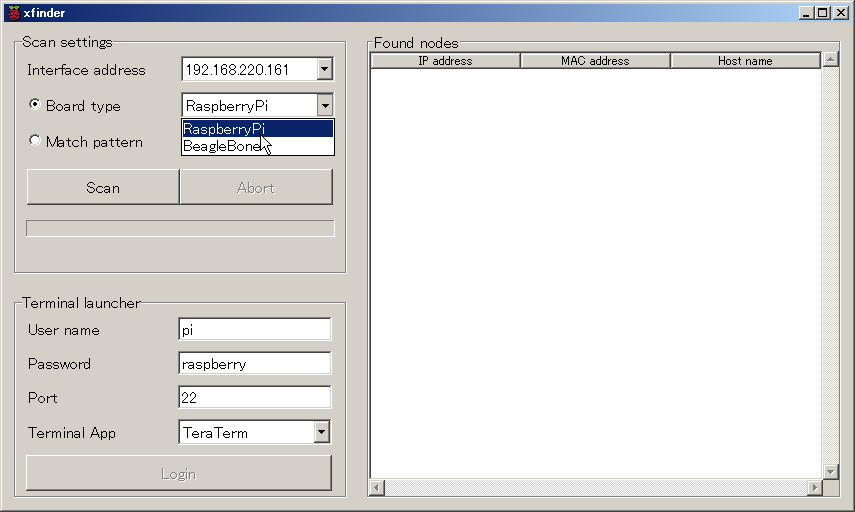
When you start xfinder.exe, the following screen will be displayed.
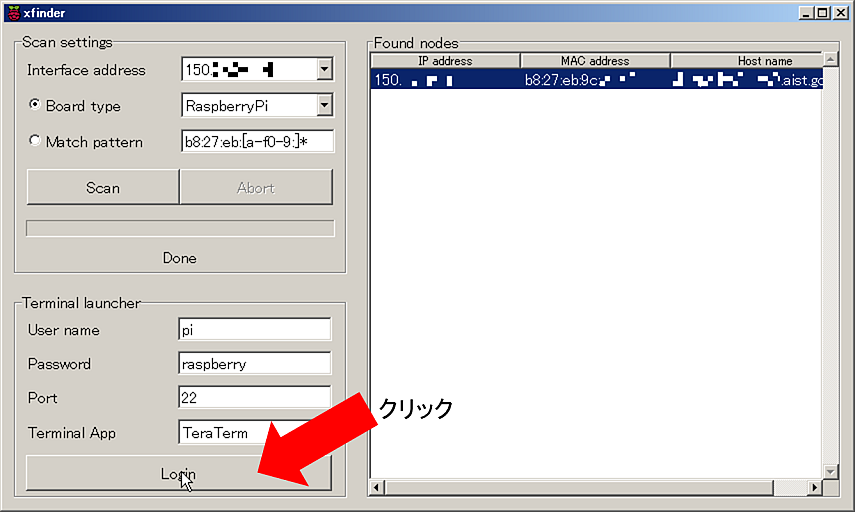
First, designate the scanning conditions (interface, board, MAC address pattern etc.) in the upper left pane, start scanning, ② select the list of Raspberry Pi etc found by scanning the next, so select ③ In the lower left pane, specify the login conditions and start the terminal application. After the terminal application starts up, you can log in to the target Raspberry Pi and perform settings, program development and so on.
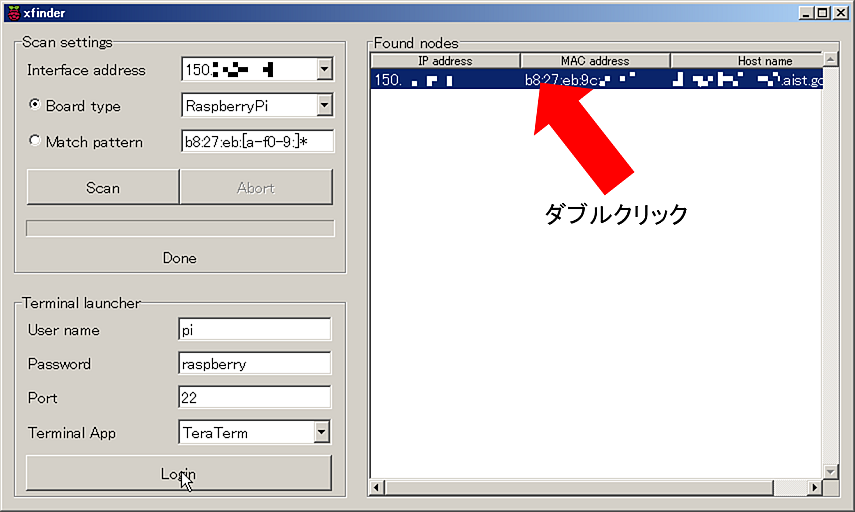
You can also start the terminal application and log in by double clicking the list of boards displayed in the right pane.
(G)Scan settings
In Scan settings in the upper left corner, set conditions for scanning the network.
(G)Interface address
Select the network interface of the current PC to search for Raspberry Pi. When there are multiple network interfaces, since multiple IP addresses are displayed, it is important to know which network (for example, one is on the global side and the other on the private side network and Raspberry Pi in the private side network If you want to find it, select a private address here) Select whether to scan.
Select ALL to scan all network interfaces. If you do not know which IP address corresponds to which network interface, go to Control Panel → Network and Internet Network and Sharing Center → Change Adapter Settings Click on the adapter icon to see what kind of IP address is assigned.
You can also open the command prompt and execute the ipconfig command to check the interface and assigned IP address.
(G)Board type
Choose which board to look for from the combo box. You can select Raspberry Pi or BeagleBone, by default Raspberry Pi is selected.
If you do not have the board you want to find in this list, you need to check the 6 digits above the MAC address of the corresponding network interface and enter it in the next Match Pattern text box to scan.
If you connect Raspberry Pi with a USB wireless LAN adapter and wireless LAN only, you can not find it even if you select Raspberry Pi here. Enter the 6 digits above the MAC address of the MAC address of the wireless LAN adapter (for example, 10: 6 f: 3 f in Buffaro) in the Match Pattern and search for it.
(G)Match pattern
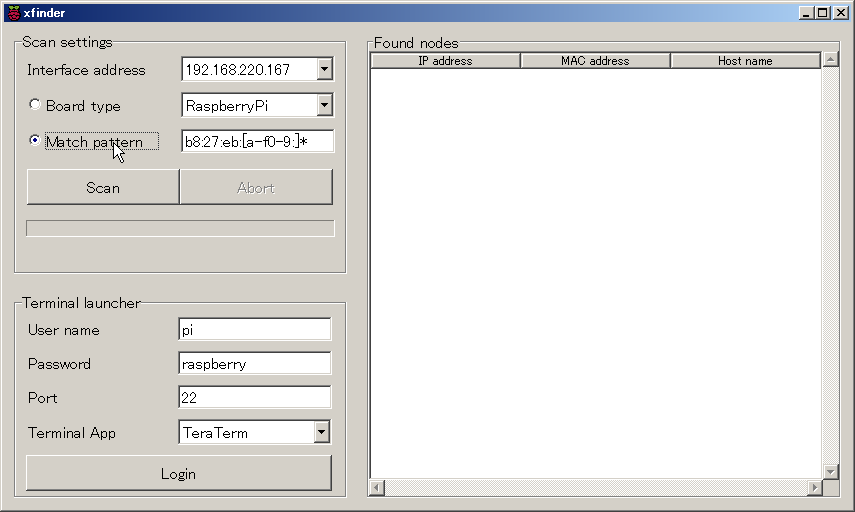
When looking for a board other than Raspberry Pi or BeagleBone, enter the pattern of the MAC address you want to search here.
Also, even if you install a wireless LAN adapter etc. in Raspberry Pi, it is possible to search by entering 6 digits on MAC address unique to the manufacturer. However, there are times when many wireless LAN adapters etc. of major manufacturers are discovered when scanning.
(G)Scan button / Abort button
Press the Scan button to execute the scan. It can not be pressed during scanning. Press the Abort button if you want to quit while scanning is in progress. It can only be pressed during scanning. The progress bar under the button shows the progress of the scan.
(G)Found nodes
The Found nodes pane on the right displays the IP address, MAC address and host name of the board found by scanning.
- IP address: Displays the IP address of the found board. If you press the header part, sort by IP address order.
- MAC address: Displays the MAC address of the found board. If you press the header part, sort by MAC address order.
- Host name: Displays the host name of the found board. If you press the header part, sort by host name.
If you double click on the list displayed here, you can start the terminal application and log in according to the setting of Terminal launcher on the left.
(G)Terminal launcher
The Terminal launcher pane on the left is used to log in to the found host using the terminal application.
- User name: Enter the user name to use when logging in. The value is automatically entered by Board type setting of Scan setting in the upper left.
- Password: Enter the password to use when logging in. The value is automatically entered by Board type setting of Scan setting in the upper left.
- Port: Enter the port number to use when logging in. By default, ssh default port number 20 is set.
- Terminal App: Terminal application to use comes from selecting from the combo box. Available terminal applications are one of TeraTerm, Poderosa, PuTTY on Windows, check if they are installed at startup, only those available are listed I will.
- Login button: Node to log in with Found nodes on the right Select when you select it. When this button is pushed, the terminal application is started according to the setting above and you can log in to Raspberry Pi.
| Board type | User name | Password |
| RaspberryPi | pi | raspberry |
| BeagleBone | root | (no password) |
Installation of development environment
By installing the development environment on Raspberry Pi, it is possible to develop by self-compiling on Raspberry Pi. (On embedded Linux boards of this size, development by cross compiling is usually usual.)
Therefore, you can compile and execute the RT component code generated by RTC Builder on PC on Raspberry Pi. Unfortunately it seems difficult to install Eclipse and use it at practical speed.
In this section we will install the necessary packages to develop RT components.
(G)Installing OpenRTM-aist
OpenRTM-aist can be installed using apt-get. First, modify sources.list.
$ sudo vi /etc/apt/sources.list
Add the following line to source list.
deb http://openrtm.org/pub/Linux/raspbian/ wheezy main
Next, install according to the following procedure.
 # apt-get update
 # apt-get -y --force-yes install gcc g++ make uuid-dev
 # apt-get -y --force-yes install libomniorb4-dev omniidl omniorb-nameserver
 # apt-get -y --force-yes install openrtm-aist openrtm-aist-dev openrtm-aist-example
 # apt-get -y --force-yes install openrtm-aist-python openrtm-aist-python-example
(G)Running sample components
After installing OpenRTM-aist, start the sample component and check whether OpenRTM-aist was installed correctly.
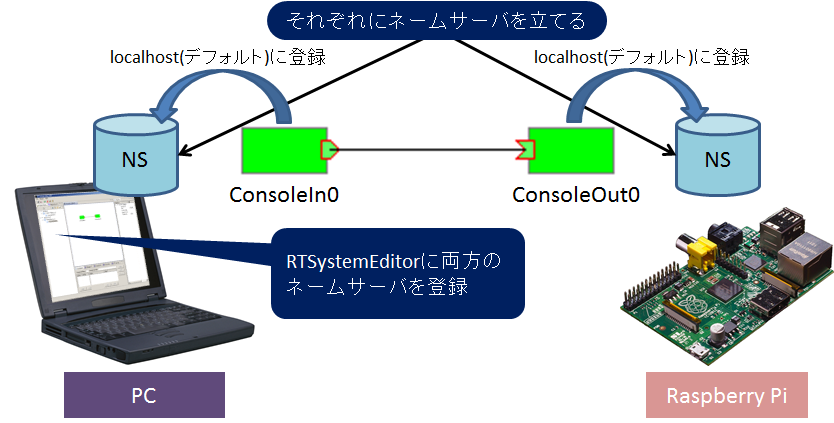
As shown below, execute the name server and ConsoleOut component on the PC side with the name server and ConsoleIn component, Raspberry Pi side. By default, the component connects to the localhost name server, so you can use it to easily access the component without setting up a specific name server in rtc.conf. In the RTSystemEditor on the PC, connect to the PC's name server and the name server on Raspberry Pi and connect the ConsoleIn component and the ConsoleOut component.
(G)Running ConsoleOut on Raspberry Pi
After connecting to Raspberry Pi with TeraTerm etc., start the component. Launch ConsoleOut after starting the naming service.
 $ rtm-naming
 $ /usr/share/OpenRTM-x.y/examples/ConsoleOutComp
 or
 $ python /usr/share/OpenRTM-x.y/examples/python/SimpleIO/ConsoleOutComp.py
When installing omniorb-nameserver above, omniORB naming service is started automatically at system startup. However, depending on the startup timing of the name service and startup timing of the network interface, it may not be able to access the name server correctly from the outside. In that case, you may be able to deal with the problem by restarting the name server with the rtm-naming command.
(G)Running ConsoleIn on the PC side
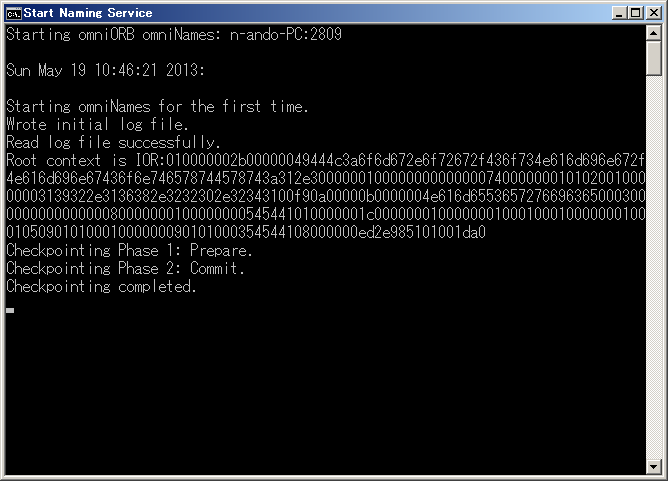
First, start the name server. In Windows, start from "Start Naming Service" under "OpenRTM-aist x.y" > "C++" > "tools" from the start menu. Also, start RTSystemEditor.
Next, start ConsoleIn. Click "ConsoleOut" under "OpenRTM-aist x.y" > "C++" > "examples" to start the ConsoleOut component.
(G)Connection by RTSystemEditor
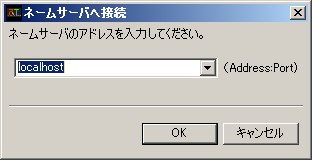
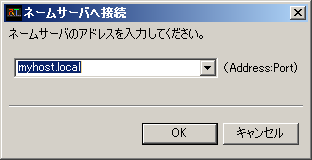
Click the outlet icon in NameService View on the left side of RTSystemEditor and connect to the name server. First, connect to the name server of the local host. Enter localhost in the connection dialog.
Next, connect to the name server of Raspberry Pi. Click on the connection icon of NameService View again and enter the host name of Raspberry Pi+.local in the dialog.
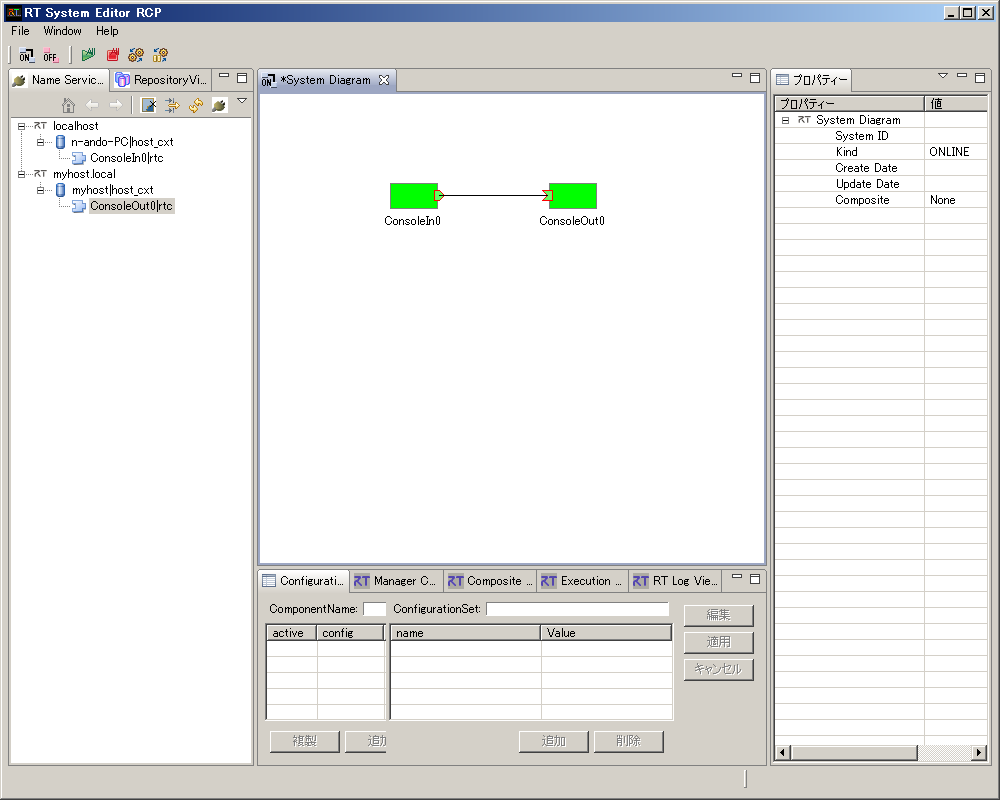
The name service view shows the status of the two name servers and you should see two components, ConsoleIn0 and ConsoleOut0, under each name server. Click on the online editor icon (icon marked ON) on the RTSystemEditor menu bar to open SystemEditor. Drag and drop ConsoleIn0 and ConsoleOut0 from NameService View onto SystemEditor and connect InPort and OutPort respectively.
Click the green play button on the menu bar to activate the two components and to the state shown above.
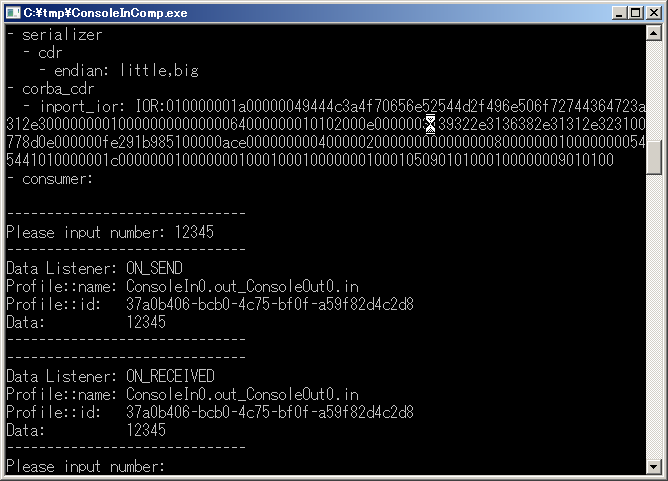
Enter the appropriate number from the window of the ConsoleIn component on the PC side.
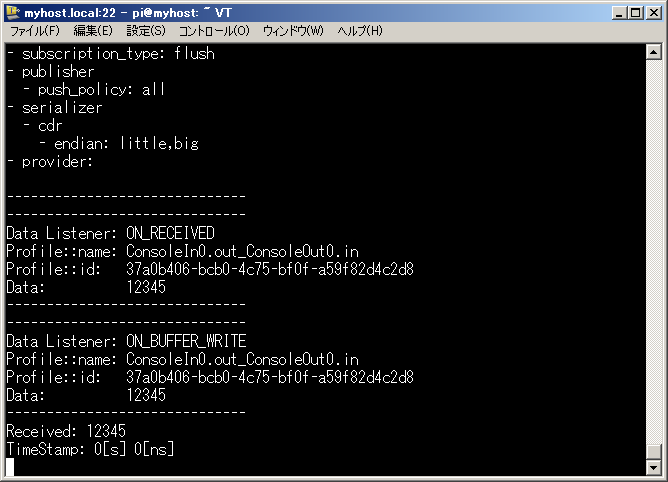
Then, the numerical value entered in ConsoleIn appears on the display of ConsoleOut on Raspberry Pi side as shown below.
(G)trouble shooting
Depending on the network environment and PC settings, the above procedure may not work. Please refer to the troubleshooting below and solve the problem.
(G)ConsoleOut is not displayed on the service of Raspberry Pi side
- Name server problem
- When the end server address of the name server is invalid This kind of phenomenon occurs. It may be resolved by restarting the name server with rtm-naming.
In addition, if there are two or more network interfaces such as Raspberry Pi's wired LAN and wireless LAN etc., there are cases to resolve by using only one network used for connection with PC.
- Component problem
- A name server other than localhost may be registered in the configuration file (rtc.conf) that the component has read. Please set up to register the component on the localhost name server such as described as corba.nameservers: localhost.
Also, if there are two or more network interfaces such as Raspberry Pi's wired LAN and wireless LAN, there are cases to solve by using only one network used for connection with PC.
(G)Can not connect with RTSystemEditor, there is no reaction, etc.
- PC side component problem
- When there are two or more network interfaces on the PC, this happens when the interface address that Raspberry Pi does not use is used as a component reference.
Check the IP address of the PC with ipconfig from the command prompt and set the IP address of the one used for rtc.conf as follows.
corba.endpoints: 192.168.11.20
However, in Vista and later Windows, files below C:\Program Files can not be edited easily. Take action by copying (or newly creating) ConsoleIn.exe and rtc.conf in an appropriate directory such as C:\tmp.
- Raspberry Pi side component problem
- When there are two or more network interfaces such as Raspberry Pi's wired LAN and wireless LAN, etc., if each is connected to a different network, the same problem as the above PC occurs . Check the IP address of the one you use with ifconfig and put it in rtc.conf as follows.
corba.endpoints: 192.168.11.21
(G)Installing CMake
cmake can be installed using apt-get. Install as a user with root authority.
 $ sudo apt-get update
 $ sudo apt-get install cmake
(G)About installation of Doxygen
In the CMake-based RT component project, it is set to generate documents by using doxygen by default. However, installing doxygen will install LaTeX and others at the same time, which puts pressure on the capacity of the SD card, so we will not install Doxygen in this tutorial.
(G)How to not generate documents
To suppress document generation by doxygen in CMake based RTC project, at the top level CMakeLists.txt,
 option(BUILD_DOCUMENTATION "Build the documentation" ON)
    ↓
 option(BUILD_DOCUMENTATION "Build the documentation" OFF)
Change it as follows.
(G)Installing Doxygen
If the SD card has enough capacity doxygen can be installed with apt-get as follows.
$ sudo apt-get install doxygen
It will take about ten minutes before Doxygen installation is complete.
(G)Installing Subversion/Git
It is recommended to install subversion / git because it is used frequently to acquire the source code from the outside.
$ sudo apt-get install subversion git
(G)Test compilation
I will test whether the component can be compiled. There are components for mobile robot Kobuki in the following repository, so check it out and compile it.
- KobukiAIST RTC: http://svn.openrtm.org/components/trunk/mobile_robots/kobuki
(G)Check out the source code
Let's check out the source code.
 $ svn co http://svn.openrtm.org/components/trunk/mobile_robots/kobuki
   : Omission
 A    kobuki/libkobuki/doc/CMakeLists.txt
 A    kobuki/libkobuki/License.rtf
 A    kobuki/libkobuki/CMakeLists.txt
 A    kobuki/rtc.conf
 A    kobuki/CMakeLists.txt
 Checked out revision 2.
 $
kobuki directory How the source code has been checked out, create a build directory, build and install within it.
  $ cd kobuki
  $ mkdir build
  $ cd build
  $ cmake -DCMAKE_INSTALL_PREFIX=/usr ..
  $ make
  $ cd src
  $ make install
kobuki directory How the source code has been checked out, create a build directory, build and install within it....
Running sample components
In the following example, using GPIO, you can create a component (DigitalIn-RTC, DigitalOut-RTC) that detects the ON/OFF of the switch and light up the LED and understand the use of GPIO which is the feature of Raspberry Pi I will deepen. The source code of the sample component can be downloaded from the following.
- Sample component source: &ref (RaspberryPi_sample.zip);
(G)GIOP of Raspberry Pi
Raspberry Pi has a GPIO terminal, which allows you to use various external devices.
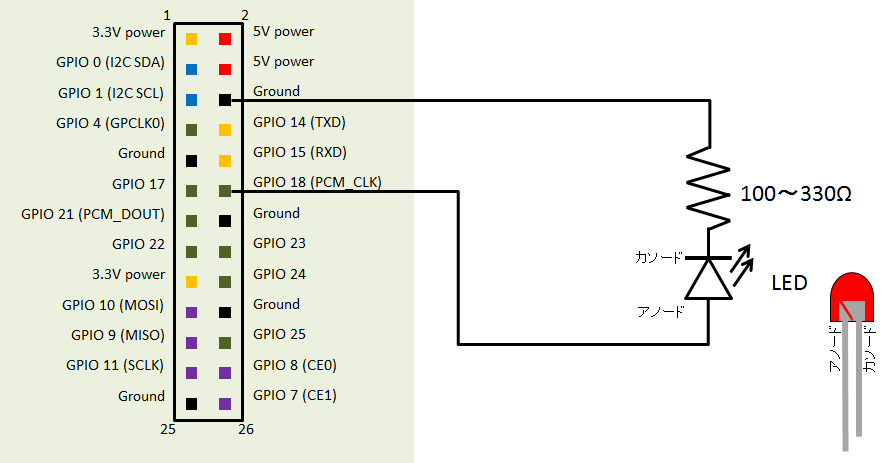
The pin assignment of the GPIO that is attached to the Raspberry Pi main unit is shown below.
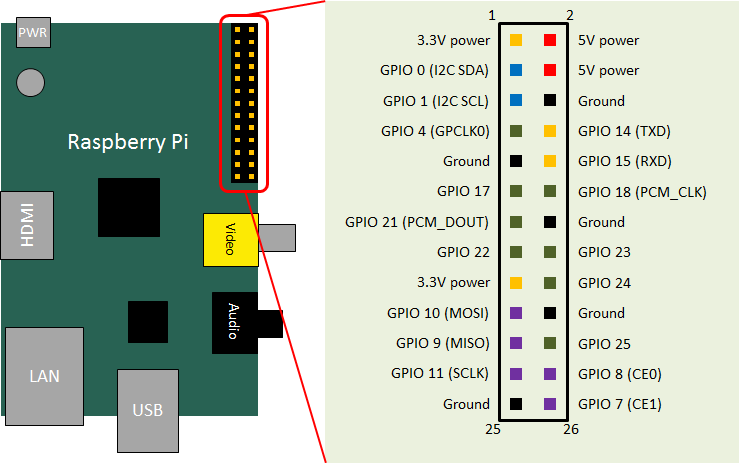
When using GPIO, pay attention to the position of each pin, especially if using 5V terminal, mistake in wiring may damage the Raspberry Pi main unit and SD card, so be careful enough please.
(G)Breadboard wiring example
Create a circuit that lights the LED and a circuit that detects ON/OFF of the switch. If you have a breadboard etc, you can easily build a circuit, but since there are few parts even if it is not, you can easily form a circuit by soldering lead wires etc. Below is a list of necessary parts.
| Bill of Material | |
| LED circuit | |
| LED | 1piece |
| Resistance | 100Ω(brown black tea gold) - 330Ω(orange orange tea gold) |
| Lead wire | Somewhat |
| Switch LED circuit | |
| LED | 1piece |
| Resistance | 330Ω(Orange Orange Tea) - 1kΩ(Brown Black Red Gold) |
| Lead wire | Somewhat |
If there is only one Raspberry Pi, connect the following LED and switch circuit to the same Raspberry Pi. If there are two Raspberry Pi, it may be interesting to install LEDs and switches on each Raspberry Pi.
(G)Wiring example for DigitalIn-RTC
DigitalIn-RTC is a component that outputs the bool value (true/false) input to the data port to the specified GPIO port. In order to observe the output value of the GPIO port, connect the LED and resistor to the Ground pin and GPIO 18 pin and create a circuit as shown below.
This is the case when creating this circuit with breadboard.

(G)Wiring example for DigitalOut-RTC
DigitalOut-RTC is a component that outputs the bool value (true/false) input to the GPIO port from the data port. In order to input the value to GPIO, connect a resistor and a switch to Ground, 3.3V Power, GPIO 17 and create a circuit as shown below.
This is the case when creating this circuit with breadboard.

(G)Compiling components
Download the source code to Raspberry Pi from below and compile the DigitalIn-RTC/DigitalOut-RTC component.
- Sample component source: RaspberryPi_sample.zip
(G)Compiling DigitalIn-RTC
 $ unzip RaspberryPi_sample.zip
 $ cd RaspberryPi_sample/DigitalInRPI/
 $ vi CMakeLists.txt
Now rewrite CMakeLists.txt and set it to suppress document generation.
 option(BUILD_DOCUMENTATION "Build the documentation" OFF)
  ↓
 option(BUILD_DOCUMENTATION "Build the documentation" ON)

 $ mkdir build
 $ cd build
 $ cmake ..
 -- The C compiler identification is GNU 4.6.3
 -- The CXX compiler identification is GNU 4.6.3
   : Omission
 -- Configuring done
 -- Generating done
 -- Build files have been written to: /home/pi/RaspberryPi_sample/DigitalInRPI/build
If OpenRTM-aist is correctly installed, configure will terminate without problems. If an error occurs due to lack of OpenRTM or coil, please confirm that OpenRTM-aist (C++ version) is correctly installed (dpkg -l |grep openrtm etc.).
 $ make
  : Omission
 Scanning dependencies of target DigitalInComp
 [ 66%] Building CXX object src/CMakeFiles/DigitalInComp.dir/DigitalInComp.cpp.o
 [100%] Building CXX object src/CMakeFiles/DigitalInComp.dir/DigitalIn.cpp.o
 Linking CXX executable DigitalInComp
 [100%] Built target DigitalInComp
 $
The compiled component DigitalInComp is under src.
 $ ls src/
 CMakeFiles  cmake_install.cmake  DigitalInComp  DigitalIn.so  Makefile
(G)Compiling DigitalOut-RTC
Compile like DigitalIn-RTC.
 $ cd RaspberryPi_sample/DigitalOutRPI/
 $ mkdir build
 $ vi CMakeLists.txt
Now rewrite CMakeLists.txt and set it to suppress document generation.
 option(BUILD_DOCUMENTATION "Build the documentation" OFF)
  ↓
 option(BUILD_DOCUMENTATION "Build the documentation" ON)

 $ mkdir build
 $ cd build
 $ cmake ..
 -- The C compiler identification is GNU 4.6.3
 -- The CXX compiler identification is GNU 4.6.3
   : Omission
 -- Configuring done
 -- Generating done
 -- Build files have been written to: /home/pi/RaspberryPi_sample/DigitalOutRPI/build
 $ make
 -- OpenRTMConfig.cmake found.
 -- Configrued by configuration mode.
  : Omission
 Scanning dependencies of target DigitalOutComp
 [ 66%] Building CXX object src/CMakeFiles/DigitalOutComp.dir/DigitalOutComp.cpp.o
 [100%] Building CXX object src/CMakeFiles/DigitalOutComp.dir/DigitalOut.cpp.o
 Linking CXX executable DigitalOutComp
 [100%] Built target DigitalOutComp
 $
The compiled component DigitalOutComp is under src.
 $ ls src/
 CMakeFiles  cmake_install.cmake  DigitalOutComp  DigitalOut.so  Makefile
(G)Running components
Once each RTC has been successfully compiled, start up each RTC after launching NameServer.
 $ rtm-naming
 $ sudo  /home/pi/RaspberryPi_sample/DigitalOutRPI/build/src/DigitalOutComp &
 $ sudo  /home/pi/RaspberryPi_sample/DigitalInRPI/build/src/DigitalInComp &
&color(red){Since the sample component uses GPIO, it must be executed with root authority.} &color(red){※サンプルコンポーネントは GPIO を利用するので root 権限で実行する必要があります。}
Launch RTSystemEditor on PC and connect to NameServewr on Raspberry Pi. After placing each RTC, connecting between the ports, activate.

When each RTC starts normally, the LED turns on/off according to the status of the takt switch.
IO programming using PiRT-Unit
This Book explains how to combine Raspberry Pi and PiRT-Unit from OpenRTM-aist.
(G)Using PiRT-Unit
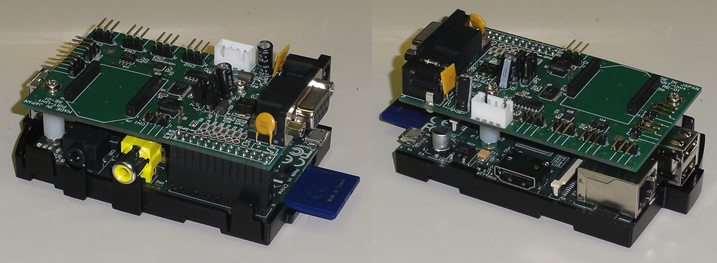
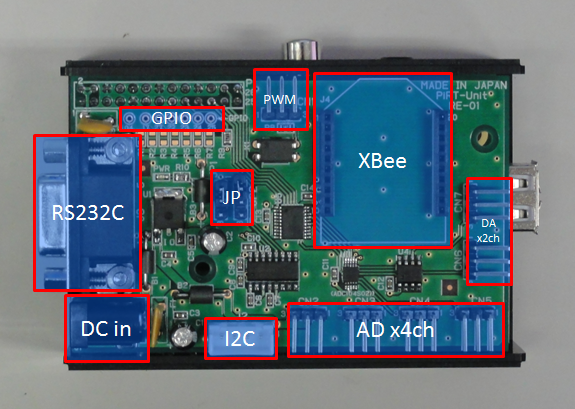
PiRT-Unit is an IO expansion board for Raspberry Pi developed at AIST. It is on sale from Win electronics industry.
- Win electronics industry: http://win-ei.com/
- Raspberry pie expansion board: http://cgi3.win-ei.com/wordpress/?page_id=135
- Item name:Pi RT-Unit
- Model name:RE-01
- price:¥6,615(税込) PiRT-Unit overview
- Raspberry pie expansion board: http://cgi3.win-ei.com/wordpress/?page_id=135
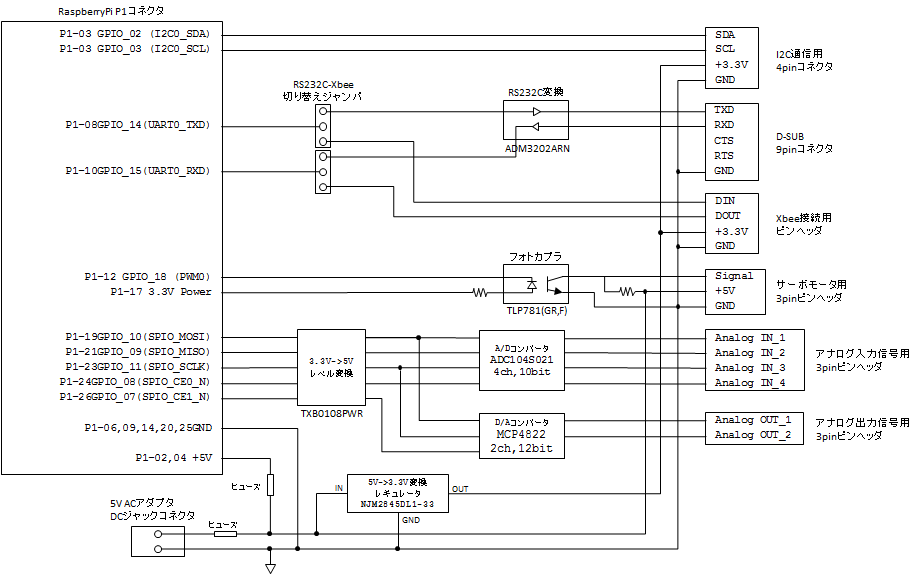
You can use AD (4ch), DA (2ch), PWM (1ch), I2C (1ch), RS232C/XBee (1ch) from PiRT-Unit respectively.
(G)Features
- Analog input (10bit ADC x 4ch) available
- Analog output (12bit DAC x 2ch) available
- PWM x 1 ch: RC servo motor available
- I2C serial communication available
- RS232C Dsub connector available
- Connector for Xbee connection available (Selectable with RS232C above)
- 5V dc input: can supply power to Raspberry Pi
- You can use the AC adapter that can be purchased cheaply by Akizuki Electronics etc.
(G)Specification
| Raspberry Pi extended IO board | |
| AD converter | 10bit, 4ch & br; chip: ADC104S021 sampling 200kHz |
| DA converter | 12bit, 2ch & br; chip MCP4822 |
| PWM output | 1ch, for RC servomotor drive photo coupler insulation |
| RS232C | D-SUB 9 pin connector Switch with XBee and jumper |
| XBee | XBee connection connector XBee: Digi International made Zigbee module Switch with XBee and jumper |
| Power supply input | 5V DC input Supply power to Raspberry Pi Power supply from Raspberry Pi also works |
Procedure to install robot arm in Kobuki
(G)Academic SCARA robot
Academic SCARA robot is a horizontal articulated robot arm for robot control learning that Viston sells.
Academic scalar For RTC of robot control please refer to the following page.
This chapter explains the procedure to fix the academic SCARA robot to Kobuki's plate.
The necessary items for this work are as follows.
| Name | Quantity |
| Kobuki | 1unit |
| Plate | 1sheet |
| Support pillar (5cm) | 8pcs |
| Academic SCARA robot | 1unit |
| Wood screw (2cm or more) | 4pcs |
(G)Robot specifications
| Academic SCARA robot specification | |
| Degree of freedom | 4 degrees of freedom + hand |
| Servo motor | RS304MD |
| Communication method | HID USB - UART bridge |
(G)When fixing the scalar bot directly to the plate
I will explain the procedure to attach the SCARA robot directly to the plate.
First of all, I will puncture a hole in the plate etc. Please drill a hole at the position of the red dot below.
After that you can fix the root part of the SCARA robot by fixing it with a wood screw.
(G)In case of fixing each base
I will explain how to attach the SCARA robot to the base and fix the base to the plate.
(G)Machining the foundation
In order to fix it to the plate of Kobuki, a hole is made in the base of the SCARA robot. Please drill a hole in the red part of the figure below. Please decide the size of the hole by the size of the wooden screw to be used.
(G)Mounting the foundation
First attach the SCARA robot to the base. After installing in the opposite direction as shown in the figure, secure with urea screw.
(G)Robot installation
Please prepare a pilot hole in the plate beforehand with dust etc. It is completed by inserting the wooden screw in the part where the hole of the foundation was opened and joining with the plate with the screw.
(G)Plate mounting
First of all, I will prepare four posts for Kobuki. Please adhere to Kobuki with laser range sensor, Raspberry Pi with double sided tape etc etc.
Please use a post with two 5cm struts connected.
Place the plate and fasten it with screws to complete.
(G)Sign Smart smart 4 degree of freedom robot arm
In this chapter, we will explain the procedure for installing the 4 degree of freedom robot arm sold by sign smart to Kobuki.
Please refer to the following page for RTC of 4 degree of freedom robot arm control.
The necessary items for this work are as follows.
| Name | Quantity |
| Kobuki | 1unit |
| Plate | 1sheet |
| Support pillar (5 cm) | 8pcs |
| 4 degrees of freedom robot arm | 1unit |
| Arduino Uno | 1unit |
| Jumper code | 15 or more |
| Breadboard | 1sheet |
| Battery compartment single 3x4pcs | 1pc |
| AA battery | 4pcs |
| Wood screw (2cm or more) | 4pcs |
When controlling from Intel Edison, Raspberry Pi, it is possible to use a servo driver equipped with PCA 9685
(G)Robot specifications
| CENTER: Specification of 4 degrees of freedom robot arm | |
| Degree of freedom | 4 degrees of freedom |
| Servomotor | MG995, SG90 9G |
(G)Robot installation
Processing to here is unnecessary because the 4-degree-of-freedom robot arm has a hole for mounting from the beginning.
Please insert the wooden screw in the hole of the base part and join with the plate.
(G)Plate mounting
It is the same as procedure of academic scalar robot.
Appendix
(G)Copying files to Raspberry Pi
By setting SSH to be effective on Raspberry Pi setting screen (Raspi-config), sFTP can be used.When connecting to Raspberry Pi with sFTP from Windows, software supporting sFTP (WinSCP etc. )Use the.
Here to the WinSCP download page.


(G)Use of Virtual Network Computing (VNC)
Install the VNC server to operate Raspbian's GUI environment on the development PC.
You can download VNC from here.
$ su # apt-get install tightvncserver
During installation, you will be prompted to enter a password to connect to the VNC server, so set an appropriate password. After installing the VNC server, SSH connection to Raspberry Pi using the terminal from the development PC and start up the VNC server.
$ vncserver :1 -geometry 1024x600 -depth 16 -pixelformat rgb565

When connecting to VNC server from Windows, use VNC client software (such as RealVNC).

