Install OpenRTM-aist 1.1 for C++
The C++ language version of OpenRTM-aist is provided with packages and installers, and it can be easily installed with many OS and distributions. You can also download the source and build it according to your own environment. This section explains how to install C++ language version OpenRTM-aist by each method.
Installation on Windows

Installation by msi package
Download the msi package from download site of openrtm.org]. Python, PyYAML, CMake, Doxygen are also necessary, please install. & br; Visual Studio is required to develop components. You can download the free version from this page.
From version 1.1.2, all 3 languages (C++, Java, Python) + tools (Eclipse + rtshell) are bundled with one Windows installer. It is recommended that you uninstall older versions beforehand. Also, please see the notation of deficit notation in download site.
Invoking the installer
For the procedure, please read Let's start OpenRTM-aist in 10 minutes! page.
Installation details
Work contents of installer
The installer performs the following tasks.
- Copy various files to the installation directory (default is C:\Program Files)
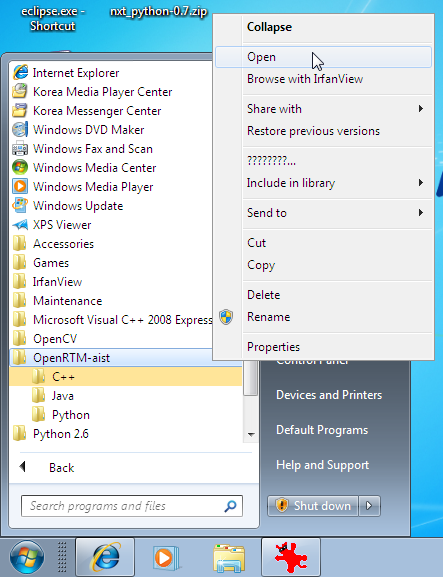
- Start Menu Create an OpenRTM-aist folder below and set various shortcuts
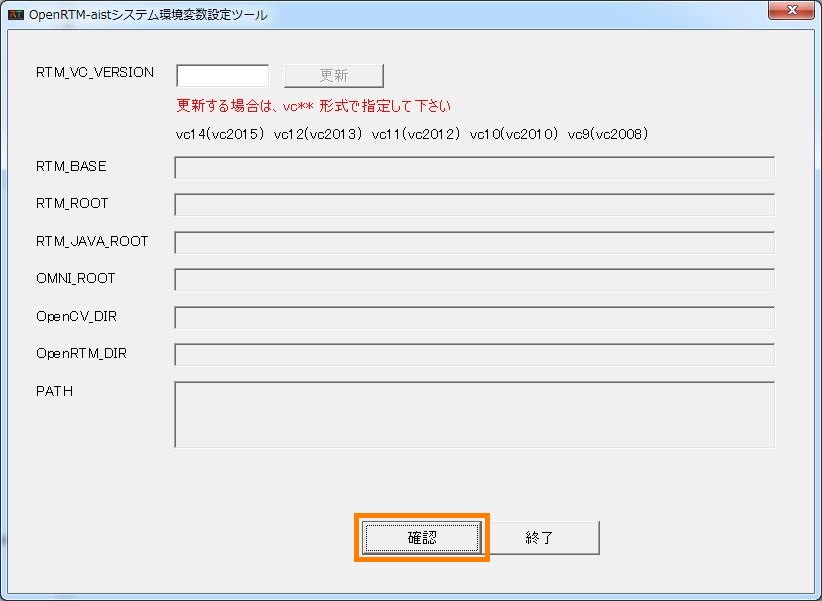
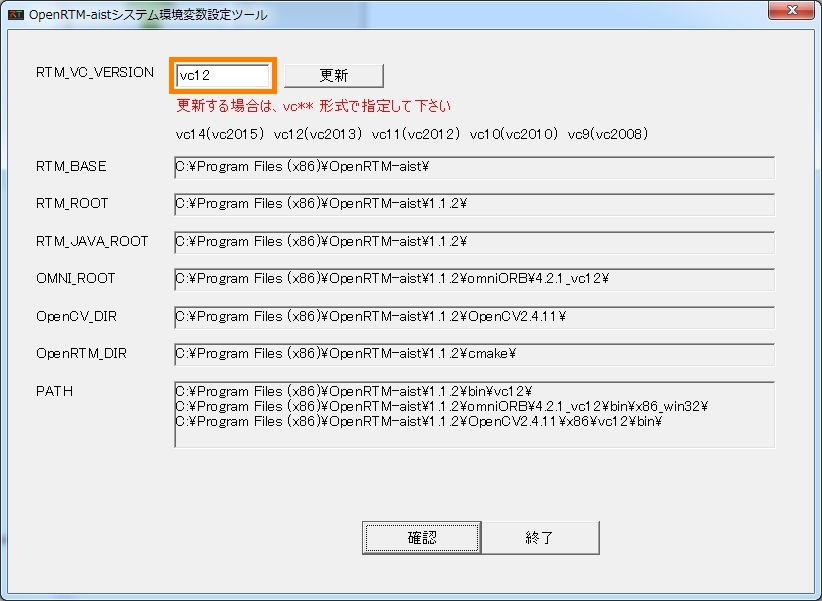
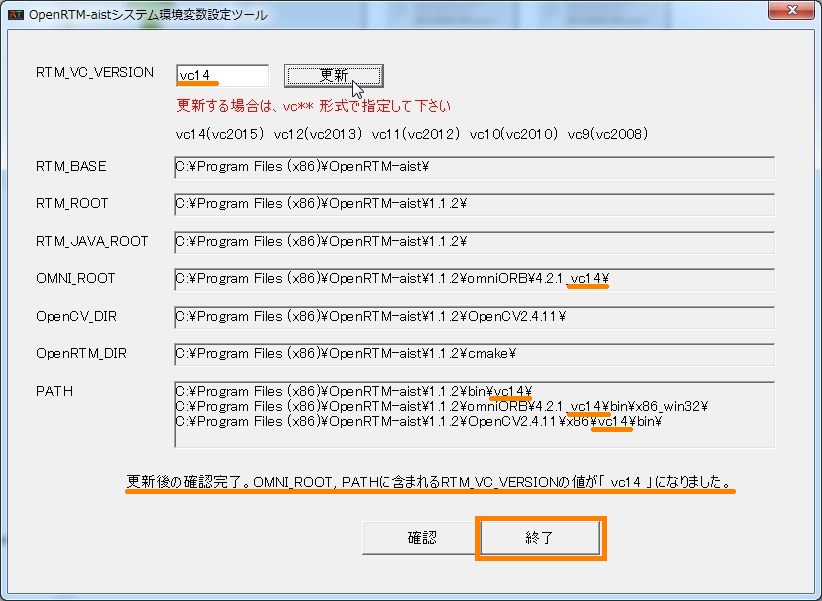
- Setting environment variables
- Setting when using msi for 32 bit
 RTM_BASE=C:\Program Files (x86)\OpenRTM-aist\
 RTM_ROOT=C:\Program Files (x86)\OpenRTM-aist\1.1.2\
 RTM_VC_VERSION=vc12
 RTM_JAVA_ROOT=C:\Program Files (x86)\OpenRTM-aist\1.1.2\
 OMNI_ROOT=C:\Program Files (x86)\OpenRTM-aist\1.1.2\omniORB\4.2.1_vc12\
 OpenCV_DIR=C:\Program Files (x86)\OpenRTM-aist\1.1.2\OpenCV2.4.11\
 OpenRTM_DIR=C:\Program Files (x86)\OpenRTM-aist\1.1.2\cmake\
- Setting when using msi for 32 bit
 C:\Program Files (x86)\OpenRTM-aist\1.1.2\bin\vc12\
 C:\Program Files (x86)\OpenRTM-aist\1.1.2\omniORB\4.2.1_vc12\bin\x86_win32\
 C:\Program Files (x86)\OpenRTM-aist\1.1.2\OpenCV2.4.11\x86\vc12\bin\
We provide a script to check the setting of the installation environment. We will explain how to use the script and what you can check on the following page.
Files to be installed
The file is installed with the following structure.
Executing script to check the setting of the above installation environment saves the directory structure under OpenRTM-aist by the tree command in the log file, so you can check the details I can do it.
 <install_dir>
   + OpenRTM-aist
      + 1.x.x  :Old version runtime
      + <version>
         + bin: dll, lib, various commands
         + cmake: OpenRTMConfig.cmake
         + coil: coil header file
         + Components
            + CXX:
               + Examples: C++ Sample components
               + OpenCV: OpenCV C++ Sample Component
            + Java: Java Sample component
            + Python: Python Sample component
         + etc: rtc.conf sample
         + ext: ComponentObserverConsumer
         + jar:
         + jre: OpenJDK JRE
         + omniORB
         + OpenCV
         + rtm: OpenRTM-aist header file
            + idl: OpenRTM-aist IDL file
         + util
            + OpenRTP:
            + RTSystemEditor:
            + rtc-template:
Installation on Ubuntu/Debian
deb packages are provided for installing the C++ version of OpenRTM-aist in Ubuntu and Debian. The supported distribution versions are listed on the download page. The corresponding versions may change or be discontinued without notice.
There are two methods of installation available:
- Use the provided install script.
- Install via the apt-get or synaptic package managers.
Bulk installation script
Download the installation script pkg_install_ubuntu.sh or pkg_install_debian.sh provided by openrtm.org from the download page and execute it with root privilege. This script installs required packages sequentially with apt-get.
By specifying the option, you can now install the package according to your purpose, It is also recommended for those who try to install OpenRTM-aist for the first time and compile the source.
Please check here for detailed installation method and kind of option package.
Using apt-get
Editing source.list
A package repository that can be used from apt-get is provided by openrtm.org. This is not included in the default package repositories, so it must be entered into the apt-get settings manually. Append one of the following lines to the file /etc/apt/sources.list:
deb http://www.openrtm.org/pub/Linux/ubuntu/ (code name) main
deb http://www.openrtm.org/pub/Linux/debian/ (code name) main
"(code name)" should be the release name of your distribution version, as shown below.
| Version | code name |
| Debian GNU Linux | |
| Debian 7.0 | wheezy |
| Debian 8.0 | jessie |
| Debian 9.0 | stretch |
| Ubuntu | |
| Ubuntu 14.04 LTS | trusty |
| Ubuntu 16.04 LTS | xenial |
| Ubuntu 16.10 | yakkety |
| Ubuntu 17.04 | zesty |
Ubuntun past / current version / codename can be checked from https://wiki.ubuntu.com/Releases.
Install with apt-get
Follow the procedure given below to install using apt-get. Answer the questions that are presented appropriately using "y".
 # apt-get update
 # apt-get install gcc g++ make uuid-dev
 # apt-get install libomniorb4 libomniorb4-dev omniidl4 omniorb4-nameserver
 # apt-get install python-support (Only needed for Debian 3.1 Sarge)
 # apt-get install openrtm-aist openrtm-aist-doc openrtm-aist-dev openrtm-aist-example
To maintain an installed version of OpenRTM-aist at the currently-installed version, append the following lines to the file "/etc/apt/preferences" (this example illustrates holding at version 1.0):
 Package: OpenRTM-aist
 Pin: version 1.0.*
For more details, see http://www.debian.org/doc/manuals/apt-howto/ch-apt-get.html#s-pin.
Packages at Launchpad/PPA
Launchpad is a we application and web site ( https://launchpad.net/ ) for open source software development which is developed and managed by Canonical Ltd. PPA (Private Package Archive) is an Ubuntu package repository in Launchpad sites, and you can publish your packages on there.
We also provide OpenRTM-aist packages for Ubuntu in PPA, and it is freely available. In case you want to publish your RTC on PPA, you can include OpenRTM-aist PPA packages as dependency in your RTC package. Installation of your RTC package would be completed with PPA's OpenRTM-aist packages. This is advantages of using OpenRTM-aist package in PPA.
Installation of PPA's OpenRTM-aist packages are the following.
Installation of PPA packages
Installation of PPA's OpenRTM-aist packages is much easier than above mentioned way. At first, please add package repository of OpenRTM-aist at PPA. Repository name is openrtm/stable.
$ sudo add-apt-repository ppa:openrtm/stable
Update package database.
$ sudo aptitude update
Please install packages. OpenRTM-aist packages are consists of openrtm-aist (run-time library), openrtm-aist-dev (header for development), openrtm-aist-doc (documentation) and openrtm-aist-example (example RTCs).
$ sudo aptitude install openrtm-aist1.1 openrtm-aist1.1-dev openrtm-aist1.1-example
That's it.
PPA repository structure of OpenRTM-aist
OpenRTM-aist's PPA repository structure is the following.
| Repository name | Description |
| ppa:openrtm/stable | Basic repository. Normally users install these pacakges. Naming rule is openrtm-aist[-]{dev,doc,example}: The newest packages openrtm-aistX.Y[-]{dev,doc,example}: Minor version packages. |
| ppa:openrtm/unstable | Unstable packages. RC-versions, beta versions and so on. Naming rule is openrtm-aistX.Y.ZrcW[-]{dev,doc,example}: revision/RC-versioned packages. |
Checking the install
To confirm the installation succeeded, use the following command.
 $ dpkg -l 'openrtm*'
 Desired=Unknown/Install/Remove/Purge/Hold
 | Status=Not/Installed/Config-f/Unpacked/Failed-cfg/Half-inst/t-aWait/T-pend
 |/ Err?=(none)/Hold/Reinst-required/X=both-problems (Status,Err: uppercase=bad)
 ||/ Name           Version        Description
 +++-==============-==============-============================================
 ii  openrtm-aist   1.0.0-0        OpenRTM-aist runtime libraries and configura
 ii  openrtm-aist-d 1.0.0-0        Header files for OpenRTM-aist development
 pn  openrtm-aist-d <none>         (no description available)
 ii  openrtm-aist-e 1.0.0-0        OpenRTM-aist examples
Package details
The packages contain the following files.
openrtm-aist
openrtm-aist contains the run-time libraries and commands.
- Commands
 /usr/bin/rtcd
 /usr/bin/rtm-naming
- License and other documents
 /usr/share/doc/openrtm-aist/changelog.gz
 /usr/share/doc/openrtm-aist/README.Debian
 /usr/share/doc/openrtm-aist/README
 /usr/share/doc/openrtm-aist/README.jp
 /usr/share/doc/openrtm-aist/NEWS.gz
 /usr/share/doc/openrtm-aist/copyright
 /usr/share/doc/openrtm-aist/changelog.Debian.gz
- Example configuration file
/usr/etc/rtc.conf.sample
- Libraries
 /usr/lib/libRTC-X.X.X.so.X.X.X
 /usr/lib/libRTC.a
 /usr/lib/libRTC.la
 /usr/lib/libRTC.so
 /usr/lib/libRTC-X.X.X.so.X
openrtm-aist-dev
openrtm-aist-dev contains the commands and headers necessary for development with OpenRTM-aist.
- Commands
 /usr/bin/rtc-template
 /usr/bin/rtm-config
 /usr/bin/rtm-skelwrapper
- License and other documents
 /usr/share/doc/openrtm-aist-dev/changelog.gz
 /usr/share/doc/openrtm-aist-dev/copyright
 /usr/share/doc/openrtm-aist-dev/changelog.Debian.gz
- Headers
 /usr/include/rtm/DefaultPeriodicTask.h
 /usr/include/rtm/OutPortPullConnector.h
 ...
 /usr/include/rtm/ExecutionContextBase.h
 /usr/include/rtm/Manager.h
 /usr/include/coil/OS.h
 /usr/include/coil/UUID.h
 ...
 /usr/include/coil/Properties.h
- Libraries and other files
 /usr/lib/OpenRTM-aist/py_helper/cxx_svc_impl.py
 /usr/lib/OpenRTM-aist/py_helper/profile_gen.py
 ...
 /usr/lib/OpenRTM-aist/py_helper/gen_base.py
 /usr/lib/OpenRTM-aist/py_helper/yat.py
 /usr/lib/pkgconfig/libcoil.pc
 /usr/lib/pkgconfig/libRTM.pc
openrtm-aist-example
openrtm-aist-example contains standalone and loadable sample RT Components and their source files.
- Sample standalone components
 /usr/share/OpenRTM-aist/examples/ConsoleOutComp
 /usr/share/OpenRTM-aist/examples/ConsoleInComp
 ...
- Sample source files
 /usr/share/OpenRTM-aist/examples/src/Composite/README.Motor
 /usr/share/OpenRTM-aist/examples/src/Composite/Makefile.Sensor
 /usr/share/OpenRTM-aist/examples/src/Composite/Motor.cpp
 ...
 /usr/share/OpenRTM-aist/examples/src/SimpleService/Makefile.MyServiceProvider
 /usr/share/OpenRTM-aist/examples/src/SimpleService/rtc.conf
- Sample loadable components
 /usr/share/OpenRTM-aist/examples/rtcs/MyServiceConsumer.so.0.0.0
 /usr/share/OpenRTM-aist/examples/rtcs/SeqIn.so.0.0.0
 ...
 /usr/share/OpenRTM-aist/examples/rtcs/ConfigSample.so.0.0.0
 /usr/share/OpenRTM-aist/examples/rtcs/ConsoleOut.so.0.0.0
- License and other documents
 /usr/share/doc/openrtm-aist-example/changelog.gz
 /usr/share/doc/openrtm-aist-example/copyright
 /usr/share/doc/openrtm-aist-example/changelog.Debian.gz
openrtm-aist-doc
openrtm-aist-doc contains the class reference and IDL interfaces reference.
- Class references
 /usr/share/OpenRTM-aist/docs/ClassReference/html/ConnectorBase_8h-source.html
 /usr/share/OpenRTM-aist/docs/ClassReference/html/RTC_8h.html
 ...
 /usr/share/OpenRTM-aist/docs/ClassReference-en/html/ConnectorBase_8h-source.html
 /usr/share/OpenRTM-aist/docs/ClassReference-en/html/RTC_8h.html
 ...
 /usr/share/OpenRTM-aist/docs/ClassReference-en/html/FactoryInit_8h-source.html
- IDL references
 /usr/share/OpenRTM-aist/docs/IDLReference/html/BasicDataType_8idl-source.html
 ...
 /usr/share/OpenRTM-aist/docs/IDLReference-en/html/BasicDataType_8idl-source.html
 /usr/share/OpenRTM-aist/docs/IDLReference-en/html/structRTC_1_1FsmProfile.html
 ...
 /usr/share/OpenRTM-aist/docs/IDLReference-en/html/interfaceOpenRTM_1_1InPortCdr-members.html
- License and other documents
 /usr/share/doc/openrtm-aist-doc/changelog.gz
 /usr/share/doc/openrtm-aist-doc/copyright
 /usr/share/doc/openrtm-aist-doc/changelog.Debian.gz
Installation on Raspberry Pi (Raspbian)
(G)For C ++ version OpenRTM - aist is provided for Raspbian armhf for Raspberry Pi, deb package for armel. It takes about 3 hours when self-compiling with Raspberry Pi, so we recommend that you use this when packages are available. Please understand beforehand that correspondence to Raspbian and its version may be changed or suspended without notice.
Introduction
(G)Supported version
At the moment the version of Raspbian that package is available
- Raspbian "wheezy" (armhf architecture)
- Soft-float Debian "wheezy" (armel architecture)
です。
(G)Preparing an SD memory card
Download the image from the following page and write it to the SD memory card. SD memory card should be more than 4 GB . For details on how to write to the SD memory card, refer to RPi SD Card Setup.
On Windows, write using Win32DiskImager etc. In Linux and Mac OS, write using dd.
$ sudo dd if = / dev / <device file of SD memory card> of = <image file downloaded / decompressed> bs = 1 m
(G)Installing OpenRTM-aist
The installation method of OpenRTM - aist can roughly be divided into the following two installation methods.
- Use bulk installation script provided by openrtm.org
- Specify -apt-get or synaptic package manager
Please install according to your preference.
(G)How to use bulk installation script
- Download the installation script pkg_install_raspbian.sh provided by openrtm.org from the download page and execute it with root privilege. This script installs required packages sequentially with apt-get.
It is very convenient because it installs all necessary packages for developing and executing OpenRTM-aist. It is also recommended for those who try installing OpenRTM-aist for the first time or compiling the source. Please check here for detailed installation method and kind of option package.
How to use apt-get
(G)Edit source.list
openrtm.org provides a package repository available from apt-get I will. However, since it is not included in the default package repository, It is necessary to change the setting of apt-get.
Add the following line to /etc/apt/sources.list.
 > su
 # vi /etc/apt/sources.list # Edit "sources.list"
deb http://www.openrtm.org/pub/Linux/raspbian/ (code name) main
| version | code name |
| Debian GNU Linux | |
| Debian 7.0 | wheezy |
The past / current version / codename of Raspbian can be checked from http://www.raspberrypi.org/downloads.
(G)Installation with apt-get
Follow the procedure below to install. On the way, you will be asked for some responses, so please complete with y .
 # apt-get update
 # apt-get install gcc g++ make uuid-dev
 # apt-get install libomniorb4-1 libomniorb4-dev omniidl omniorb-nameserver
 # apt-get install openrtm-aist openrtm-aist-doc openrtm-aist-dev openrtm-aist-example
If you want to keep installed version of OpenRTM - aist as it is, edit /etc/apt/preferences and add the following line. (In this example, version is fixed to 1.1 series.)
 Package: OpenRTM-aist
 Pin: version 1.1.*
For details, refer to the following. http://www.debian.org/doc/manuals/apt-howto/ch-apt-get.ja.html#s-pin
(G)Confirm installation
Confirm the installation.
 pi@raspberrypi ~ $ dpkg -l 'openrtm*'
 Request = (U)unknown / (I)installation / (R)delete / (P)complete delete / (H)hold
 (H)Semi-install / (W)Wait for trigger / (T)Trigger on hold (N)No / (I)Installed / (C)Setting / (U)Expanding /
 | / Error? = (Blank)No / (R)Required reinstallation (status, error capital letter = abnormal)
 || / Name                  Version        Architecture description
 +++-=====================-===============-===============-=======================
 ii  openrtm-aist          1.1.0-0         armhf           OpenRTM-aist, RT-Middleware distributed by AIST
 ii  openrtm-aist-dev      1.1.0-0         armhf           OpenRTM-aist headers for development
 ii  openrtm-aist-doc      1.1.0-0         all             Documentation for openrtm-aist
 ii  openrtm-aist-example  1.1.0-0         armhf           OpenRTM-aist examples
(G)Package details
The contents of each package are as follows.
(G)openrtm-aist
openrtm - aist contains a runtime library and commands.
- Command
 /usr/bin/rtcd
 /usr/bin/rtm-naming
- Licensing etc.
 /usr/share/doc/openrtm-aist/changelog.gz
 /usr/share/doc/openrtm-aist/README.Debian
 /usr/share/doc/openrtm-aist/README
 /usr/share/doc/openrtm-aist/README.jp
 /usr/share/doc/openrtm-aist/NEWS.gz
 /usr/share/doc/openrtm-aist/copyright
 /usr/share/doc/openrtm-aist/changelog.Debian.gz
- Configuration file sample
/usr/etc/rtc.conf.sample
- Library
 /usr/lib/libRTC.la
 /usr/lib/libRTC.so
 /usr/lib/libRTC-X.X.X.so.X
 /usr/lib/libRTC-X.X.X.so
(G)openrtm-aist-dev
Openrtm - aist - dev contains commands and headers necessary for development.
- Command
 /usr/bin/rtc-template
 /usr/bin/rtm-config
 /usr/bin/rtm-skelwrapper
- Licensing etc.
 /usr/share/doc/openrtm-aist-dev/changelog.gz
 /usr/share/doc/openrtm-aist-dev/copyright
 /usr/share/doc/openrtm-aist-dev/changelog.Debian.gz
- Header
 /usr/include/openrtm-1.1/rtm/DefaultPeriodicTask.h
 /usr/include/openrtm-1.1/rtm/OutPortPullConnector.h
 Omission
 /usr/include/openrtm-1.1/rtm/ExecutionContextBase.h
 /usr/include/openrtm-1.1/rtm/Manager.h
 /usr/include/coil-1.1/coil/OS.h
 /usr/include/coil-1.1/coil/UUID.h
 Omission
 /usr/include/coil-1.1/coil/Properties.h
- Library · others
 /usr/lib/openrtm-1.1/py_helper/cxx_svc_impl.py
 /usr/lib/openrtm-1.1/py_helper/profile_gen.py
 Omission
 /usr/lib/openrtm-1.1/py_helper/gen_base.py
 /usr/lib/openrtm-1.1/py_helper/yat.py
 /usr/lib/pkgconfig/libcoil.pc
 /usr/lib/pkgconfig/libRTM.pc
(G)openrtm-aist-example
openrtm-aist-example contains samples of standalone RTC, loadable RTC and source of sample RTC.
- Sample (stand-alone RTC)
 /usr/share/openrtm-1.1/examples/ConsoleOutComp
 /usr/share/openrtm-1.1/examples/ConsoleInComp
 Omission
- Sample (source)
 /usr/share/openrtm-1.1/examples/src/Composite/README.Motor
 /usr/share/openrtm-1.1/examples/src/Composite/Makefile.Sensor
 /usr/share/openrtm-1.1/examples/src/Composite/Motor.cpp
 Omission
 /usr/share/openrtm-1.1/examples/src/SimpleService/Makefile.MyServiceProvider
 /usr/share/openrtm-1.1/examples/src/SimpleService/rtc.conf
- Sample (Loadable RTC)
 /usr/share/openrtm-1.1/example/rtc/MyServiceConsumer.so.0.0.0
 /usr/share/openrtm-1.1/example/rtc/SeqIn.so.0.0.0
 Omission
 /usr/share/openrtm-1.1/example/rtc/ConfigSample.so.0.0.0
 /usr/share/openrtm-1.1/example/rtc/ConsoleOut.so.0.0.0
- License etc.
 /usr/share/doc/openrtm-aist-example/changelog.gz
 /usr/share/doc/openrtm-aist-example/copyright
 /usr/share/doc/openrtm-aist-example/changelog.Debian.gz
(G)openrtm-aist-doc
openrtm-aist-doc contains Japanese and English class reference, IDL interface definition reference.
- Class Reference
 /usr/share/openrtm-1.1/doc/ClassReference/html/ConnectorBase_8h_source.html
 /usr/share/openrtm-1.1/doc/ClassReference/html/RTC_8h.html
 Omission
 /usr/share/openrtm-1.1/doc/ClassReference/html/FactoryInit_8h_source.html
- IDL reference
 /usr/share/openrtm-1.1/doc/IDLReference/html/BasicDataType_8idl_source.html
 Omission
 /usr/share/openrtm-1.1/doc/IDLReference/html/interfaceOpenRTM_1_1InPortCdr-members.html
- Class Reference (English)
 /usr/share/openrtm-1.1/doc/ClassReference-en/html/ConnectorBase_8h_source.html
 /usr/share/openrtm-1.1/doc/ClassReference-en/html/RTC_8h.html
 Omission
 /usr/share/openrtm-1.1/doc/ClassReference-en/html/FactoryInit_8h-source.html
- IDL Reference (English)
 /usr/share/openrtm-1.1/doc/IDLReference-en/html/BasicDataType_8idl_source.html
 /usr/share/openrtm-1.1/doc/IDLReference-en/html/structRTC_1_1FsmProfile.html
 Omission
 /usr/share/openrtm-1.1/doc/IDLReference-en/html/interfaceOpenRTM_1_1InPortCdr-members.html
- License etc.
 /usr/share/doc/openrtm-aist-doc/changelog.gz
 /usr/share/doc/openrtm-aist-doc/copyright
 /usr/share/doc/openrtm-aist-doc/changelog.Debian.gz
Installation on Fedora
OpenRTM-aist version 1.2.0 or later, batch installation script is scheduled to be supported.
There are two types of installation methods in Fedora Linux roughly divided as follows.- Use the provided install script.
- Install via the yum package manager.
Bulk installation script
Download the installation script pkg_install_fedora.sh provided by openrtm.org from the download page and execute it with root privilege. This script installs required packages sequentially with yum.
It is very convenient because it installs all necessary packages for developing and executing OpenRTM-aist. By specifying the option, it is now possible to install the package according to the purpose, so it is also recommended for those who try to install OpenRTM - aist for the first time and compile the source.
However, since all the packages related to OpenRTM - aist are installed, there is a possibility that even unnecessary ones are installed. People who understand in detail should install it manually.
For detailed options and types of packages, please check here
Using yum
Creating /etc/yum.repos.d/openrtm.repo
A package repository that can be used from yum is provided by openrtm.org. This is not included in the default package repositories, so it must be entered into the yum settings manually. Enter the following lines to the file /etc/yum.repos.d/openrtm.repo:
 [openrtm]
 name=Fedora $releasever - $basearch
 failovermethod=priority
 baseurl=http://www.openrtm.org/pub/Linux/Fedora/releases/$releasever/Fedora/$basearch/os/Packages
 enabled=1
 gpgcheck=0
 gpgkey=file:///etc/pki/rpm-gpg/RPM-GPG-KEY-fedora file:///etc/pki/rpm-gpg/RPM-GPG-KEYCENTER:''/etc/yum.repos.d/openrtm.repo''
Install with yum
Follow the procedure given below to install using yum. Answer the questions that are presented appropriately using "y".
 > su
 # yum install gcc-c++ python
 # yum install omniORB omniORB-devel omniORB-doc omniORB-servers omniORB-utils omniORB-bootscripts
 # yum install OpenRTM-aist OpenRTM-aist-devel OpenRTM-aist-doc OpenRTM-aist-example
Checking the install
To confirm the installation succeeded, use the following command.
 # rpm -q OpenRTM-aist
 OpenRTM-aist-1.0.0-0.fcX
Package details
The packages contain the following files.
OpenRTM-aist
openrtm-aist contains the run-time libraries and commands.
- Sample configuration file.
/etc/rtc.conf.sample
- Libraries
 /usr/lib/libRTC-1.0.0.so.0
 /usr/lib/libRTC-1.0.0.so.0.0.4
 /usr/lib/libRTC.a
 /usr/lib/libRTC.la
 /usr/lib/libRTC.so
 /usr/lib/libcoil.a
 /usr/lib/libcoil.la
 /usr/lib/libcoil.so
 /usr/lib/libcoil.so.0
 /usr/lib/libcoil.so.0.0.0
OpenRTM-aist-devel
openrtm-aist-dev contains headers and commands for developing with OpenRTM-aist.
- Commands
 /usr/bin/coil-config
 /usr/bin/rtc-template
 /usr/bin/rtcd
 /usr/bin/rtcprof
 /usr/bin/rtm-config
 /usr/bin/rtm-naming
 /usr/bin/rtm-skelwrapper
- Headers
 /usr/include/coil/Allocator.h
 /usr/include/coil/Async.h
 ...
 /usr/include/coil/memory.h
 /usr/include/coil/stringutil.h
 ...
 /usr/include/rtm/BufferBase.h
 /usr/include/rtm/BufferStatus.h
 ...
 /usr/include/rtm/Typename.h
 /usr/include/rtm/config_rtc.h
- IDL, stubs and skeletons
 /usr/include/rtm/idl/BasicDataType.hh
 /usr/include/rtm/idl/BasicDataType.idl
 ...
 /usr/include/rtm/idl/device_interfaces/RFID.idl
 /usr/include/rtm/idl/device_interfaces/Ranger.idl
- Libraries
 /usr/lib/OpenRTM-aist/py_helper/README_gen.py
 /usr/lib/OpenRTM-aist/py_helper/README_gen.pyc
 ...
 /usr/lib/OpenRTM-aist/py_helper/yat.pyc
 /usr/lib/OpenRTM-aist/py_helper/yat.pyo
 /usr/lib/pkgconfig/libcoil.pc
 /usr/lib/pkgconfig/openrtm-aist.pc
OpenRTM-aist-doc
openrtm-aist-doc contains the class reference and IDL interfaces reference.
- Class reference
 /usr/share/OpenRTM-aist/docs/ClassReference/html/ConnectorBase_8h-source.html
 /usr/share/OpenRTM-aist/docs/ClassReference/html/RTC_8h.html
 ...
 /usr/share/OpenRTM-aist/docs/ClassReference-en/html/ConnectorBase_8h-source.html
 /usr/share/OpenRTM-aist/docs/ClassReference-en/html/RTC_8h.html
 ...
 /usr/share/OpenRTM-aist/docs/ClassReference-en/html/FactoryInit_8h-source.html
- IDL reference
 /usr/share/OpenRTM-aist/docs/IDLReference/html/BasicDataType_8idl-source.html
 ...
 /usr/share/OpenRTM-aist/docs/IDLReference-en/html/BasicDataType_8idl-source.html
 /usr/share/OpenRTM-aist/docs/IDLReference-en/html/structRTC_1_1FsmProfile.html
 ...
 /usr/share/OpenRTM-aist/docs/IDLReference-en/html/interfaceOpenRTM_1_1InPortCdr-members.html
OpenRTM-aist-example
openrtm-aist-example contains standalone and loadable sample RT Components and their source files.
- Sample standalone components
 /usr/share/OpenRTM-aist/examples/ConsoleOutComp
 /usr/share/OpenRTM-aist/examples/ConsoleInComp
 ...
- Sample source files
 /usr/share/OpenRTM-aist/examples/src/Composite/README.Motor
 /usr/share/OpenRTM-aist/examples/src/Composite/Makefile.Sensor
 /usr/share/OpenRTM-aist/examples/src/Composite/Motor.cpp
 ...
 /usr/share/OpenRTM-aist/examples/src/SimpleService/Makefile.MyServiceProvider
 /usr/share/OpenRTM-aist/examples/src/SimpleService/rtc.conf
- Sample loadable components
 /usr/share/OpenRTM-aist/examples/rtcs/MyServiceConsumer.so.0.0.0
 /usr/share/OpenRTM-aist/examples/rtcs/SeqIn.so.0.0.0
 ...
 /usr/share/OpenRTM-aist/examples/rtcs/ConfigSample.so.0.0.0
 /usr/share/OpenRTM-aist/examples/rtcs/ConsoleOut.so.0.0.0
Installation on Vine Linux

There are two methods of installation available:
- Use the provided install script.
- Install via the apt-get package manager.
Vine Linux batch installation script
Download the installation script pkg_install [version number] _vine.sh provided by openrtm.org from the download page and execute it with root privilege. This script installs required packages sequentially with apt-get.
It is very convenient because it installs all necessary packages for developing and executing OpenRTM-aist. It is recommended for those who try installing OpenRTM-aist for the first time. However, since all the packages related to OpenRTM - aist are installed, there is a possibility that even unnecessary ones are installed. If you know more, you should install it manually. Below is the installation procedure using the batch installation script.
 > wget [pkg_installXXX.sh download URL]
 > su
 # sh pkg_install1XX_vine.sh
 // Questions will be asked during the procedure. Answer "y" or "Y" when appropriate.
Using rpm
Editing sources.list
A package repository that can be used from apt-get is provided by openrtm.org. This is not included in the default package repositories, so it must be entered into the apt-get settings manually. Append one of the following lines to the file /etc/apt/sources.list:
rpm http://www.openrtm.org/pub/Linux/Vine/apt x.x/$(ARCH) main
where "x.x" is the Vine version number, e.g. 5.0 for Vine 5.0.
rpm http://www.openrtm.org/pub/Linux/Vine/apt 5.0/$(ARCH) main
After editing sources.list, follow the procedure given below to install.
 > su
 # apt-get update
 # apt-get install gcc-c++ python
 # apt-get install omniORB omniORB-devel omniORB-servers omniORB-doc
 # apt-get install e2fsprogs e2fsprogs-devel
 # apt-get install OpenRTM-aist OpenRTM-aist-devel OpenRTM-aist-doc OpenRTM-aist-example
Answer "y" or "Y" to questions as appopriate.
Checking the install
To confirm the installation succeeded, use the following command.
 # rpm -q OpenRTM-aist
 OpenRTM-aist-1.0.0-0.vl50
Package details
OpenRTM-aist
openrtm-aistcontains the run-time libraries and commands.
- Sample configuration file
/etc/rtc.conf.sample
- Libraries
 /usr/lib/libRTC-1.0.0.so.0
 /usr/lib/libRTC-1.0.0.so.0.0.4
 /usr/lib/libRTC.a
 /usr/lib/libRTC.la
 /usr/lib/libRTC.so
 /usr/lib/libcoil.a
 /usr/lib/libcoil.la
 /usr/lib/libcoil.so
 /usr/lib/libcoil.so.0
 /usr/lib/libcoil.so.0.0.0
OpenRTM-aist-devel
openrtm-aist-dev contains the commands and headers necessary for development with OpenRTM-aist.
- Commands
 /usr/bin/coil-config
 /usr/bin/rtc-template
 /usr/bin/rtcd
 /usr/bin/rtcprof
 /usr/bin/rtm-config
 /usr/bin/rtm-naming
 /usr/bin/rtm-skelwrapper
- Headers
 /usr/include/coil/Allocator.h
 /usr/include/coil/Async.h
 ...
 /usr/include/coil/memory.h
 /usr/include/coil/stringutil.h
 ...
 /usr/include/rtm/BufferBase.h
 /usr/include/rtm/BufferStatus.h
 ...
 /usr/include/rtm/Typename.h
 /usr/include/rtm/config_rtc.h
- IDL, stubs and skeletons
 /usr/include/rtm/idl/BasicDataType.hh
 /usr/include/rtm/idl/BasicDataType.idl
 ...
 /usr/include/rtm/idl/device_interfaces/RFID.idl
 /usr/include/rtm/idl/device_interfaces/Ranger.idl
- Libraries
 /usr/lib/OpenRTM-aist/py_helper/README_gen.py
 /usr/lib/OpenRTM-aist/py_helper/README_gen.pyc
 ...
 /usr/lib/OpenRTM-aist/py_helper/yat.pyc
 /usr/lib/OpenRTM-aist/py_helper/yat.pyo
 /usr/lib/pkgconfig/libcoil.pc
 /usr/lib/pkgconfig/openrtm-aist.pc
OpenRTM-aist-doc
openrtm-aist-doc contains the class reference and IDL interfaces reference.
- Class reference
 /usr/share/OpenRTM-aist/docs/ClassReference/html/ConnectorBase_8h-source.html
 /usr/share/OpenRTM-aist/docs/ClassReference/html/RTC_8h.html
 ...
 /usr/share/OpenRTM-aist/docs/ClassReference-en/html/ConnectorBase_8h-source.html
 /usr/share/OpenRTM-aist/docs/ClassReference-en/html/RTC_8h.html
 ...
 /usr/share/OpenRTM-aist/docs/ClassReference-en/html/FactoryInit_8h-source.html
- IDL reference
 /usr/share/OpenRTM-aist/docs/IDLReference/html/BasicDataType_8idl-source.html
 ...
 /usr/share/OpenRTM-aist/docs/IDLReference-en/html/BasicDataType_8idl-source.html
 /usr/share/OpenRTM-aist/docs/IDLReference-en/html/structRTC_1_1FsmProfile.html
 ...
 /usr/share/OpenRTM-aist/docs/IDLReference-en/html/interfaceOpenRTM_1_1InPortCdr-members.html
OpenRTM-aist-example
openrtm-aist-example contains standalone and loadable sample RT Components and their source files.
- Sample standalone components
 /usr/share/OpenRTM-aist/examples/ConsoleOutComp
 /usr/share/OpenRTM-aist/examples/ConsoleInComp
 ...
- Sample source files
 /usr/share/OpenRTM-aist/examples/src/Composite/README.Motor
 /usr/share/OpenRTM-aist/examples/src/Composite/Makefile.Sensor
 /usr/share/OpenRTM-aist/examples/src/Composite/Motor.cpp
 ...
 /usr/share/OpenRTM-aist/examples/src/SimpleService/Makefile.MyServiceProvider
 /usr/share/OpenRTM-aist/examples/src/SimpleService/rtc.conf
- Sample loadable components
 /usr/share/OpenRTM-aist/examples/rtcs/MyServiceConsumer.so.0.0.0
 /usr/share/OpenRTM-aist/examples/rtcs/SeqIn.so.0.0.0
 ...
 /usr/share/OpenRTM-aist/examples/rtcs/ConfigSample.so.0.0.0
 /usr/share/OpenRTM-aist/examples/rtcs/ConsoleOut.so.0.0.0
Installing by MacPorts on Mac OS X

MacPorts
MacPorts is a system to allow the installation and management of open-source software packages in Mac OS X. It is based on the ports system of FreeBSD. A recipe known as a "portfile" describes how to automatically compile and install a package, including downloading source and applying patches. There is also another system for Mac OS X, known as Fink.
Installing with MacPorts
To use MacPorts, Apple's Xcode and an X11 environment must be installed. These can be installed from the Mac OS X install CD. See the MacPorts webpage for details.
MacPorts uses dmg package files. You must select the dmg file that matches your operating system version. The dmg files can be downloaded from the MacPorts website:
Install OpenRTM-aist by the ports
A script to download the portfile and automatically build and install it is available:
- Portfile
- Install script: Automatically downloads ports.tgz and installs it.
In an appropriate directory, execute the script as below. You will be asked for a superuser password during the install.
 $ sh port_install100_mac.sh
 sh port_install.sh
 file:///Users/n-ando/ports/
 Getting Portfile from:  http://www.openrtm.org/pub/MacOSX/macports//ports.tgz
 --2010-07-27 23:21:06--  http://www.openrtm.org/pub/MacOSX/macports//ports.tgz
 Resolving www.openrtm.org (www.openrtm.org)... 182.48.18.55
 Connecting to www.openrtm.org (www.openrtm.org)|182.48.18.55|:80... connected.
 HTTP request sent, awaiting response... 200 OK
 Length: 3600 (3.5K) [application/x-gzip]
 Saving to: `ports.tgz.1'

 100%[================================================>] 3,600       --.-K/s   in 0.002s

 2010-07-27 23:21:06 (2.02 MB/s) - `ports.tgz' saved [3600/3600]

 x ports/
 x ports/devel/
 x ports/PortIndex
 x ports/PortIndex.quick
 x ports/devel/OpenRTM-aist/
 x ports/devel/OpenRTM-aist/Portfile
 x ports/devel/OpenRTM-aist/files/
 x ports/devel/OpenRTM-aist/Portfile~
 x ports/devel/OpenRTM-aist/files/patch-src-lib-rtm-InPortConsumer.h
 x ports/devel/OpenRTM-aist/files/patch-src-lib-coil-posix-coil-UUID.cpp
 x ports/devel/OpenRTM-aist/files/patch-src-lib-coil-posix-coil-Routing.cpp
 x ports/devel/OpenRTM-aist/files/patch-examples-SimpleService-Makefile.in
 x ports/devel/OpenRTM-aist/files/patch-examples-Composite-Makefile.in
 x ports/devel/OpenRTM-aist/files/patch-examples-ConfigSample-Makefile.in
 x ports/devel/OpenRTM-aist/files/patch-examples-SeqIO-Makefile.in
 x ports/devel/OpenRTM-aist/files/patch-examples-SimpleIO-Makefile.in
 x ports/devel/OpenRTM-aist/files/patch-src-lib-rtm-idl-Makefile.in
 Creating port index in /Users/n-ando/ports
 Adding port devel/OpenRTM-aist

 Total number of ports parsed:   1
 Ports successfully parsed:      1
 Ports failed:                   0
 Up-to-date ports skipped:       0

 Adding local ports repository entry to sources.conf
 # A password may be required for sudo. Input your password.
 Password:
 Installing OpemRTM-aist...it may take several minutes.
 # A password may be required for sudo. Input your password.
 --->  Computing dependencies for OpenRTM-aist
 --->  Fetching OpenRTM-aist
 --->  Verifying checksum(s) for OpenRTM-aist
 --->  Extracting OpenRTM-aist
 --->  Applying patches to OpenRTM-aist
 --->  Configuring OpenRTM-aist
 --->  Building OpenRTM-aist
 --->  Staging OpenRTM-aist into destroot
 --->  Installing OpenRTM-aist @1.0.0_2
 --->  Activating OpenRTM-aist @1.0.0_2
 --->  Cleaning OpenRTM-aist
 Cleaning local ports repository entry in sources.conf
 # A password may be required for sudo. Input your password.
 Password:
 $
ports will automatically resolve any dependencies required by the package. This may take some time.
Install details
The details of the install are contained in the port_installXXX_mac.sh script. It roughly follows this procedure:
- Download the portfile
- Extract the portfile
- Add the extracted location to sources.conf
- Build and install using the port
In MacPorts, it searches for the package specified to be installed with the port command from the specific place described in the settings file sources.conf, downloads the source according to Porrtfile and builds.
Installation on QNX

(G)QNX
QNX (Queen Nex, or Queenix) is a commercial real-time OS mainly sold for embedded systems. It is a POSIX-compliant UNIX type OS, which is a built-in OS but is a process type operating system similar to general UNIX. The kernel is a microkernel, various functions are modularized as a server, and only the necessary server is operated according to the purpose, so it is possible to configure a compact system. Since it can operate on various CPUs such as x86 family, MIPS, PowerPC, SH-4, ARM, StrongARM, XScale, and furthermore it has obtained certification in accordance with functional safety standard IEC 61508, safety related It can also be used for systems.
QNX also has a free licensing program for educational institutions, which can be used relatively easily at universities and others.
(G)pkgsrc
pkgsrc is one of package management systems for UNIX, derived from FreeBSD's port collection and is now used as a package management system of NetBSD. pkgsrc itself does not depend on a specific OS, it can be used as a file system for NetBSD, Solaris, Linux, Mac OS X, FreeBSD, OpenBSD, IRIX, BSD / OS, AIX, Interix, DragonFlyBSD, OSF / 1, HP-UX, QNX, It can be used on various Unix OS such as Haiku, MINIX 3, Illumos.
(G)pkgsrc for QNX
There is no package management system in QNX, and pkgsrc for QNX is maintained in the QNX user forum.
After installing the OS, check out pkgsrc from the repository, and put it on the system. (To access the repository, QNX forum account is required.) Since checking out from the svn repository is very time-consuming, you can also download and use pkgsrc_HEAD 650_r396.tgz, but beforehand the latest in pkgsrc We recommend checking the version.
- QNX Account
- QNX Forum
- bootstrap
- Archive of pkgsrc HEAD 650 (r396) (.svn deleted)
- Archive of pkgsrc HEAD 650 (r396) (including .svn)
 # cd /usr/
 # svn checkout --username <username> http://community.qnx.com/svn/repos/pkgsrc/HEAD_650/pkgsrc
 # (cd pkgsrc/bootstrap && ./bootstrap)
 # (cd pkgsrc/misc/figlet && bmake install)
 # pkg_info
 # cd /usr
 # tar xvzf <somewhere>/pkgsrc_HEAD650_r396.tgz
 # (cd pkgsrc/bootstrap && ./bootstrap)
 # (cd pkgsrc/misc/figlet && bmake install)
 # pkg_info
(G)Installing OpenRTM-aist by pkgsrc
pkgsrc has a binary package installation and a method of building from the source and installing it. Not all packages are provided in binary, so you will need to build from sources as needed.
(G)OpenRTM.org's pkgsrc repository
OpenRTM-aist provides a binary package at the following URL of openrtm.org.
OmniORB necessary for OpenRTM-aist is also provided by openrtm.org because there is no binary package in the above distribution site.
(G)Installation
The installation method is as follows.
- Set environment variable PKG_PATH to http://www.openrtm.org/pub/pkgsrc/packages/QNX/i386/6.5.0/All
- Since 6.5.0 is the version of QNX, please read as appropriate
- pkg_add - v Install OpenRTM - aist with OpenRTM - aist - 1.1.0 - RELESE
- omniORB will also be installed at the same time
 # export PKG_PATH=http://www.openrtm.org/pub/pkgsrc/packages/QNX/i386/6.5.0/All
 # pkg_add -v OpenRTM-aist-1.1.0-RELESE
 Replace 1.1.0-RELESE with the version to be installed as appropriate.
 Running install with PRE-INSTALL for omniORB-4.1.6.
 bin/omkdepend
 bin/omnicpp
   : Installation of omniORB begins
 man/man1/omniidl.1
 Running install with PRE-INSTALL for omniORB-4.1.6.
 Package omniORB-4.1.6 registered in /var/db/pkg/omniORB-4.1.6
   : Installation of OpenRTM-aist begins
 lib/libcoil.so
 lib/libcoil.la
 lib/libcoil-1.1.0.so
  :
 share/openrtm-1.1/doc/IDLReference-en/html/unionSDOPackage_1_1Numeric.html
 etc/rtc.conf.sample
 Package OpenRTM-aist-1.1.0-RELEASE registered in /var/db/pkg/OpenRTM-aist-1.1.0-RELEASE
 #
 # pkg_info|grep OpenRTM
 OpenRTM-aist-1.1.0-RELEASE RT-Middleware and OMG RTC framework
Installation is now complete.
(G)Test
A sample program is installed under /usr/pkg/share/openrtm-1.1/examples. We will use OpenRTM - aist to verify the operation of OpenRTM-aist.
(G)Starting name server
First, start the name server.
 # rtm-naming
 or
 # cp /usr/pkg/share/examples/rc.d/omninames /etc/rc.d/
 # chmod 755 /etc/rc.d/omninames
 # /etc/rc.d/omninames
In the latter, we copy the omninames startup script to the rc directory (/etc/rc.d) and then start it. This script can also stop the name server.
# /etc/rc.d/omninames stop
(G)ConsoleOut
First, let's start the ConsoleOut component. In the example below, we create a tmp directory in the home directory, copy it to it, and then execute it.
 # cd ; mkdir tmp ; cd tmp
 # cp -r /usr/pkg/share/openrtm-1.1/example .
 # cd example
 # ./ConsoleOutComp
 succeed.
 =================================================
  Component Profile
 -------------------------------------------------
 InstanceID:     ConsoleOut0
 Implementation: ConsoleOut
 Description:    Console output component
  :
 =================================================
 Port0 (name): ConsoleOut0.in
 -------------------------------------------------
 - properties -
 port.port_type: DataInPort
 dataport.data_type: IDL:RTC/TimedLong:1.0
 dataport.subscription_type: Any
 dataport.dataflow_type: push,pull
 dataport.interface_type: corba_cdr
 -------------------------------------------------
(G)ConsoleIn
 # cd ; cd tmp/example
 # ./ConsoleInComp
 Creating a component: "ConsoleIn"....succeed.
 =================================================
  Component Profile
 -------------------------------------------------
 InstanceID:     ConsoleIn0
 Implementation: ConsoleIn
 Description:    Console input component
  :
 =================================================
 Port0 (name): ConsoleIn0.out
 -------------------------------------------------
 - properties -
 port.port_type: DataOutPort
 dataport.data_type: IDL:RTC/TimedLong:1.0
 dataport.subscription_type: flush,new,periodic
 dataport.dataflow_type: push,pull
 dataport.interface_type: corba_cdr
 -------------------------------------------------
  :
 Please input number:
Now, start RTSystemEditor on another PC, connect and activate the port. If you type a number at the ConsoleIn prompt, it will be output from ConsoleOut.
Installation on VxWorks
(G)VxWorks
VxWorks is a real-time OS for embedded systems developed by Wind River. It is the most popular OS in large-scale commercial real-time OS, and it is used in relatively large equipment. It can operate on various CPU such as x86, PowerPC, SH - 4, ARM, MIPS, SPARC etc. It conforms to DO - 178B standard and IEC 61508 standard, and it is used in a wide range of fields such as aerospace and space.
(G)Wind River Workbench
Wind River Workbench is an integrated development environment that executes VxWorks compilation, debugging, etc. by GUI.
This page explains the procedure for introducing OpenRTM-aist (C++ version) to VxWorks.
(G)Environment
The host PC is supposed to be Ubuntu 14.04 (or 16.04). We plan to deal with Windows in the future.
Install the following software on the host PC.
- Wind River Workbench
Please purchase from Wind River and install it.
Since Workbench operates in 32 bit environment, please install i386 version libc6 package for 64 bit Ubuntu.
sudo apt-get install libc6:i386 libncurses5:i386 libstdc++6:i386
- tclsh
- cmake
- subversion
Please install with the following command.
sudo apt-get install tclsh cmake subversion
- ORBexpress
It is necessary only when using ORBexpress.
(G)Build
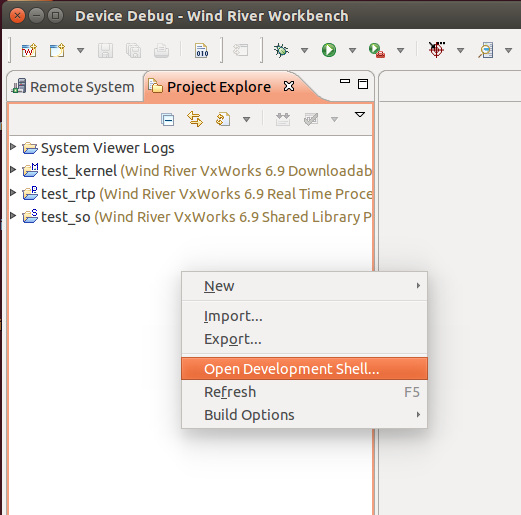
Build is executed by command line operation. From Workbench, right click on Project Explore and launch the command line shell from Open Development Shell .
To build on normal Ubuntu terminal, please set environment variables by the following procedure. If you use the command line shell launched in Workbench, you have already set environment variables, so please proceed to the next step.
(G)Setting environment variables
Please set the following environment variables.
| Variable name | Example |
| WIND_HOME | /home/openrtm/WindRiver |
| WIND_USR | ${WIND_HOME}/vxworks-6.9/target/usr |
| WRVX_COMPBASE | ${WIND_HOME}/components |
| WIND_BASE | ${WIND_HOME}/vxworks-6.9 |
| WIND_HOST_TYPE | x86-linux2 |
| WIND_GNU_BASE | ${WIND_HOME}/gnu/4.3.3-vxworks-6.9/${WIND_HOST_TYPE} |
| WIND_FOUNDATION_PATH | ${WIND_HOME}/workbench-3.3/foundation |
Please change WIND_HOME appropriately according to the directory where Workbench is installed.
 export WIND_HOME=/home/openrtm/WindRiver
 export WIND_USR=${WIND_HOME}/vxworks-6.9/target/usr
 export WRVX_COMPBASE=${WIND_HOME}/components
 export WIND_BASE=${WIND_HOME}/vxworks-6.9
 export WIND_HOST_TYPE=x86-linux2
 export WIND_GNU_BASE=${WIND_HOME}/gnu/4.3.3-vxworks-6.9/${WIND_HOST_TYPE}
 export WIND_FOUNDATION_PATH=${WIND_HOME}/workbench-3.3/foundation
Please set the shared library path to execute the compiler.
export LD_LIBRARY_PATH=${WIND_HOME}/lmapi-5.0/x86-linux2/lib:${WIND_FOUNDATION_PATH}/${WIND_HOST_TYPE}/lib:${LD_LIBRARY_PATH}(G)Build omniORB
When omniORB is used, it is necessary to build omniORB source code. If omniORB is not used, proceed to the next step.
(G)Get source code
Please obtain omniORB source code with the following command.
 wget https://jaist.dl.sourceforge.net/project/omniorb/omniORB/omniORB-4.2.2/omniORB-4.2.2.tar.bz2
 tar xf omniORB-4.2.2.tar.bz2
(G)Correction patch application
Apply fix patch for VxWorks 6.6, 6.9.
 wget http://svn.openrtm.org/omniORB/trunk/vxworks/omniORB-4.2.2-vxworks.patch
 patch -p1 -d omniORB-4.2.2 < omniORB-4.2.2-vxworks.patch
(G)Build IDL compiler etc.
The IDL compiler etc must operate on Ubuntu. Please build omniORB for Ubuntu by the following procedure.
 cd omniORB-4.2.2
 mkdir build
 cd build
 ../configure
 make
 cd ..
(G)Cross compiling
Build omniORB for VxWorks.
 sed -i '1s/^/platform = ${VXWORKS_PLATFORM}\n/' config/config.mk
 cd src
 make export
However, please be sure to enter VXWORKS_PLATFORM according to your operating environment.
| VXWORKS_PLATFORM | CPU | VxWorks version | Implementation method |
| powerpc_vxWorks_kernel_6.6 | PowerPC | 6.6 | Kernel module |
| powerpc_vxWorks_RTP_6.6 | PowerPC | 6.6 | RTP |
| powerpc_vxWorks_kernel_6.9 | PowerPC | 6.9 | kernel module |
| powerpc_vxWorks_RTP_6.9 | PowerPC | 6.9 | RTP |
| simlinux_vxWorks_kernel_6.6 | simulator on Linux | 6.6 | kernel module |
| simpentium_vxWorks_RTP_6.6 | Simulator on Linux | 6.6 | RTP |
| simlinux_vxWorks_kernel_6.9 | simulator on Linux | 6.9 | kernel module |
| simpentium_vxWorks_RTP_6.9 | Simulator on Linux | 6.9 | RTP |
In the case of building a kernel module, name servers etc. are not generated. When starting name servers with VxWorks, please also build RTP.
(G)Build OpenRTM-aist
(G)Obtain source code
Please obtain the source code with the following command.
svn co http://svn.openrtm.org/OpenRTM-aist/trunk/OpenRTM-aist/
(G)Compilation
Start compiling with the following command.
 cd OpenRTM-aist/
 python convert_character_code.py ./ vxworks euc_jp
 mkdir src/lib/coil/common/coil
 cp src/lib/coil/common/*.* src/lib/coil/common/coil/
 cp build/yat.py utils/rtm-skelwrapper/
 mkdir build_vxworks
 cd build_vxworks/
 cmake -DCMAKE_TOOLCHAIN_FILE=${TOOLCHAIN_FILE} -DVX_VERSION=${VX_VERSION} -DORB_ROOT=${ORB_ROOT} -DOMNI_VERSION=${OMNI_VERSION} -DCORBA=${CORBA} -DVX_CPU_FAMILY=${ARCH} ..
 make
Please specify the following for CMake options.
| TOoolCHAIN_FILE | '../Toolchain-vxworks6.6-Linux.cmake' 'for VxWorks 6.6 (kernel module, PowerPC),' '../ Toolchain-vxworks6.cmake' ' |
| VX_VERSION | vxworks - 6.6 or vxworks - 6.9 |
| ORB_ROOT | omniORB directory (eg /home/openrtm/omniORB-4.2.2) |
| VX_CPU_FAMILY | ppc (PowerPC), simlinux (kernel module, simulator), simpentium (RTP, simulator) |
| OMNI_VERSION | omniORB version (40, 41, 42), unnecessary if omniORB is not used |
| CORBA | omniORB or ORBexpress |
For RTP, you need to add -DRTP = ON to the cmake command.
(G)Operation check
When the build is completed, please confirm the operation by the following procedure.
OpenRTM-aist operation confirmation (VxWorks, kernel module, when using simulator)
This page explains the procedure to check the operation of the RTC kernel module built for VxWorks using the Workbench simulator.
(G)Setting up the simulator
Follow the procedure below to set up the simulator.
(G)Simulator connection
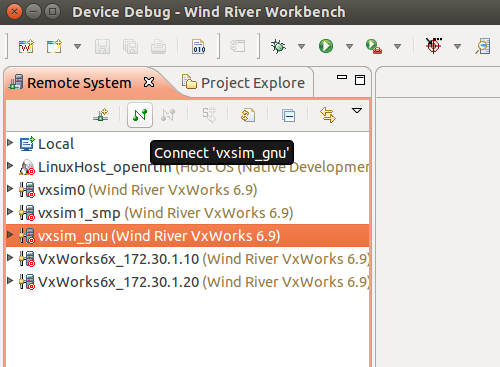
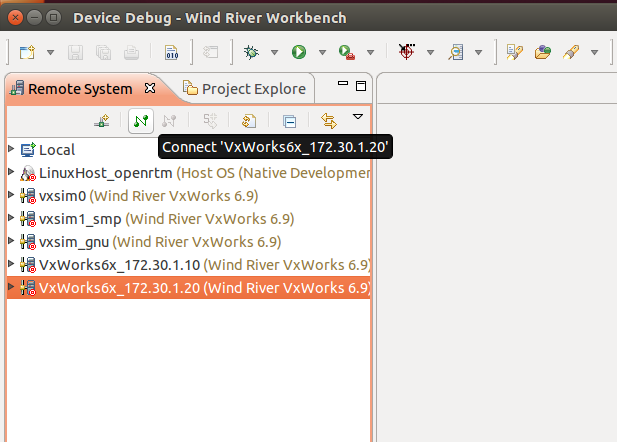
After selecting the simulator with Workbench Remote System, press connect 'xxxxx' button to connect with the simulator.
(G)Loading kernel modules
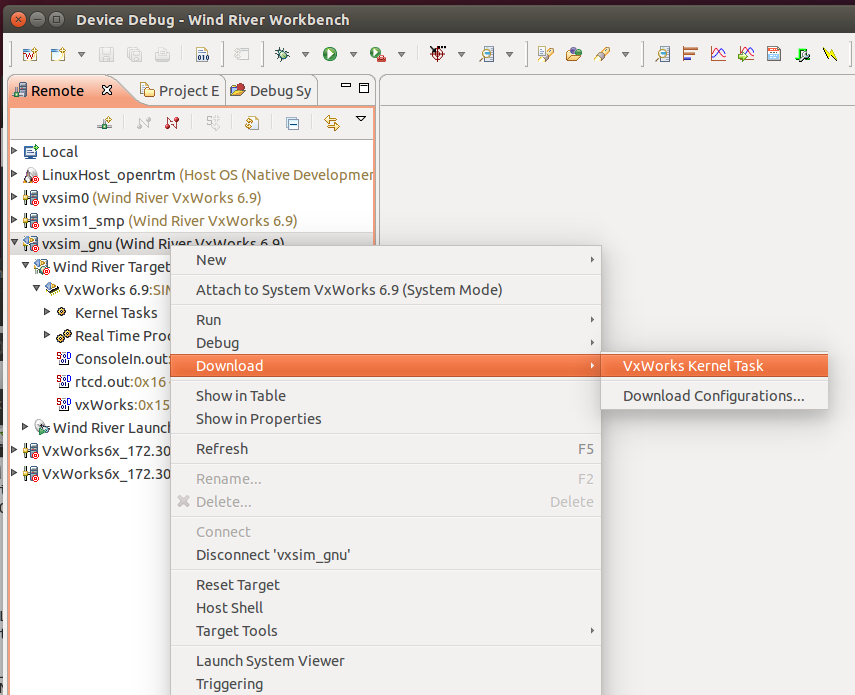
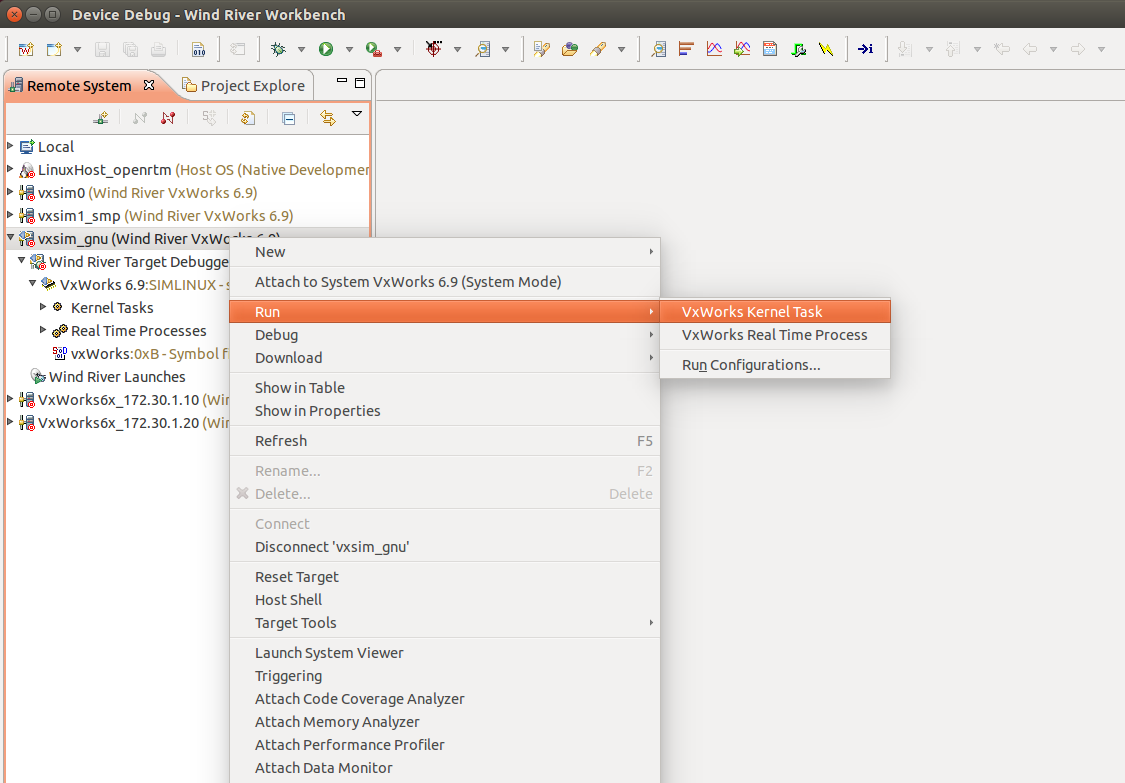
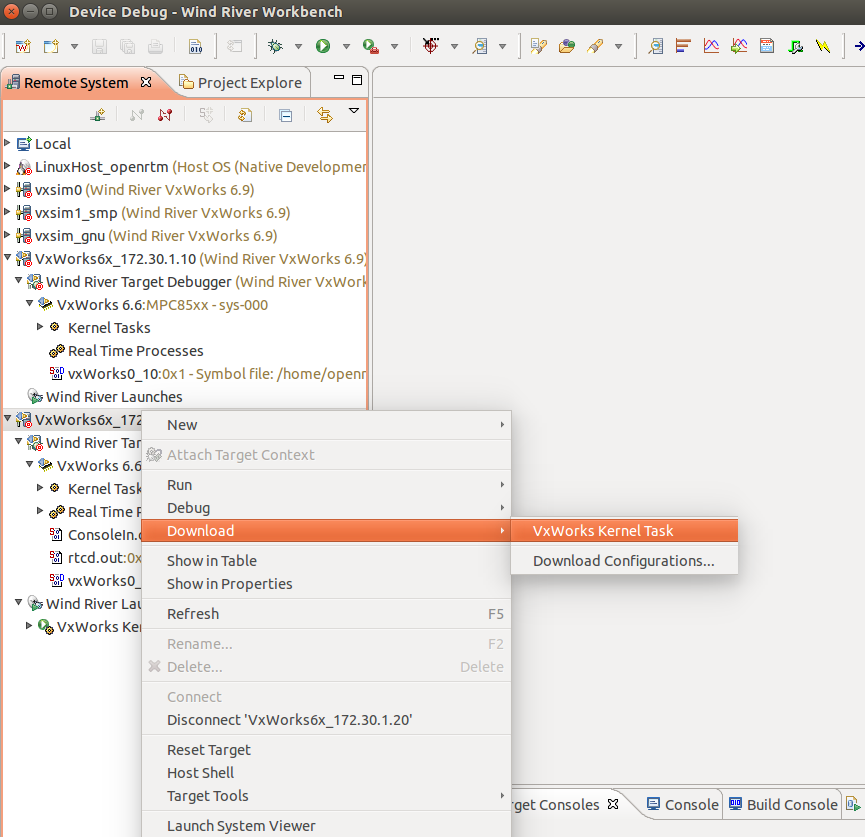
In the Workbench Remote System, right click on the simulator and select Download → VxWorks Kernel Task.
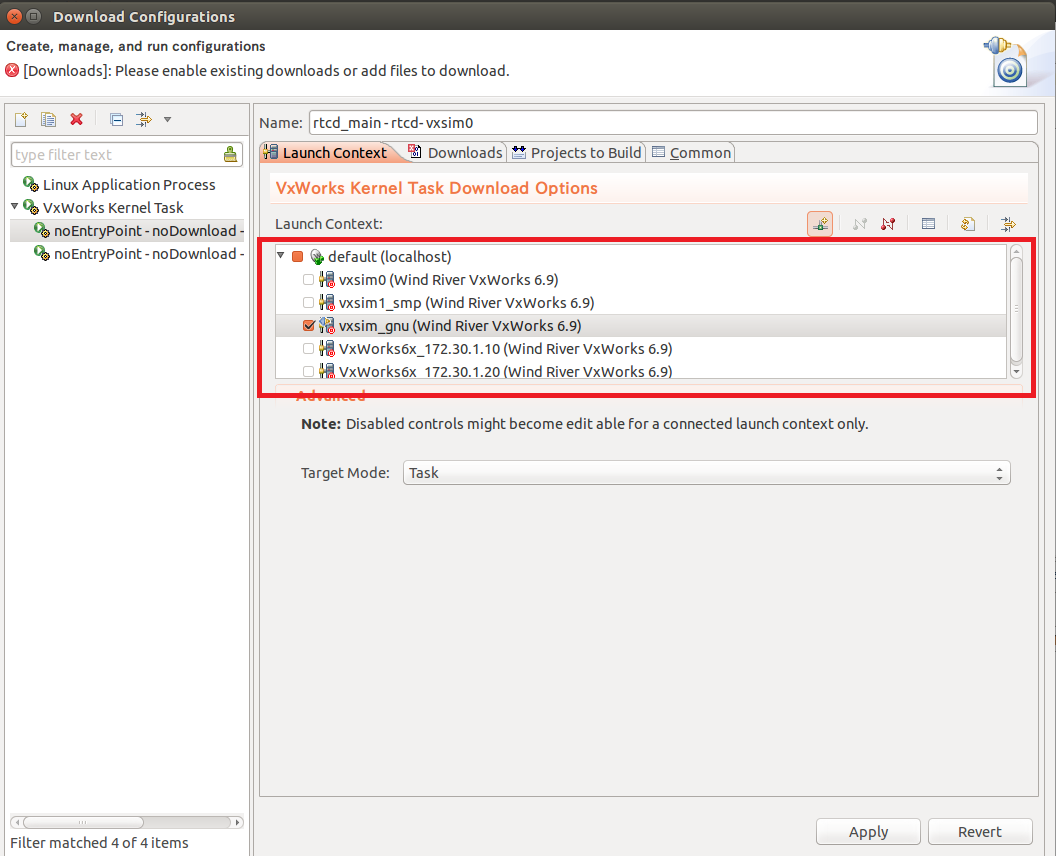
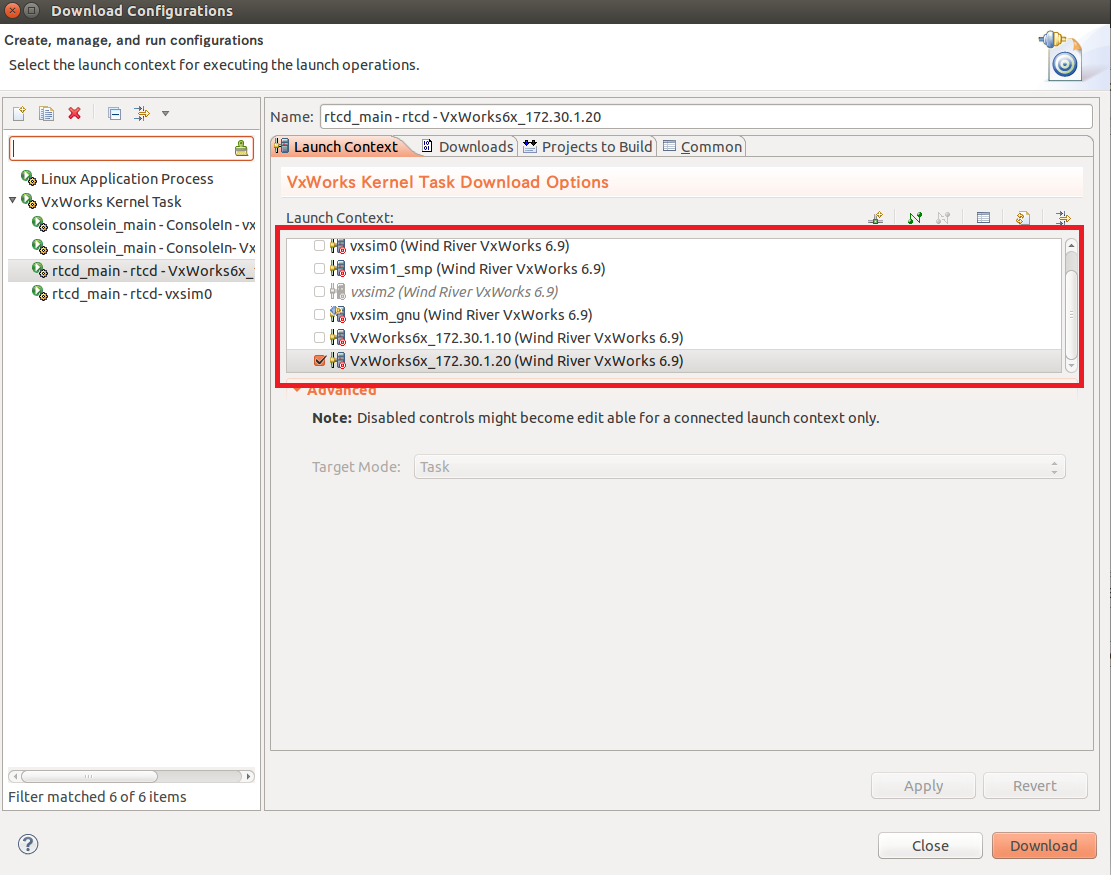
From the Launch Context tab of the Download Configurations window, select the simulator for the system to be downloaded.
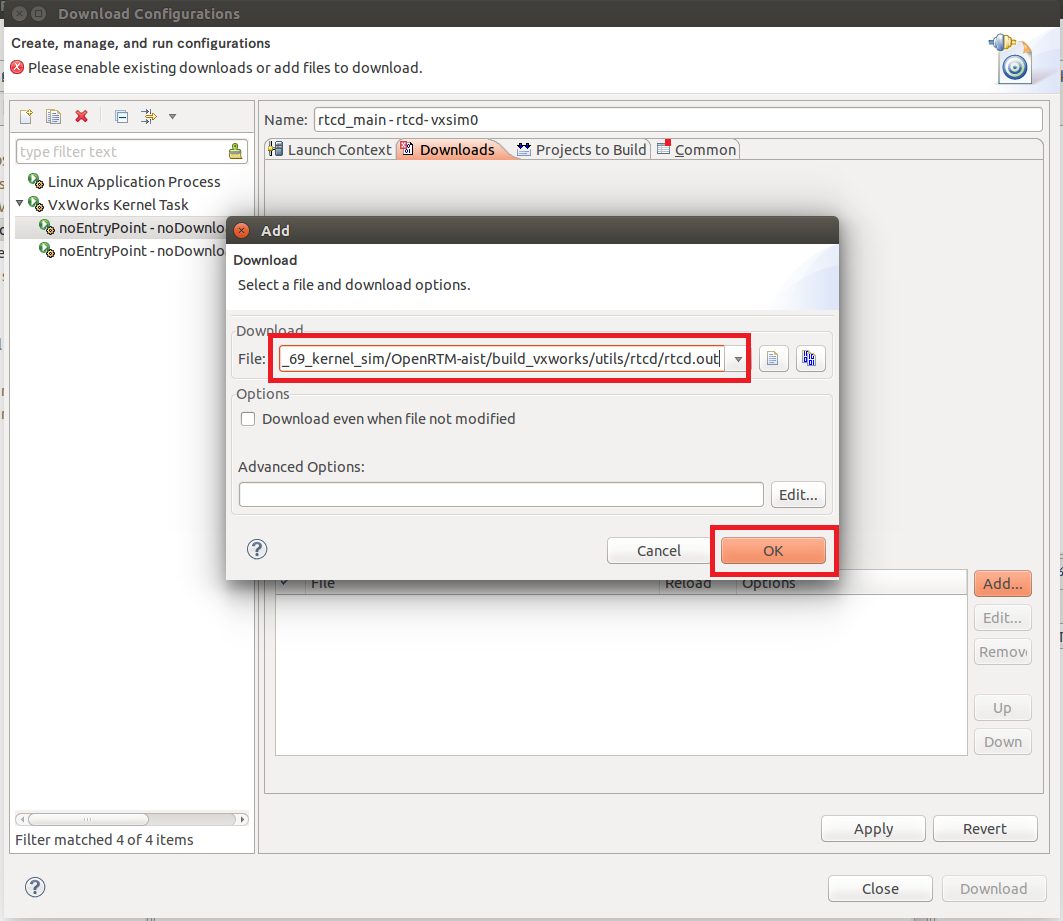
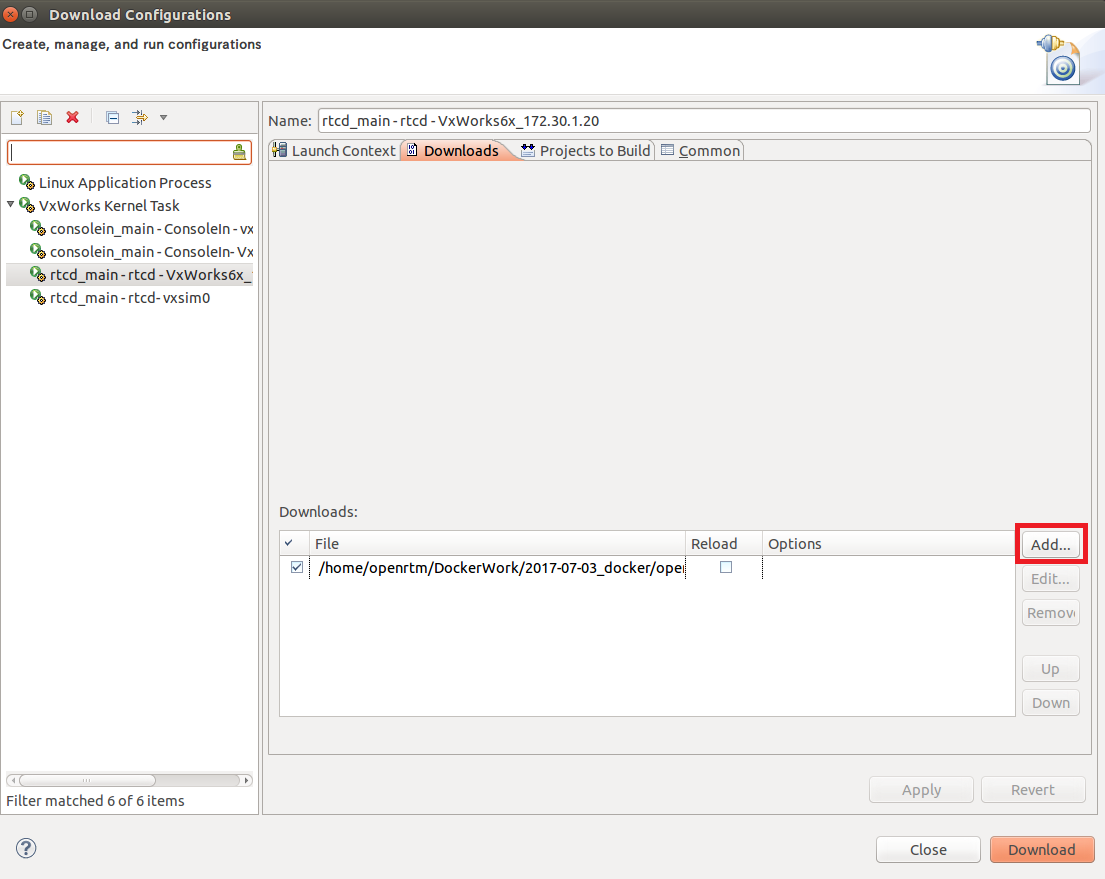
Set the module to download from the Downloads tab. Click the [Add] button.
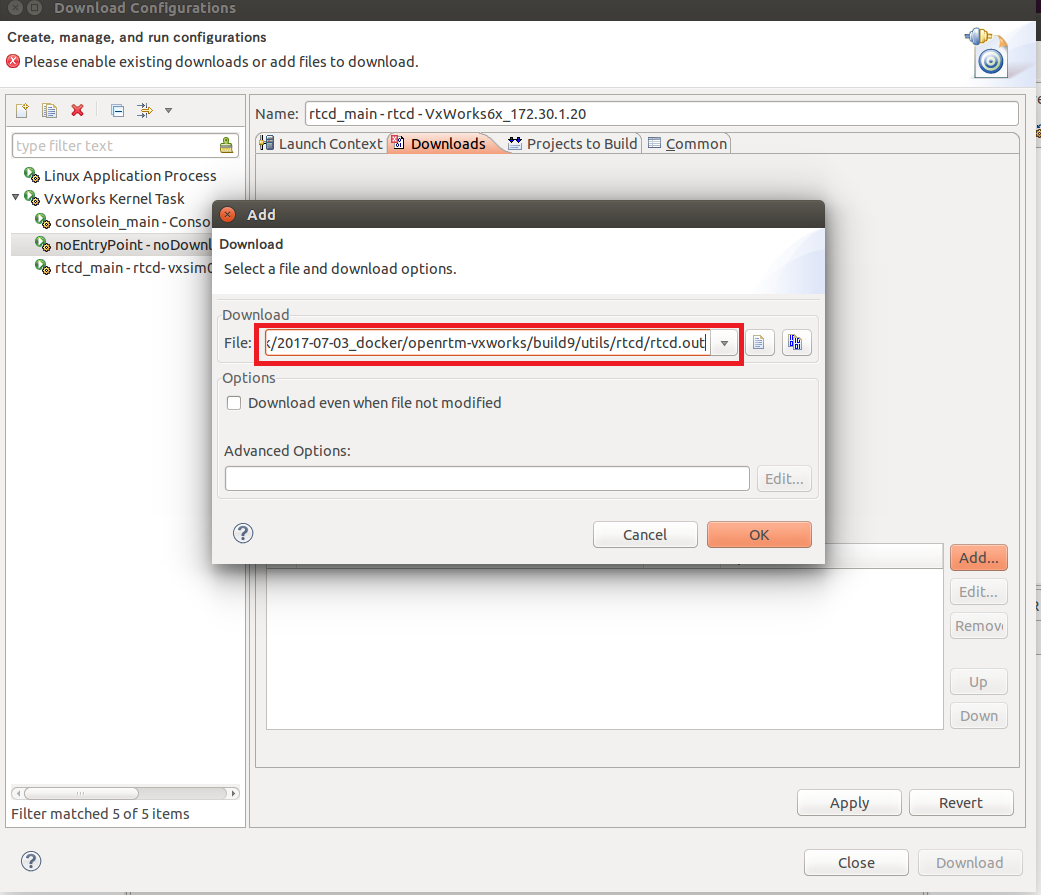
After setting the path of rtcd.out in the Add window, click the [OK] button. rtcd.out is generated under utils/rtcd in the OpenRTM-aist build directory.
- Example:/home/openrtm/OpenRTM-aist/build_vxworks/utils/rtcd/rtcd.out
Click the [Download] button to start the download.
Please also download the RTC kernel module to be started in the same procedure.
- Example(ConsoleIn):/home/openrtm/OpenRTM-aist/build_vxworks/examples/SimpleIO/ConsoleIn.out
- Example(ConsoleOut):/home/openrtm/OpenRTM-aist/build_vxworks/examples/SimpleIO/ConsoleOut.out
(G)RTC execution
(G)Launch Name Server
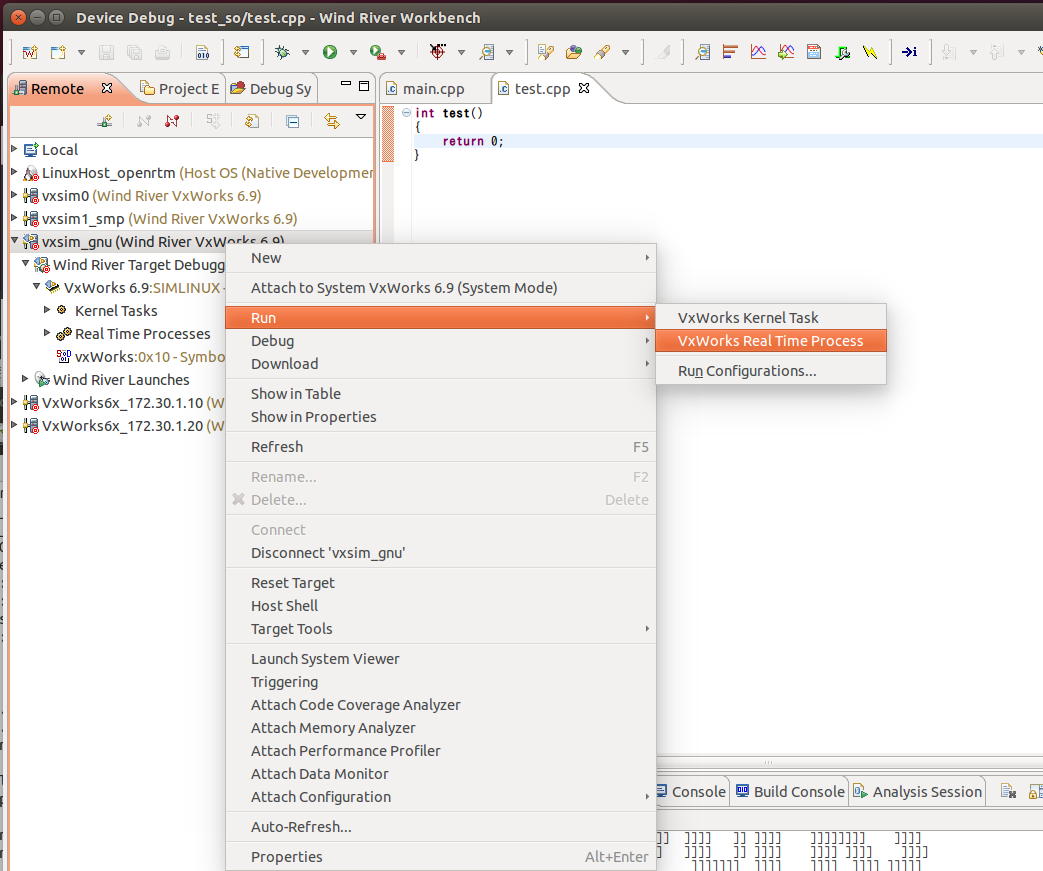
Start the name server on the VxWorks simulator. Since the name server starts up as a real time process (RTP), right click on the simulator from Remote Systems and click Run → VxWorks Real Time Process.
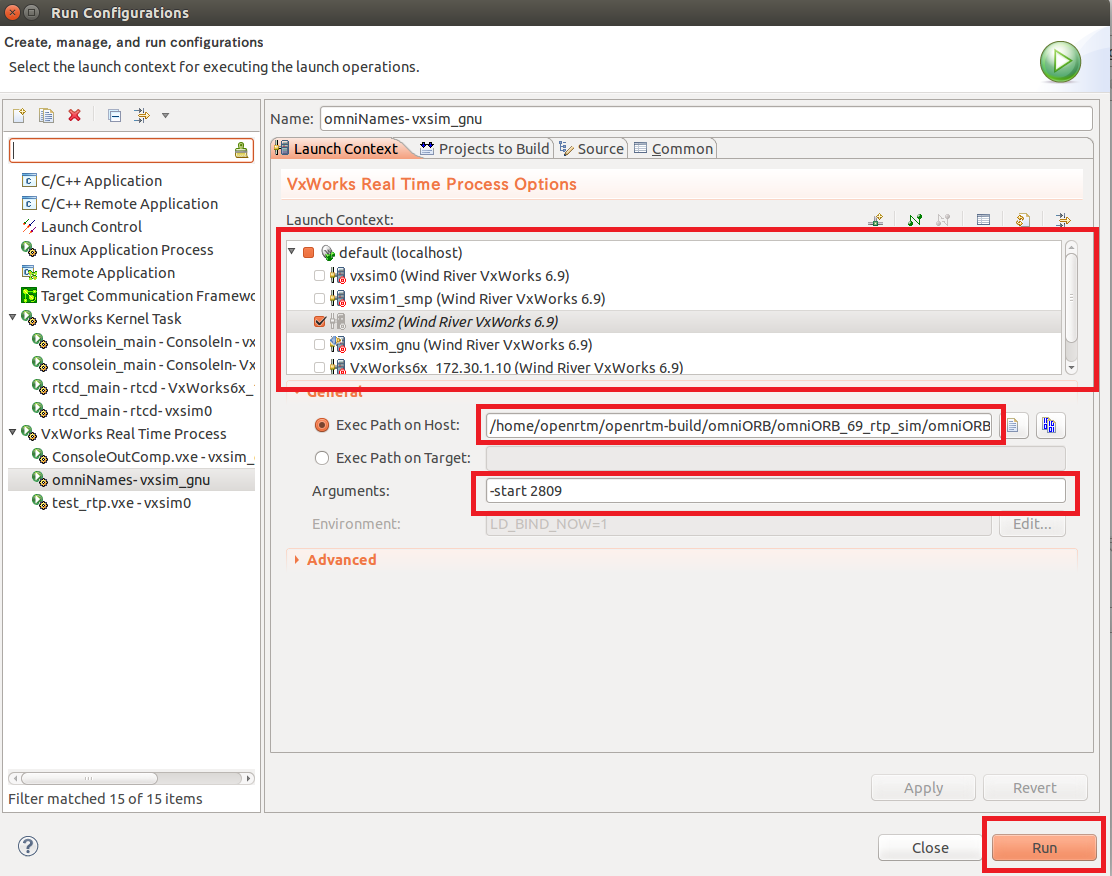
Please make various settings from the Launch Context tab of the Run Configurations window.
- Set up the system to run as a simulator
- Path setting for omniNames.out
- Setting command line arguments
omniNames.out is generated in RTP build directory of omniORB. Because it is not generated in the build directory of the kernel module, omniORB should also build about RTP. If libc.so.1 does not exist in the path of the shared library, you will get an error, please copy it from the Workbench to the omniNames.out directory.
cp $WIND_BASE/target/lib/usr/root/SIMPENTIUMgnu/bin/libc.so.1 /home/openrtm/omniORB-4.2.2/bin/simpentium_vxWorks_RTP_6.9/
If you can not build RTP, do not start the name server in VxWorks, but register RTC on the name server on Ubuntu.
- Example:/home/openrtm/omniORB-4.2.2/bin/simpentium_vxWorks_RTP_6.9/omniNames.out
Arguments is the port number of the name server.
- Example:-start 2809
After setting is completed, click the [Run] button to start the name server.
(G)Manager start
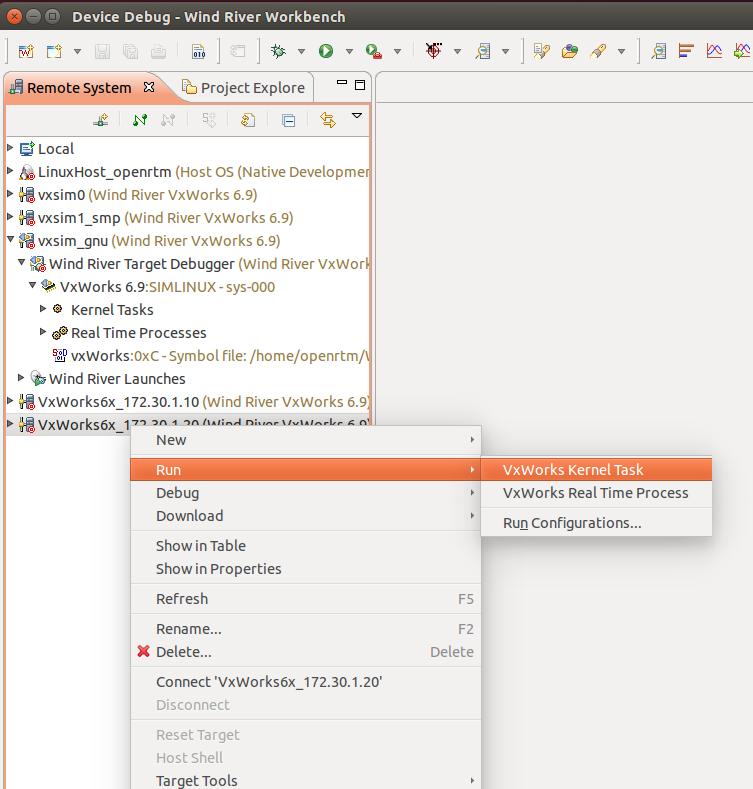
In the Workbench Remote System, right click on the simulator and select Run → VxWorks Kernel Task.
Perform various settings in the Run Configurations window. Please enter rtcd_main for Entry Point. Please set "-o manager.shutdown_on_nortcs:NO - o manager.shutdown_auto: NO" to Arguments. Press the [Run] button to start the manager.
To start Ubuntu side name server, add - o corba.nameservers:192.168.200.254 to Arguments. Please check the IP address of Ubuntu's tap 0 interface as appropriate.
(G)Starting RTC
It starts up in the same procedure as starting manager. For Entry Point, specify a function to start RTC.
- Example(ConsoleIn):consolein_main
- Example(ConsoleOut):consoleout_main
You do not need to enter anything in Arguments.
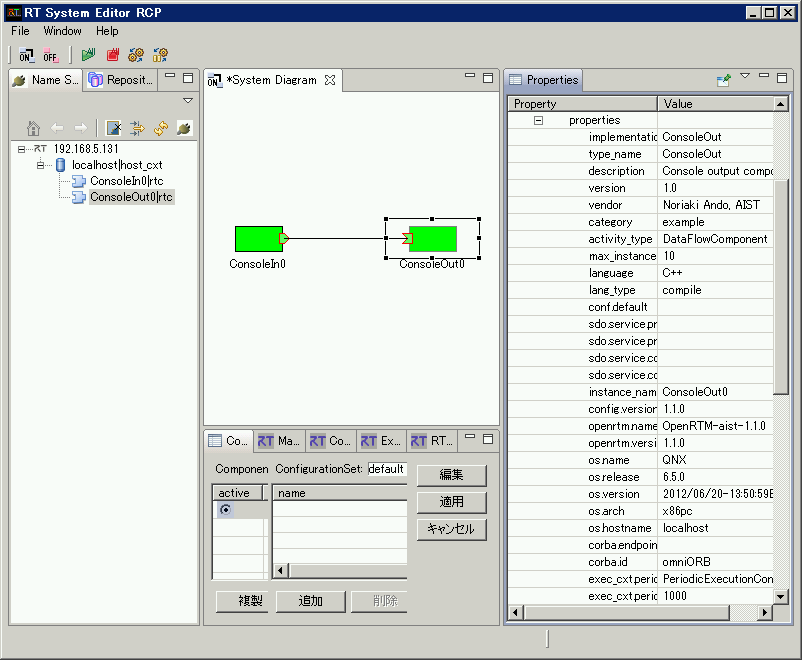
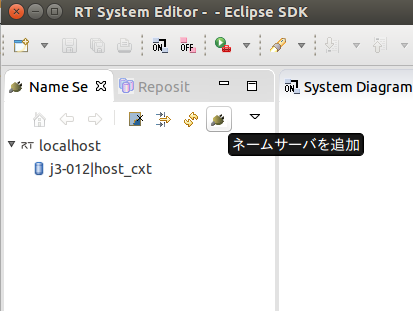
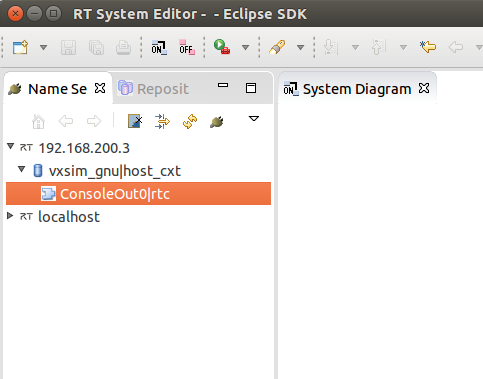
Please check if RTC started in RT system editor started by Ubuntu. To the VxWorks name server, click the name service connection button, specify the IP address in the displayed window and click OK to connect.
Please check if the RTC started is registered.
Procedures such as RTC connection, activation, etc. are the same as when checking operation with Ubuntu.
(G)On command line operation
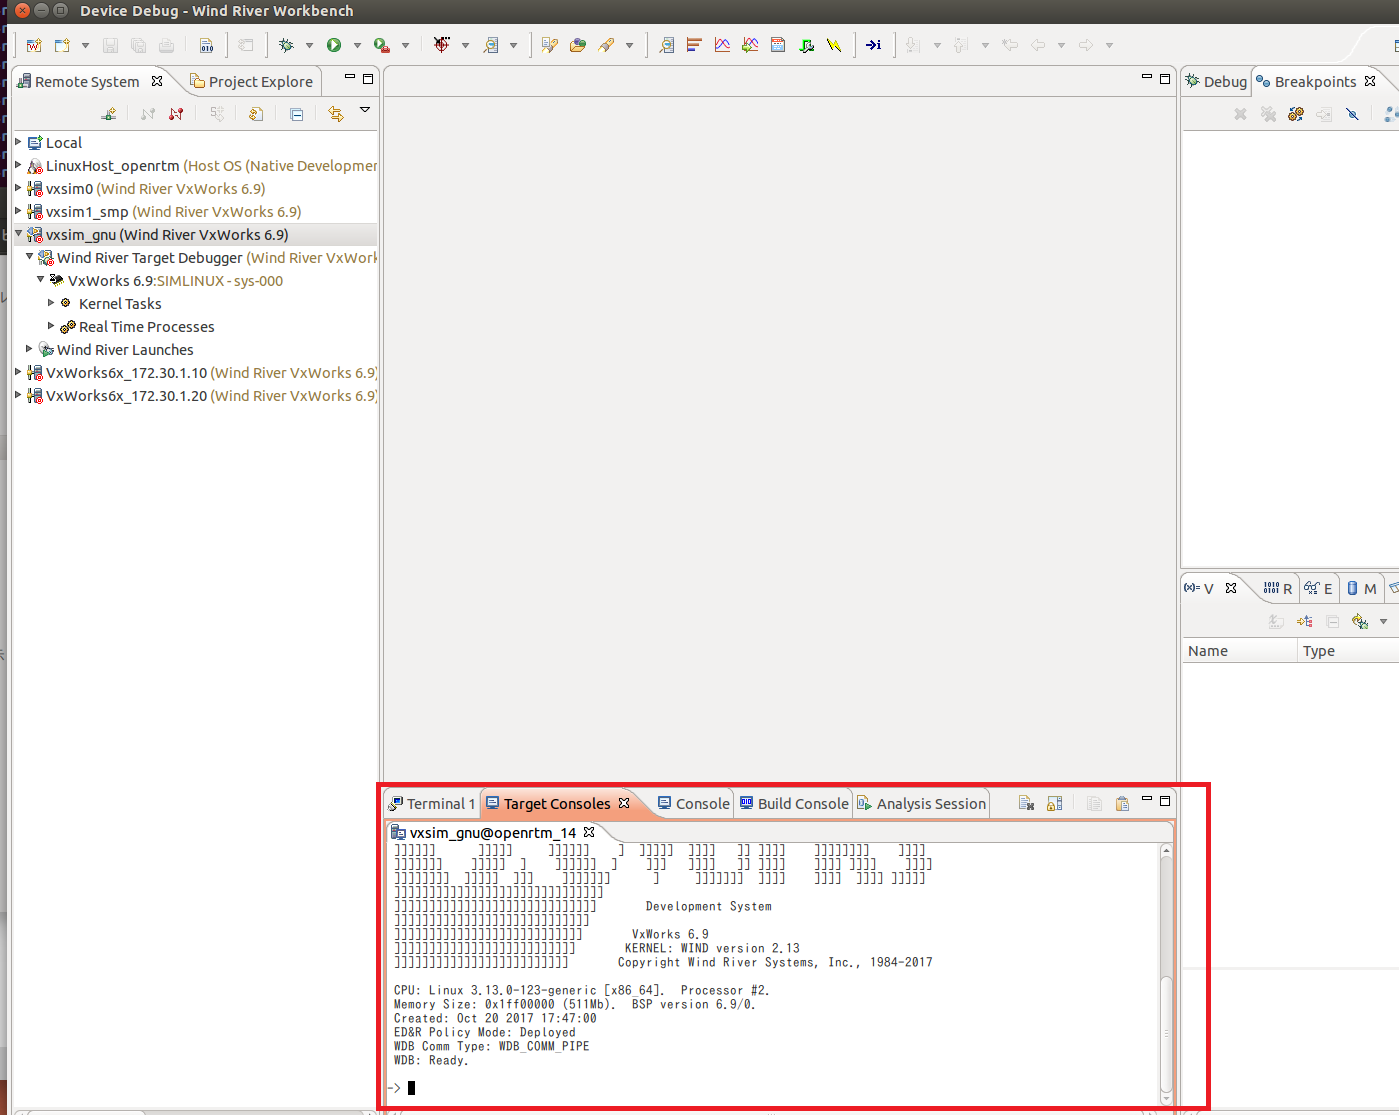
After connecting the simulator, you can enter commands from the Target Console window.
The operation of RTC can be confirmed with the following command. Please change the path of Workbench, omniORB, openRTM-aist accordingly.
 cd "/home/openrtm/openrtm-build/omniORB/omniORB_69_rtp_sim/omniORB-4.2.2/bin/simpentium_vxWorks_RTP_6.9"
 cp "/home/openrtm/WindRiver/vxworks-6.9/target/lib/usr/root/SIMPENTIUMgnu/bin/libc.so.1","./"
 rtpSp "./omniNames.out -start 2809"

 cd "/home/openrtm/openrtm-build/OpenRTM/OpenRTM_69_kernel_sim/OpenRTM-aist/build_vxworks/utils/rtcd"
 ld<rtcd.out
 cd "/home/openrtm/openrtm-build/OpenRTM/OpenRTM_69_kernel_sim/OpenRTM-aist/build_vxworks/examples/SimpleIO"
 ld<ConsoleIn.out

 taskSpawn "rtcd_main",100,67108864,1000000,rtcd_main,"-o","manager.shutdown_on_nortcs:NO","-o","manager.shutdown_auto:NO"
 taskSpawn "consolein_main",100,0,1000000,consolein_main
Setting up VxWorks simulator
This page explains the settings of the VxWorks simulator running on Wind River Workbench.
(G)Add simulator
Workbench The default simulator is the linux_diab simulator. Since OpenRTM-aist uses the gnu compiler, you need to use the linux_gnu simulator.
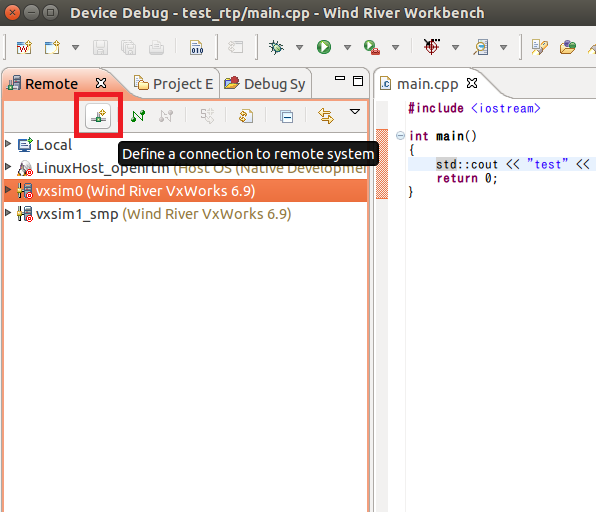
Please press the [Define a connection to remote system] button and add the simulator.
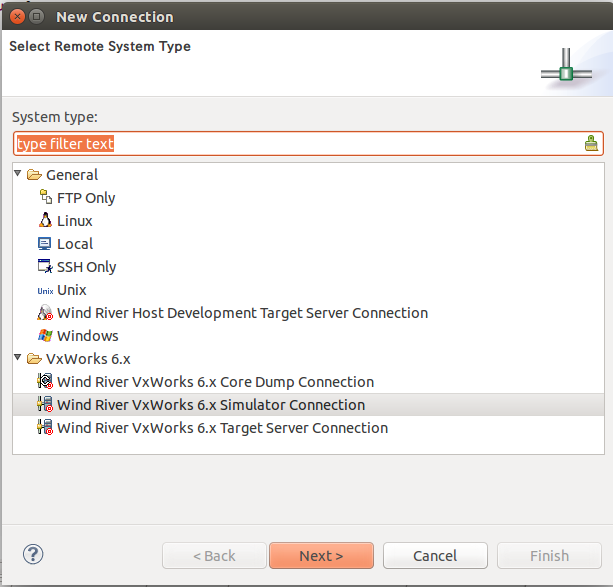
Select Wind River VxWorks 6.x Simulator Connection on the Select Remote System Type in the New Connection window and proceed to the next.
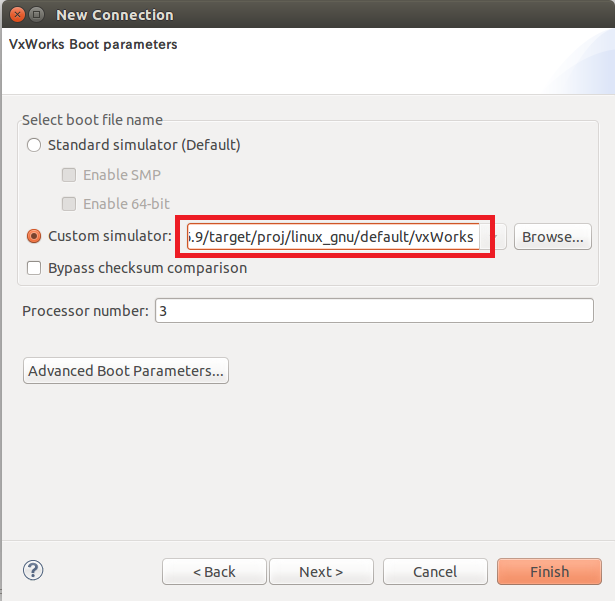
In VxWorks Boot parameters, specify linux_gnu simulator in Custom simulator.
- Example:/home/openrtm/WindRiver/vxworks-6.9/target/proj/linux_gnu/default/vxWorks
After going to Network Options, set the network to Full Network and set the IP address. Click the [Finish] button to create a simulator.
(G)Starting network interface
Launch the network interface for the simulator. Execute the following command.
sudo ${WIND_BASE}/host/${WIND_HOST_TYPE}/bin/vxsimnetdA network interface called tap0 will be added.
To use the name server started on Ubuntu side, restart the name server with the following command.
sudo rtm-naming
OpenRTM-aist operation confirmation (VxWorks, RTP, when using a simulator)
This page explains the procedure for checking the operation of RTC real-time process (RTP) built for VxWorks using the Workbench simulator.
(G)Setting up the simulator
Follow the procedure below to set up the simulator.
(G)Simulator connection
After selecting the simulator with Workbench Remote System, press connect 'xxxxx' button to connect with the simulator.
(G)RTC execution
(G)Launch Name Server
Start the name server on the VxWorks simulator. Since the name server starts up as a real time process (RTP), right click on the simulator from Remote Systems and click Run → VxWorks Real Time Process.
Please make various settings from the Launch Context tab of the Run Configurations window.
- Set up the system to run as a simulator
- Path setting for omniNames.out
- Setting command line arguments
omniNames.out is generated in the omniORB build directory. If libc.so. does not exist in the path of the shared library, you will get an error, please copy it from the Workbench to the omniNames.out directory.
cp $WIND_BASE/target/lib/usr/root/SIMPENTIUMgnu/bin/libc.so.1 /home/openrtm/omniORB-4.2.2/bin/simpentium_vxWorks_RTP_6.9/
If you can not build RTP, do not start the name server in VxWorks, but register RTC on the name server on Ubuntu.
- Example:/home/openrtm/omniORB-4.2.2/bin/simpentium_vxWorks_RTP_6.9/omniNames.out
Arguments is the port number of the name server.
- Example:-start 2809
After setting is completed, click the [Run] button to start the name server.
(G)Starting RTC
Run rtcd.vxe in the same procedure as starting name server. rtcd.vxe is generated under utils / rtcd in the OpenRTM-aist build directory.
- Example(ConsoleIn):/home/openrtm/OpenRTM-aist/build_vxworks/examples/SimpleIO/ConsoleIn.vxe
- Example(ConsoleOut):/home/openrtm/OpenRTM-aist/build_vxworks/examples/SimpleIO/ConsoleOut.vxe
You do not need to enter anything in Arguments, but add - o corba.nameservers:192.168.200.254 to Arguments to start Ubuntu side name server. Please check the IP address of Ubuntu's tap 0 interface as appropriate.
Please check if RTC started in RT system editor started by Ubuntu. To the VxWorks name server, click the name service connection button, specify the IP address in the displayed window and click OK to connect.
Please check if the RTC started is registered.
Procedures such as RTC connection, activation, etc. are the same as when checking operation with Ubuntu.
(G)On command line operation
After connecting the simulator, you can enter commands from the Target Console window.
The operation of RTC can be confirmed with the following command. Please change the path of Workbench, omniORB, openRTM-aist accordingly.
 cd "/home/openrtm/openrtm-build/omniORB/omniORB_69_rtp_sim/omniORB-4.2.2/bin/simpentium_vxWorks_RTP_6.9"
 cp "/home/openrtm/WindRiver/vxworks-6.9/target/lib/usr/root/SIMPENTIUMgnu/bin/libc.so.1","./"
 rtpSp "./omniNames.out -start 2809"

 cd "/home/openrtm/openrtm-build/OpenRTM/OpenRTM_69_rtp_sim/OpenRTM-aist/build_vxworks/examples/SimpleIO"
 cp "/home/openrtm/WindRiver/vxworks-6.9/target/lib/usr/root/SIMPENTIUMgnu/bin/libc.so.1","./"
 rtpSp "./ConsoleOutComp.vxe"
OpenRTM-aist operation confirmation (in the case of using VxWorks, kernel module, PowerPC board)
This page explains the procedure to check the operation of the RTC kernel module built for VxWorks on the PowerPC board.
(G)Connection between Workbench and VxWorks
Please generate a connection between Workbench and VxWorks as follows.
After selecting the target server with Workbench Remote System, press connect 'xxxxx' button to connect to VxWorks.
(G)Loading kernel modules
In the Workbench Remote System, right-click the target server and select Download → VxWorks Kernel Task.
From the Launch Context tab of the Download Configurations window, select the target server for the system to be downloaded.
Set the module to download from the Downloads tab. Click the [Add] button.
After setting the path of rtcd.out in the Add window, click the [OK] button. rtcd.out is generated under utils/rtcd in the OpenRTM-aist build directory.
- Example:/home/openrtm/OpenRTM-aist/build_vxworks/utils/rtcd/rtcd.out
Click the [Download] button to start the download.
Please also download the RTC kernel module to be started in the same procedure.
- Example(ConsoleIn):/home/openrtm/OpenRTM-aist/build_vxworks/examples/SimpleIO/ConsoleIn.out
- Example(ConsoleOut):/home/openrtm/OpenRTM-aist/build_vxworks/examples/SimpleIO/ConsoleOut.out
(G)RTC execution
(G)Manager start
In the Workbench Remote System, right-click the target server and select Run → VxWorks Kernel Task.
Perform various settings in the Run Configurations window. Please enter rtcd_main for Entry Point. - o manager.shutdown_on_nortcs:NO - o manager.shutdown_auto: NO - o corba.nameservers: 172.30.1.1 for Arguments. Since name servers do not start on VxWorks, register RTC on the name server on Ubuntu. When using ORBexpress please also add endpoint setting corba.endpoints: 172.30.1.20: 1234. Press the [Run] button to start the manager. Change the IP address as appropriate.
(G)Starting RTC
It starts up in the same procedure as starting manager. For Entry Point, specify a function to start RTC.
- Example(ConsoleIn):consolein_main
- Example(ConsoleOut):consoleout_main
You do not need to enter anything in Arguments. Please check if RTC started in RT system editor started by Ubuntu.
Please check if the RTC started is registered.
Procedures such as RTC connection, activation, etc. are the same as when checking operation with Ubuntu.
However, when using ORBexpress, you need to set the endian to big when connecting data port connectors.
(G)On command line operation
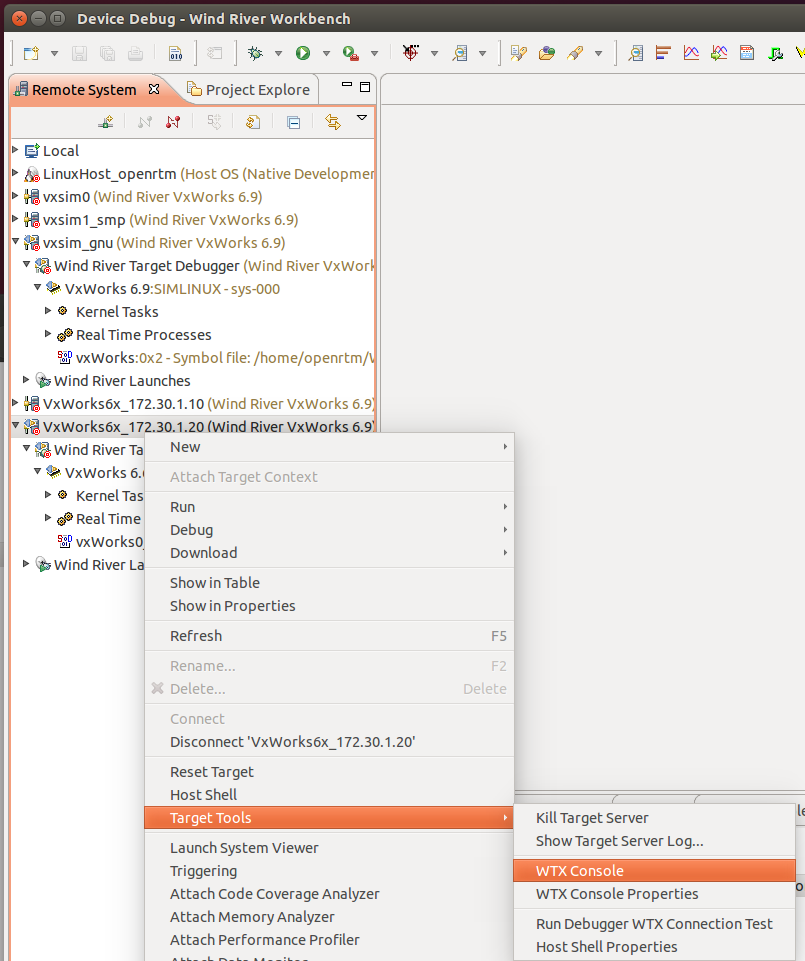
You can enter commands from the WTX Console window after connecting to the target server.
The operation of RTC can be confirmed with the following command. Change the path of Workbench, omniORB, openRTM-aist, IP address of Ubuntu accordingly.
 cd "/home/openrtm/openrtm-build/OpenRTM/OpenRTM_69_kernel_sim/OpenRTM-aist/build_vxworks/utils/rtcd"
 ld<rtcd.out
 cd "/home/openrtm/openrtm-build/OpenRTM/OpenRTM_69_kernel_sim/OpenRTM-aist/build_vxworks/examples/SimpleIO"
 ld<ConsoleIn.out

 taskSpawn "rtcd_main",100,67108864,1000000,rtcd_main,"-o","manager.shutdown_on_nortcs:NO","-o","manager.shutdown_auto:NO","-o","corba.nameservers:172.30.1.1"
 taskSpawn "consolein_main",100,0,1000000,consolein_main
Building from source in Windows
If you want to use the OpenRTM-aist itself after adding it in Windows, you can build the source package for Windows yourself. This section explains how to acquire the source from the download page or repository and build OpenRTM-aist on Windows.
Various knowledge on Windows such as setting up environment and building installer is required for build of OpenRTM-aist. Reader for this document is programmers who have basic knowledge for software development and building installer on Windows.
Source code for Windows
The source package for Windows is distributed separately from the source package for Linux. Although the actual source code is the same, the Windows source package contains the following:
- Shift-JIS character encoding (Linux uses EUC).
- A Visual Studio solution.
- Visual C++ project files.
- An environment to create an MSI installer package.
Source code organisation
As shown in the diagram, the original source code is contained in a Subversion repository. From this, on Linux the following packages are created:
- Linux/Unix source code distribution package.
- Windows source code distribution package.
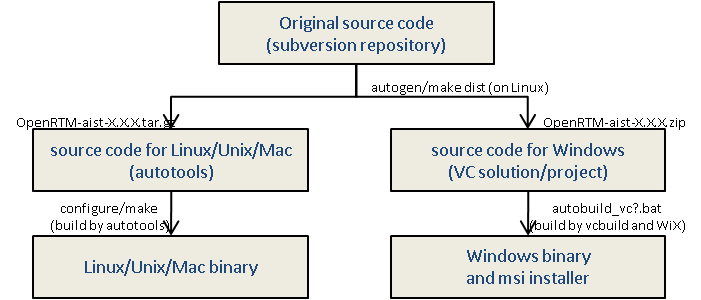 OpenRTM-aist source code organisation
To use source obtained from the repository on Windows, you must first make a source package in Linux.
Build environment
The following environments and tools are necessary:
- Visual C++ (or Visual C++ Express Edition)
- omniORB
Visual C++/Visual Studio
In order to build the binary for Windows, the Visual C++ development environment is necessary. Currently supported Visual C++ is Visual C++ 2008, 2010, 2012, 2012, 2013.
Visual C ++ Express Edition is a C++ development environment provided free of charge by Microsoft and MFC and ATL can not be used, but you can develop Windows applications (Win32 applications). Even in component development using OpenRTM-aist, components that do not use MFC, ATL, etc. can be developed only with Visual C++ Express Edition. Please download and install the ISO image from the link below, obtain the Microsoft Live ID and obtain the license (free).
omniORB
To build OpenRTM-aist, you need a library of omniORB 4.1.7 (as of March 31, 31/31). Prepared binary packages provided by openrtm.org are provided at the following link. Please download the appropriate one according to the environment and deploy it to the appropriate place (assuming C: \ distribution \ omniORB in the following).
Environment variable: OMNI_ROOT
The OMNI_ROOT environment variable must be set. The directory structure of the location this points to must be as follows.
 <OMNI_ROOT>
  + bin
  |  + scripts
  |  + x86_win32
  + idl
  |  + COS
  + include
  |  + COS
  |  + omniORB4
  |  |  + internal
  |  + omnithread
  |  + omniVms
  + lib
  |  + python
  |  |  + omniidl
  |  |  + omniidl_be
  |  |     + cxx
  |  |        + dynskel
  |  |        + header
  |  |        + impl
  |  |        + skel
  |  + x86_win32
WiX
1.1.1-RELEASE version does not maintain installer creation code included in source.
WiX (Windows Installer XML) is an open source project aiming to create Windows msi installer with command line based tools.
OpenRTM-aist creates an installer for Windows using WiX. Please install WiX beforehand when creating up to the installer.
Python
Python 2.7 is required because some Python scripts are used during the build. Please obtain the latest version from the following site and install it.
When launching the installer, there are some parts to select in the wizard, You can install by default.
Downloading a source package
Download an appropriate source package, named similar to OpenRTM-aist-X.X.X-win32.zip, and extract it to a suitable location.
Fix batch file
The top of build.bat has the following part. Please check whether these are set to appropriate values respectively.
For the setting of ARCH and VC_VERSION, see the description in this batch file.
 set RTM_ROOT=%~dp0
 set COIL_ROOT=%RTM_ROOT%\coil
 set OMNI_ROOT=C:\distribution\omniORB-4.1.7-win64-vc12
 if not DEFINED ARCH       set ARCH=x86_64
 if not DEFINED VC_VERSION set VC_VERSION=12
 if not DEFINED PYTHON_DIR set PYTHON_DIR=C:\Python27_x64
Build
Once your environment has been set up as above, you can build OpenRTM-aist. Execute autobuild_vc8.bat (for VC2005) or autobuild_vc9.bat (for VC2008), and the build should automatically start.
You can also build from a solution file. Open the OpenRTM-aist_vc8.sln (for VC2005) or OpenRTM-aist_vc9.sln (for VC2008) and build it.
Installing
Once everything has built successfully, install it using the following procedure.
- Set the RTM_ROOT environment variable to the OpenRTM-aist directory.
- Copy the DLL files into a directory included in the PATH environment variable. Alternatively, add %RTM_ROOT%\bin to the PATH environment variable.
- Adding %RTM_ROOT%\utils\rtc-template to the PATH environment variable is also recommended.
This completes the installation of OpenRTM-aist.
Building from source in Linux
You can compile from the source if you want to change the UNIX environment, package, cross development environment, OpenRTM-aist main source and use it. This section explains how to obtain the source from the download page or repository and build OpenRTM-aist on Linux.
Building the source
The C++ edition of OpenRTM-aist uses autotools for its build environment, allowing it to be built in a variety of environments.
Supported operating systems and distributions
OpenRTM-aist has been tested and confirmed to work on the following distributions.
- FreeBSD
- Vine Linux
- Fedora
- Debian
- Ubuntu
It should be possible to build and use OpenRTM-aist on other versions of Linux/UNIX.
Dependencies
OpenRTM-aist-1.0.0 depends on the folloowing environmental tools and libraries.
- gcc/g++ version 3 or later (for compiling).
- omniORB-4.x or later (needed to build).
- omniORB-4.0.6 contains bugs; we do not recommend using this version.
- uuid library: libuuid (for distributions that do not provide a uuid-generation function by default).
- Python: Needed for several build tools.
- PyYAML.
Install these dependencies according to their individual documentations. Installing them into standard locations such as /usr and /usr/local will make compiling OpenRTM-aist easier.
Download the source
Download the OpenRTM-aist source code from the download page.
Extract the source
Extract the source code from the OpenRTM-aist-X.X.X.tar.gz file into a suitable location.
 $ tar xvzf OpenRTM-aist-X.X.X.tar.gz
 $ cd OpenRTM-aist-X.X.X
Build
OpenRTM-aist uses autotools for building. As with any autotools package, use autoconf and automake to prepare for building.
$ ./configure --prefix=/usr [options]
The usable options are listed in the help:
$ ./configure --help
make
Confirm that configure has completed successfully. Once it has, issue the make command.
$ make
When the make command has completed without any errors, the header files, libraries, utilities, etc. can be installed.
 $  su
 # make install
This completes the build and installation procedure.
Building from the repository
The OpenRTM-aist source code is stored in a publicly-available Subversion repository. This source code can be checked out and built.
Necessary tools
The source in the repository does not include a configure script or any Makefile.in files. These must be generated using the following tools.
- automake
- libtool
- autoconf
Since tools such as etc are necessary, it installs in advance. Ubuntu and others can use these bulk installation script mentioned above when installing these necessary tools.
By running pkg_install_ubuntu.sh in Ubuntu as follows, you can install tools for developers who develop the OpenRTM-aist body (including automake etc.) at once.
# pkg_install_ubuntu.sh -l c++ -c
Checkout the source
Checkout the source from the repository as below.
 $ svn co http://www.openrtp.jp/openrtm/svn/OpenRTM-aist/trunk/OpenRTM-aist
 A    OpenRTM-aist/include
 A    OpenRTM-aist/include/rtm
 A    OpenRTM-aist/AUTHORS
 A    OpenRTM-aist/src
 A    OpenRTM-aist/src/ext
 A    OpenRTM-aist/src/ext/artlinux
 ...
 A    OpenRTM-aist/examples/Templates/PanTilt.xml
 A    OpenRTM-aist/INSTALL.jp
  U   OpenRTM-aist
 Checked out revision 2009.
Execute autogen.sh
Enter the directory created during the checkout procedure.
 $ ls
 OpenRTM-aist
 $ cd OpenRTM-aist
 $ ls
 AUTHORS         Makefile.am     acinclude.m4    examples/       win32/
 COPYING.LIB     NEWS            build/          include/
 COPYRIGHT*      README          configure.ac    openrtm.m4
 ChangeLog       README.jp       docs/           src/
 INSTALL.jp      TUTORIAL.jp     etc/            utils/
There is a shell script named "autogen" in the build directory. Execute this script. Execution may take several minutes.
 $ls build/autogen
 build/autogen*
 $ sh build/autogen

 Setting up environment to generate configure script.

 ------------------------------------------------------------
  Searching Autotools
 ------------------------------------------------------------
 autoconf   was found in /usr/local/bin/autoconf.
 autoheader was found in /usr/local/bin/autoheader.
 autom4te   was found in /usr/local/bin/autom4te.
 autoreconf was found in /usr/local/bin/autoreconf.
 autoupdate was found in /usr/local/bin/autoupdates.
 automake   was found in /usr/local/bin/automake-1.9.
 aclocal    was found in /usr/local/bin/aclocal-1.9.
 libtool    was found in /usr/local/bin/libtool.
 libtoolize was found in /usr/local/bin/libtoolize.


 ------------------------------------------------------------
  Searching libtool.m4
 ------------------------------------------------------------
 file was found: /usr/local/share/aclocal/libtool.m4

  Copying libtool.m4 from /usr/local/share/aclocal/libtool.m4

 ------------------------------------------------------------
  Doing autoreconf
 ------------------------------------------------------------
 autoreconf-2.62: Entering directory `.'
 autoreconf-2.62: configure.ac: not using Gettext
 autoreconf-2.62: running: /usr/local/bin/aclocal-1.9 --force
 autoreconf-2.62: configure.ac: tracing
 autoreconf-2.62: configure.ac: adding subdirectory src/lib/coil to autoreconf
 autoreconf-2.62: Entering directory `src/lib/coil'
 autoreconf-2.62: running: /usr/local/bin/libtoolize --copy --force
 You should update your `aclocal.m4' by running aclocal.
 autoreconf-2.62: running: /usr/local/bin/autoconf --force
 autoreconf-2.62: running: /usr/local/bin/autoheader --force
 autoreconf-2.62: running: /usr/local/bin/automake-1.9 --add-missing --copy --force-missing
 configure.ac: installing `./install-sh'
 configure.ac: installing `./missing'
 ace/coil/Makefile.am: installing `./depcomp'
 Makefile.am: installing `./INSTALL'
 autoreconf-2.62: Leaving directory `src/lib/coil'
 You should update your `aclocal.m4' by running aclocal.
 configure.ac: installing `./install-sh'
 configure.ac: installing `./missing'
 examples/AutoTest/Makefile.am: installing `./depcomp'
 Makefile.am: installing `./INSTALL'
 autoreconf-2.62: Leaving directory `.'
 done
 $
Configure and build
The autogen script will create a configure script in the OpenRTM-aist directory. Execute this script and run the make command to build the source.
 $ ls -l configure
 -rwxr-xr-x  1 n-ando  n-ando  812893 Jul  6 05:56 configure*
 $ ./configure --prefix=/usr
 $ make
Making a distributable source package
The "make dist" command can be used to create a distributable source package, such as those provided by openrtm.org. This includes making a source package suitable for building on Windows. In order to make a distribution package, some additional tools are necessary, such as doxygen, latex, and qkc.
 $ make dist
 (Wait several minutes.)
 $ ls -l OpenRTM-aist*
 -rw-r--r--  1 n-ando  n-ando  9266837 Apr  7 09:53 OpenRTM-aist-1.0.0-win32.zip
 -rw-r--r--  1 n-ando  n-ando  4831099 Apr  7 09:53 OpenRTM-aist-1.0.0.tar.bz2
 -rw-r--r--  1 n-ando  n-ando  7258796 Apr  7 09:53 OpenRTM-aist-1.0.0.tar.gz
 $
The following source packages are created:
- OpenRTM-aist-1.0.0-win32.zip: Source code for Windows.
- OpenRTM-aist-1.0.0.tar.gz: Generic gzipped source.
- OpenRTM-aist-1.0.0.tar.bz2: Generic bzipped source.
Build from source (Windows version, runtime library /MT, /MTd specification)
(G)When developing an RTC with multithread (/MT) and multithreading debug (/MTd) specified in the runtime library in Visual Studio, if the executable file of /MT, /MTd links with another DLL and processes it, heap It may end abnormally due to destruction or the like. If you want to specify multithreading (/MT) and multithreading debugging (/MTd), create a static library of OpenRTM-aist as follows.
- Since I have not confirmed the operation confirmation almost, please do the following work at your own risk all.
Build OpenRTM-aist
(G)Obtaining OpenRTM-aist source code
Please obtain the OpenRTM-aist source code from the following.
Please download to appropriate place after downloading. In this example, place it in the following position.
C:\openrtm_work\OpenRTM-aist
(G)Obtain omniORB
Please obtain binary package of omniORB from the following. Please select the one appropriate for the version of Visual Studio.
After downloading, please create and expand a folder named omniORB in the OpenRTM-aist folder.
C:\openrtm_work\OpenRTM-aist\omniORB
(G)Editing various files
/MT, /MTd Edits various files for building.
(G)build.bat
Edit the following batch file called build.bat.
C:\openrtm_work\OpenRTM-aist\build.bat
Please change the following places as appropriate depending on the environment.
 set RTM_ROOT=%~dp0
 set COIL_ROOT=%RTM_ROOT%\coil
 set OMNI_ROOT=%RTM_ROOT%\omniORB
 if not DEFINED ARCH       set ARCH=x86
 if not DEFINED VC_VERSION set VC_VERSION=12
 if not DEFINED PYTHON_DIR set PYTHON_DIR=c:\python27
 if not DEFINED RTM_VERSION set RTM_VERSION=1.1.2
 if not DEFINED OMNI_VERSION  set OMNI_VERSION=4.1.7
 if not DEFINED OMNITHREAD_VERSION set OMNITHREAD_VERSION=3.4
(G)libRTC_vc**.vcxproj、libcoil_vc**.vcxproj、libRTCSkel_vc**.vcxproj
Edit the following libRTC_vc12.vcxproj, libcoil_vc12.vcxproj, libRTCSkel_vc12.vcxproj project file. Please edit libRTC_vc11.vcxproj, libcoil_vc11.vcxproj, libRTCSkel_vc11.vcxproj etc. according to the version of Visual Studio.
- C:\openrtm_work\OpenRTM-aist\rtm\libRTC_vc12.vcxproj
- C:\openrtm_work\OpenRTM-aist\rtm\libcoil_vc12.vcxproj
- C:\openrtm_work\OpenRTM-aist\rtm\idl\libRTCSkel_vc12.vcxproj
First, change the runtime library. Change MultiThreadedDebugDLL to MultiThreadedDebug as shown below. Whether editing is different depending on whether it is 32 bit or 64 bit, there is no problem even if both are changed.
<RuntimeLibrary>MultiThreadedDebugDLL</RuntimeLibrary>

<RuntimeLibrary>MultiThreadedDebug</RuntimeLibrary>
Likewise, change MultiThreadedDLL to MultiThreaded.
<RuntimeLibrary>MultiThreadedDLL</RuntimeLibrary>

<RuntimeLibrary>MultiThreaded</RuntimeLibrary>
Then change it to generate a static library instead of a dynamic library. Since libRTCSkel_vc12.vcxproj originally generates a static library, there is no need to change it.
Please change DynamicLibrary to StaticLibrary.
<ConfigurationType>DynamicLibrary</ConfigurationType>

<ConfigurationType>StaticLibrary</ConfigurationType>
Also change the output file name accordingly.
<OutputFile>$(OutDir)\RTC$(rtm_dllver).dll</OutputFile>

<OutputFile>$(OutDir)\RTC$(rtm_dllver).lib</OutputFile>
<OutputFile>$(OutDir)\RTC$(rtm_dllver)d.dll</OutputFile>

<OutputFile>$(OutDir)\RTC$(rtm_dllver)d.lib</OutputFile>
<OutputFile>$(OutDir)\coil$(coil_dllver).dll</OutputFile>

<OutputFile>$(OutDir)\coil$(coil_dllver).dll</OutputFile>
<OutputFile>$(OutDir)\coil$(coil_dllver)d.dll</OutputFile>

<OutputFile>$(OutDir)\coil$(coil_dllver)d.dll</OutputFile>
Also change the command to copy the file.
<Command>copy "$(OutDir)\\$(TargetName).lib" "$(SolutionDir)bin\\RTC$(rtm_dllver)d.lib"
copy "$(OutDir)\\RTC$(rtm_dllver)d.dll" "$(SolutionDir)bin\\"
</Command>

<Command>copy "$(OutDir)\\$(TargetName).lib" "$(SolutionDir)bin\\RTC$(rtm_dllver)d.lib"
</Command>
<Command>copy "$(OutDir)\\$(TargetName).lib" "$(SolutionDir)bin\\RTC$(rtm_dllver).lib"
copy "$(OutDir)\\RTC$(rtm_dllver).dll" "$(SolutionDir)bin\\"
</Command>

<Command>copy "$(OutDir)\\$(TargetName).lib" "$(SolutionDir)bin\\RTC$(rtm_dllver).lib"
;</Command>
<Command>copy "$(OutDir)\\$(TargetName).lib" "$(SolutionDir)bin\\coil$(coil_dllver)d.lib"
copy "$(OutDir)\\coil$(coil_dllver)d.dll" "$(SolutionDir)bin\\"
</Command>

<Command>copy "$(OutDir)\\$(TargetName).lib" "$(SolutionDir)bin\\coil$(coil_dllver)d.lib"
</Command>
<Command>copy "$(OutDir)\\$(TargetName).lib" "$(SolutionDir)bin\\coil$(coil_dllver).lib"
copy "$(OutDir)\\coil$(coil_dllver).dll" "$(SolutionDir)bin\\"
</Command>

<Command>copy "$(OutDir)\\$(TargetName).lib" "$(SolutionDir)bin\\coil$(coil_dllver).lib"
</Command>
Because errors occur in OpenRTM-aist-1.1.2 and omniORB-4.1.7, please add RTM_OMNIORB_41 to PreprocessorDefinitions of libRTC_vc12.vcxproj. It is unnecessary in OpenRTM-aist-1.2.0 or omniORB-4.2.1.
<PreprocessorDefinitions>LIBRARY_EXPORTS;WIN32;_DEBUG;_WINDOWS;_USRDLL;__WIN32__;__NT__;__OSVERSION__=4;__x86__;_WIN32_WINNT=0x0400;_CRT_SECURE_NO_DEPRECATE;%(PreprocessorDefinitions)</PreprocessorDefinitions>

<PreprocessorDefinitions>LIBRARY_EXPORTS;WIN32;_DEBUG;_WINDOWS;_USRDLL;__WIN32__;__NT__;__OSVERSION__=4;__x86__;_WIN32_WINNT=0x0400;_CRT_SECURE_NO_DEPRECATE;RTM_OMNIORB_41;%(PreprocessorDefinitions)</PreprocessorDefinitions>
(G)rtm_config.props
Change omniORB's linked library. Please edit the following file called rtm_config.props.
C:\openrtm_work\OpenRTM-aist\rtm_config.props
Change the following parts.
 <omni_lib>omniORB$(omni_dllver)_rt.lib;omniDynamic$(omni_dllver)_rt.lib;omnithread$(omnithread_dllver)_rt.lib</omni_lib>
 <omni_libd>omniORB$(omni_dllver)_rtd.lib;omniDynamic$(omni_dllver)_rtd.lib;omnithread$(omnithread_dllver)_rtd.lib</omni_libd>

 <omni_lib>omniORB4.lib;omniDynamic4.lib;omnithread.lib</omni_lib>
 <omni_libd>omniORB4d.lib;omniDynamic4d.lib;omnithreadd.lib</omni_libd>
(G)Build
When you start build.bat, it starts the build. When finished, check that the following files are generated in the bin folder.
- libRTCSkel.lib
- libRTCSkeld.lib
- coil112_vc12.lib
- coil112_vc12d.lib
- RTC112_vc12.lib
- RTC112_vc12d.lib
A lot of errors are generated by compiling sample components, rtcd, rtcprof, but ignore it as it is not necessary if you build your own RTC.
(G)Edit OpenRTMConfig.cmake
Because the library name to be linked by omniORB has changed and it is necessary to add a library to be newly linked, edit the following file.
- C:\openrtm_work\OpenRTM-aist\cmake\OpenRTMConfig.cmake
 set(OMNIORB_LIBRARIES optimized;omniORB417_rt;
                       optimized;omniDynamic417_rt;
                       optimized;omnithread34_rt;
                       debug;omniORB417_rtd;
                       debug;omniDynamic417_rtd;
                       debug;omnithread34_rtd)
 set(OMNIORB_LIBRARIES optimized;omniORB4;
                       optimized;omniDynamic4;
                       optimized;omnithread;
                       debug;omniORB4d;
                       debug;omniDynamic4d;
                       debug;omnithreadd)
set(OPENRTM_LIBRARIES optimized;RTC112_vc12;
optimized;coil112_vc12;
optimized;omniORB4_rt;
optimized;omniDynamic4_rt;
optimized;omnithread4_rt;
optimized;advapi32;
optimized;ws2_32;
optimized;mswsock;
debug;RTC112_vc12d;
debug;coil112_vc12d;
debug;omniORB4_rtd;
debug;omniDynamic4_rtd;
debug;omnithread4_rtd;
debug;advapi32;
debug;ws2_32;
debug;mswsock)
 set(OPENRTM_LIBRARIES optimized;RTC112_vc12;
                       optimized;coil112_vc12;
                       optimized;omniORB4;
                       optimized;omniDynamic4;
                       optimized;omnithread;
                       optimized;advapi32;
                       optimized;ws2_32;
                       optimized;mswsock;
                       optimized;libRTCSkel;
                       optimized;rpcrt4;
                       debug;RTC112_vc12d;
                       debug;coil112_vc12d;
                       debug;omniORB4d;
                       debug;omniDynamic4d;
                       debug;omnithreadd;
                       debug;advapi32;
                       debug;ws2_32;
                       debug;mswsock;
                       debug;libRTCSkeld;
                       debug;rpcrt4)
Please note that this file will be overwritten if you build OpenRTM - aist again.
(G)Build RTC
Next, set /MT, /MTd and edit the RTC file you want to build. Edit CMakeLists.txt in the src folder. By adding the following description, set the runtime library to /MT, /MTd.
 set(CMAKE_CXX_FLAGS_RELEASE "/MT")
 set(CMAKE_CXX_FLAGS_DEBUG "/MTd")
Next, set the OpenRTM-aist and omniORB to be used for the build to the one that was built previously and build RTC. From the command prompt, enter the following command to set the variable.
 set RTM_ROOT=C:\openrtm_work\OpenRTM-aist
 set VC_VERSION=12
 set OMNI_ROOT=C:\openrtm_work\OpenRTM-aist\omniORB
 set OpenRTM_DIR=C:\openrtm_work\OpenRTM-aist\cmake
Please change accordingly depending on the version of Visual Studio etc. Finally it is done by building with the following command.
 cmake .
 cmake --build . --config Debug
(G)On the cause of the error
If the /MT executable file is linked with some sort of DLL, the following error message may be displayed.
Expression: _pFirstBlock == pHead
Or releasing the memory allocated on the executable file side on the DLL side.
- DLL side
- Executable file side
This seems that when /MT, /MTd is specified in the runtime library, heap destruction may occur because the heap area is created separately in the executable file and the DLL. However, it does not occur reliably, for example if you put a print statement before executing the deleteData function, it will not happen why. In this case, since it falls at a place not related at all afterwards, it becomes very difficult to identify the cause.
On the other hand, if /MD, /MDd is specified in the runtime library, this problem does not occur because the heap area is shared.
Basically, you should use /MD, /MDd for the runtime library because it is impossible to check and fix where abnormality occurs in OpenRTM-aist or omniORB.
If you really want to set /MT, /MTd in the runtime library, create a static library using the above method.
Although RTC specified by /MT, /MTd can be operated by the above method, omniORB and coil are linked to a library named advapi32.dll, and advapi32.dll is /MD's runtime library ( MSVCRT), we do not know what will happen here.
Build process of OpenRTM-aist(C++) by using CMake
(G)Windows + omniORB
Please install TortoiseSVN from the following.
Please obtain the OpenRTM-aist source code from the following.
Please obtain the already built omniORB from the following.
Move to the checked out folder (OpenRTM - aist) and execute the following command.
 python convert_character_code.py ./ win32 utf_8_sig
 mkdir src\lib\coil\common\coil
 move src\lib\coil\common\*.* src\lib\coil\common\coil
 copy build\yat.py utils\rtm-skelwrapper
 mkdir build_omni
 cd build_omni
 cmake -DOMNI_VERSION=42  -DOMNI_MINOR=2 -DOMNITHREAD_VERSION=40 -DORB_ROOT=C:/workspace/omniORB-4.2.2-win64-vc15 -DCORBA=omniORB -G "Visual Studio 15 2017 Win64" ..
 cmake --build . --config Release
| Variable name | Meaning | Value that can be set |
| OMNI_VERSION | omniORB version | 40, 41, 42 |
| ORB_ROOT | OmniORB expanded path | |
| CORBA | CORBA library | omniORB |
(G)Windows + TAO
Please install TortoiseSVN from the following.
Please obtain the OpenRTM-aist source code from the following.
Please download ACE + TAO.zip from below.
Build ACE and TAO in Visual Studio. Change ace/config-win32.h in the folder where ACE + TAO.zip has been expanded to ace/config.h. Next, open the ACE_wrappers_vc12.sln (or ACE_wrappers_vc14.sln, ACE_wrappers_vs2017.sln) in Visual Studio and build it with the following environment variables set.
Move to the checked out folder (OpenRTM-aist) and execute the following command.
 python convert_character_code.py ./ win32 utf_8_sig
 mkdir src\lib\coil\common\coil
 move src\lib\coil\common\*.* src\lib\coil\common\coil
 copy build\yat.py utils\rtm-skelwrapper
 mkdir build_tao
 cd build_tao
 cmake -DORB_ROOT=C:/workspace/ACE_wrappers -DCORBA=TAO -G "Visual Studio 15 2017 Win64" ..
 set PATH=%PATH%;C:\workspace\ACE_wrappers\lib;
 cmake --build . --config Release
(G)Windows 10 IoT + omniORB
Built-in binary files for omniORB's Windows 10 IoT are currently not distributed, so you need to build them yourself. Cygwin installation is required.
Get source code of omniORB.
Please expand omniORB - 4.2.2.tar.bz2 to a suitable place.
First apply the patch for ARM + Windows. Please obtain a patch from below.
Execute the following command on Cygwin.
patch -p1 -d omniORB-4.2.2 < omniORB-4.2.2-windows-iot.patch
Edit mk/platforms/arm_win32_vs_14.mk in the folder where you expanded omniORB-4.2.2.tar.bz2. If the version of Visual Studio you use is different, please select the one that is appropriate. Specify the Python directory as follows.
PYTHON = /cygdrive/c/Python27/python
Next, edit config/config.mk. Specify the corresponding mk file as follows. Please correspond as appropriate when the version of Visual Studio is different.
platform = arm_win32_vs_14
For cross compiling, prepare executable files such as idl compiler which can operate in the development environment. Please obtain the binary of omniORB which was built for x86 from the following.
Please copy the contents of bin / x86_win32 in the folder where you unzipped the zip file to bin/x86_win32 in the folder where you expanded omniORB - 4.2.2.tar.bz2.
Move to the directory where omniORB-4.2.2.tar.bz2 is expanded and execute the following command.
 set PATH=C:\cygwin64\bin;%PATH%;
 call "C:\Program Files (x86)\Microsoft Visual Studio 14.0\VC\vcvarsall.bat" x86_arm
 cd src
 make export
This will create an executable file in bin / ARM_win32 and a library in lib / ARM_win32. For vcvarsall.bat, please use the version that is appropriate for the version of Visual Studio. For Visual Studio 2017 it will be C:\Program Files (x86)\Microsoft Visual Studio\2017\Community\VC\Auxiliary\Build\vcvarsall.bat.
The build of OpenRTM-aist is almost the same as usual. Please specify the compiler for ARM as cmake's option Visual Studio 14 2015 ARM.
 python convert_character_code.py ./ win32 utf_8_sig
 mkdir src\lib\coil\common\coil
 move src\lib\coil\common\*.* src\lib\coil\common\coil
 copy build\yat.py utils\rtm-skelwrapper
 mkdir build_omni
 cd build_omni
 cmake -DOMNI_VERSION=42  -DOMNI_MINOR=2 -DOMNITHREAD_VERSION=40 -DORB_ROOT=C:/workspace/omniORB-4.2.2 -DCORBA=omniORB -G "Visual Studio 14 2015 ARM" ..
 cmake --build . --config Release
You can not build it unless ARM compiler is installed in Visual Studio. If you do not have an ARM compiler installed, please start Visual Studio Installer and install Visual Studio C ++ Compiler and Library for ARM.
(G)Ubuntu + omniORB
 svn co http://svn.openrtm.org/OpenRTM-aist/trunk/OpenRTM-aist/
 cd OpenRTM-aist/
 mkdir src/lib/coil/common/coil
 cp src/lib/coil/common/*.* src/lib/coil/common/coil/
 cp build/yat.py utils/rtm-skelwrapper/
 mkdir build_linux
 cd build_linux/
 cmake -DOMNI_VERSION=41 -DCORBA=omniORB ..
 make
| Variable name | Meaning | Value that can be set |
| OMNI_VERSION | omniORB version | 40, 41, 42 |
| CORBA | CORBA library | omniORB |
(G)Ubuntu + TAO
First of all build and install ACE + TAO with the following command.
 sudo apt-get install gperf
 export ACE_ROOT=${PWD}/ACE_wrappers/build/linux
 export TAO_ROOT=${ACE_ROOT}/TAO
 export LD_LIBRARY_PATH=$ACE_ROOT/ace:$ACE_ROOT/lib
 export INSTALL_PREFIX=/home/openrtm/ace_install
 wget http://download.dre.vanderbilt.edu/previous_versions/ACE+TAO-6.4.5.tar.gz
 tar xf ACE+TAO-6.4.5.tar.gz
 cd ACE_wrappers
 mkdir -p build/linux
 ./bin/create_ace_build build/linux
 echo '#include "ace/config-linux.h"' > build/linux/ace/config.h
 echo 'include $(ACE_ROOT)/include/makeinclude/platform_linux.GNU' > build/linux/include/makeinclude/platform_macros.GNU
 cd build/linux
 make
 make install
 cd TAO
 make
 make install
Build OpenRTM-aist with the following command.
 svn co http://svn.openrtm.org/OpenRTM-aist/trunk/OpenRTM-aist/
 cd OpenRTM-aist/
 mkdir src/lib/coil/common/coil
 cp src/lib/coil/common/*.* src/lib/coil/common/coil/
 cp build/yat.py utils/rtm-skelwrapper/
 mkdir build_tao
 cd build_tao
 cmake -DORB_ROOT=$ACE_ROOT -DCORBA=TAO ..
 make
(G)VxWorks + omniORB
It is necessary to specify the home directory of Wind River Workbench in advance. Please set the directory where Wind River Workbench is installed to the variable WIND_HOME.
export WIND_HOME=/home/openrtm/WindRiver
It is necessary to build omniORB before building OpenRTM-aist.
(G)omniORB
Get source code of omniORB.
- http://omniorb.sourceforge.net/ Please obtain the VxWorks compatible patch of omniORB.
Execute the build with the following command.
 wget https://jaist.dl.sourceforge.net/project/omniorb/omniORB/omniORB-4.2.2/omniORB-4.2.2.tar.bz2
 tar xf omniORB-4.2.2.tar.bz2
 wget http://svn.openrtm.org/omniORB/trunk/vxworks/omniORB-4.2.2-vxworks.patch
 patch -p1 -d omniORB-4.2.2 < omniORB-4.2.2-vxworks.patch
 cd omniORB-4.2.2
 mkdir build
 cd build
 ../configure
 make
 cd ..
 sed -i '1s/^/platform = ${VXWORKS_PLATFORM}\n/' config/config.mk
 cd src
 make export
However, please be sure to enter VXWORKS_PLATFORM according to your operating environment.
| VXWORKS_PLATFORM | CPU | VxWorks version | Implementation method |
| powerpc_vxWorks_kernel_6.6 | PowerPC | 6.6 | Kernel module |
| powerpc_vxWorks_RTP_6.6 | PowerPC | 6.6 | RTP |
| powerpc_vxWorks_kernel_6.9 | PowerPC | 6.9 | kernel module |
| powerpc_vxWorks_RTP_6.9 | PowerPC | 6.9 | RTP |
| simlinux_vxWorks_kernel_6.6 | simulator on Linux | 6.6 | kernel module |
| simpentium_vxWorks_RTP_6.6 | Simulator on Linux | 6.6 | RTP |
| simlinux_vxWorks_kernel_6.9 | simulator on Linux | 6.9 | kernel module |
| simpentium_vxWorks_RTP_6.9 | Simulator on Linux | 6.9 | RTP |
(G)OpenRTM-aist
Please enter the following command.
 svn co http://svn.openrtm.org/OpenRTM-aist/trunk/OpenRTM-aist/
 cd OpenRTM-aist/
 mkdir src/lib/coil/common/coil
 cp src/lib/coil/common/*.* src/lib/coil/common/coil/
 cp build/yat.py utils/rtm-skelwrapper/
 mkdir build_vxworks
 cd build_vxworks/
 cmake -DCMAKE_TOOLCHAIN_FILE=${TOOLCHAIN_FILE} -DVX_VERSION=${VX_VERSION} -DORB_ROOT=${ORB_ROOT} -DOMNI_VERSION=42 -DCORBA=omniORB -DVX_CPU_FAMILY=${ARCH} ..
make| TOoolCHAIN_FILE | ../Toolchain-vxworks6.6-Linux.cmake, for VxWorks 6.6 (kernel module, PowerPC), ../ Toolchain-vxworks6.cmake |
| VX_VERSION | vxworks-6.6 or vxworks-6.9 |
| ORB_ROOT | omniORB directory (eg /home/openrtm/omniORB-4.2.2) |
| VX_CPU_FAMILY | ppc (PowerPC), simlinux (kernel module, simulator), simpentium (RTP, simulator) |
For RTP, you need to add -DRTP=ON to the cmake command.
 cmake -DCMAKE_TOOLCHAIN_FILE=${TOOLCHAIN_FILE} -DVX_VERSION=${VX_VERSION} -DORB_ROOT=${ORB_ROOT} -DOMNI_VERSION=42 -DCORBA=omniORB -DVX_CPU_FAMILY=${ARCH} -DRTP=ON ..
 make
(G)VxWorks + ORBexpress
Currently the corresponding environment is VxWorks 6.6, PowerPC only.
Please enter the following command.
 svn co http://svn.openrtm.org/OpenRTM-aist/trunk/OpenRTM-aist/
 cd OpenRTM-aist/
 mkdir src/lib/coil/common/coil
 cp src/lib/coil/common/*.* src/lib/coil/common/coil/
 cp build/yat.py utils/rtm-skelwrapper/
 mkdir build_vxworks
 cd build_vxworks/
 cmake -DCMAKE_TOOLCHAIN_FILE=${TOOLCHAIN_FILE} -DORB_ROOT=${ORB_ROOT} -DCORBA=ORBexpress ..
 make
Please make the following settings for TOOLCHAIN_FILE, ORB_ROOT.
| TOOLCHAIN_FILE | For kernel module../Toolchain-vxworks6.6-Linux.cmake, for RTP ../Toolchain-vxworks6.cmake |
| ORB_ROOT | ORBexpress directory (ex:/home/openrtm/OIS/ORBexpress/RT_2.8.4_PATCH_KC1) |
Testing operation in Windows
Once the installer has completed successfully, OpenRTM-aist can be tested using the included sample components. These are typically stored in one of the following locations:
- The start menu: [Start] > [OpenRTM-aist] > [C++] > [Components] > [Examples]
- C:\Program Files\OpenRTM-aist\1.0\examples\C++
- OpenRTM-aist\examples (When building from source.)
We will use the SimpleIO components to check that OpenRTM-aist has built and installed correctly.
SimpleIO sample component set
This set contains the ConsoleInComp and ConsoleOutComp components. ConsoleInComp receives numbers as input from the console and sends them over an OutPort. ConsoleOutComp receives numbers via an InPort and prints them to the console. They use this very simple I/O to illustrate the basics of RT Components. Connect the OutPort of ConsoleInComp to the InPort of ConsoleOutComp and activate them.
The explanation below assumes OpenRTM-aist has been installed using the MSI package and the sample components are available in the Start Menu. Right-clicking on the OpenRTM-aist entry in the Start Menu and selecting "Open" will make accessing these more convenient.
Start the name server
First, a name server that the components can register on must be started. Start it using the shortcut in the Start Menu at [OpenRTM-aist 1.1] > [tools] > [Start Naming Service].
A console like the following will open.
When the console doesn't open
Sometimes the name server console does not open. There are several possible causes for this, described below.
omniORB is not installed
If using the MSI package provided by openrtm.org and selecting a custom install, it is possible to install OpenRTM-aist without installing omniORB. This is also a possibility if installing OpenRTM-aist manually. Check that omniORB is installed.
The OMNI_ROOT environment variable is not set
The "Start Naming Service" shortcut executes a batch file located at %RTM_ROOT%\bin\rtm-naming.bat to start the name server. It uses the OMNI_ROOT environment variable to locate the omniNames.exe executable. When installed using the standard installer, OpenRTM-aist will set this variable correctly. It may not, for some reason, have been set. If you installed OpenRTM-aist manually, it will not be set. Confirm that the variable has been set and is pointing to the correct location. From the control panel, select "System" >> "Advanced system settings" >> "Environment variables" and check the variable is in one of the lists.
Other
If your user name contains two-byte characters, omniNames.exe may fail to start because it cannot create the log file folder. In this case, setting the TEMP environment variable to a location that does not include two-byte characters typically corrects the problem. For example, create a directory such as C:\temp and change TEMP to point to this folder. Then, edit rtm-naming.bat and add the following lines to the top.
 set cosnames="omninames"
 set orb="omniORB"
 set port=%1
 rem set OMNIORB_USEHOSTNAME=localhost
 set PATH=%PATH%;%OMNI_ROOT%\bin\x86_win32
 set TEMP=C:\temp
In rare cases, the host name or address settings of the machine may be incorrect, causing the name server to start incorrectly. Informing omniNames.exe of the correct IP can resolve this problem. Set the OMNIORB_USEHOSTNAME environment variable in the following way (the example assumes the host's IP is 192.168.0.11):
 set cosnames="omninames"
 set orb="omniORB"
 set port=%1
 set OMNIORB_USEHOSTNAME=192.168.0.11
 set PATH=%PATH%;%OMNI_ROOT%\bin\x86_win32
Start the sample components
After starting the name server, start some suitable components. The OpenRTM-aist start menu folder contains a sub-folder called "Examples," which contains many components as shown below.
Start the ConsoleInComp.exe and ConsoleOutComp.exe executables, causing two consoles to open.
When the components don't start
Sometimes the component consoles do not open. There are several possible causes for this, described below.
The console opens and immediately closes
There may be an error in the rtc.conf file, preventing the components from starting. Confirm the contents of the rtc.conf file in the Start Menu folder, called "rtc.conf for examples." For example, the corba.endpoint/corba.endpoints settings should match the host address of the current computer.
Try creating a minimal rtc.conf, as below.
corba.nameservers: localhost
The components terminate with a runtime error
If the libraries are not correctly installed or the settings are incorrect, it can cause a runtime error. Try completely uninstalling OpenRTM-aist and re-installing it.
Start RTSystemEditor (RTSE)
RTSystemEditor can be started from the Start Menu: "OpenRTM-aist" >> "C++" >> "Tools" >> "RTSystemEditor."
Browsing the name server
Connect to the name server and browse the registered components. You can connect to a name server using the Name Service View on the left side of RTSystemEditor. Click the plug icon to connect to a name server and enter its address (localhost or localhost:2809) in the dialog box. The default port for omniNames is 2809.
The name server running on localhost will appear in the Name Service View. Open the tree branches by clicking the arrows to find the two components you started.
Adding components to the system
Open a system editor using the new system editor button in the toolbar ![]() . The editor will open in the central pane. Drag the components
. The editor will open in the central pane. Drag the components ![]() from the name service view into the editor.
from the name service view into the editor.
Connecting and activating
The OutPort of ConsoleIn0 is displayed on its right-hand side ![]() . Drag from this to the InPort on the ConsoleOut0 component
. Drag from this to the InPort on the ConsoleOut0 component ![]() to connect these data ports. The connection dialog will be displayed. Click "OK" to accept the defaults and connect the components.
to connect these data ports. The connection dialog will be displayed. Click "OK" to accept the defaults and connect the components.
A line indicating the connection will appear between the two ports. Next, click the "Activate All" button ![]() in the toolbar. This will activate all components in the editor at once. Active components will appear green.
in the toolbar. This will activate all components in the editor at once. Active components will appear green.
After connecting the ports of ConsoleInComp and ConsoleOutComp, the terminal for ConsoleInComp will display:
Please input number:
Enter a number and press enter. This number should fit within a short int. Look at the ConsoleOutComp terminal. The number you entered should have been printed out. If this is the case, OpenRTM-aist is functioning correctly.
If the start of RTSystemEditorRCP (RTSE) does not start
If the following message appears and RTSystemEditorRCP (RTSE) does not start up, you need to install the 32-bit Java operating environment (JRE) or Java development environment (JDK). If you select JRE for change installation, it will be installed. To uninstall or change the program in the control panel, right click on OpenRTM - aist and select "Change". For JRE selection on the installer screen, OpenRTM-aist in 10 minutes! page.
Other samples
Other sample components are included in the installed OpenRTM-aist. They can all be used in the same way as the above example.
| ConsoleInComp.exe | Receive numbers from the console and send them over an OutPort. Connect it to ConsoleOutComp.exe to use. |
| ConsoleOutComp.exe | Receive numbers over an InPort and print them in a console. Connect it to ConsoleInComp.exe to use. |
| SequenceInComp.exe | A component to output various simple data types (short, long, float, double, and sequences). Connect it to SequenceOutComp.exe to use. |
| SequenceOutComp.exe | Display various simple data types received over an InPort. Connect it to SequenceInComp.exe to use. |
| MyServiceProviderComp.exe | Provides a simple service, MyService. Connect it to MyServiceConsumerComp.exe to use. |
| MyServiceConsumerComp.exe | Consumes a simple service, MyService. Connect it to MyServiceProviderComp.exe to use. |
| ConfigSampleComp.exe | Sample demonstrating configuration parameters. Modify the configuration parameters in RTSystemEditor or with rtconf to see the effect. |
| USBCameraAcquireComp.exe | Connect to a USB camera and acquire images, sending them over an OutPort. Use it with USBCameraMonitor.exe. |
| USBCameraMonitor.exe | Receive images over an InPort and display them on screen. Use it with USBCameraAquire.exe. |
Testing operation in Linux
Once the installer has completed successfully, OpenRTM-aist can be tested using the included sample components. These are typically stored in one of the following locations:
- /usr/share/OpenRTM-aist/examples
- /usr/local/share/OpenRTM-aist/examples
- /opt/local/share/OpenRTM-aist/examples (When installing in Mac OS X using MacPorts.)
If you built from source, then "make install" will place the components in a share/OpenRTM-aist/examples directory below your install prefix. You can also find them in the source tree, at OpenRTM-aist/examples/<sample component set>
We will use the SimpleIO components to check that OpenRTM-aist has built and installed correctly.
SimpleIO sample component set
This set contains the ConsoleInComp and ConsoleOutComp components. ConsoleInComp receives numbers as input from the console and sends them over an OutPort. ConsoleOutComp receives numbers via an InPort and prints them to the console. They use this very simple I/O to illustrate the basics of RT Components. Connect the OutPort of ConsoleInComp to the InPort of ConsoleOutComp and activate them.
For the sake of simplicity, the explanation will be described assuming that the sample is under /usr/share/openrtm-1.1/example.
Test using the sample components
Start the name server
First, a name server that the components can register on must be started. If omniORB was installed as a package in Linux, it will often add the name server as a system service. You can check if this is the case on your system using the ps command:
 $ ps ax | grep omni
 1550  ?        Sl     0:00 /usr/bin/omniNames -errlog /var/log/omniorb4-nameserver.log
 18418 pts/2    S+     0:00 grep --color=auto omni
If omniNames is not executing, the command will produce something like this (or no output at all):
 $ ps ax | grep omni
 18418 pts/2    S+     0:00 grep --color=auto omni
To start omniNames manually, use the rtm-naming command:
 $ rtm-naming
 Starting omniORB omniNames: ubuntu910:9876

 Thu Dec  3 18:52:14 2009:

 Starting omniNames for the first time.
 Wrote initial log file.
 Read log file successfully.
 Root context is  IOR:010000002b00000049444c3a6f6d672e6f72672f436f734e616d696e672f4e616d696e67436f6e746578744578743a312e30000001000000000000007400000001010200100000003139322e3136382e3130302e31323500942600000b0000004e616d6553657276696365000300000000000000080000000100000000545441010000001c0000000100000001000100010000000100010509010100010000000901010003545441080000004e8a174b01000fef
 Checkpointing Phase 1: Prepare.
 Checkpointing Phase 2: Commit.
 Checkpointing completed.
Create an rtc.conf
An RTC configuration file, rtc.conf, must be created for the test. First, make a suitable working directory. This example will create a directory called RTCwork below the home directory. Change to this directory and create a file called "rtc.conf".
 $ cd ~/RTCwork
 $ vi rtc.conf
Add the following lines to this file. Note that you cannot use the rtc.conf in share/OpenRTM-aist/examples/ for this example.
 corba.nameservers: localhost
 naming.formats: %h.host_cxt/%n.rtc
 logger.enable: NO
 example.ConsoleOut.config_file: consout.conf
 example.ConsoleIn.config_file: consin.conf
If your system is configured to use IPv6, using "localhost" may not function correctly. In that case, use "127.0.0.1" instead.
Start ConsoleInComp
Open a new terminal and start ConsoleInComp, making sure it uses the rtc.conf you created.
 $ /usr/share/OpenRTM-aist/examples/ConsoleInComp -f rtc.conf
 Creating a component: "ConsoleIn"....succeed.
 =================================================
  Component Profile
 -------------------------------------------------
 InstanceID:     ConsoleIn0
 Implementation: ConsoleIn
 Description:    Console input component
 Version:        1.0
 Maker:          Noriaki Ando, AIST
 Category:       example
   Other properties
 =================================================
 =================================================
 Port0 (name): out
 -------------------------------------------------
 - properties -
 port.port_type: DataOutPort
 dataport.data_type: TimedLong
 dataport.subscription_type: flush,new,periodic
 dataport.dataflow_type: push
 dataport.interface_type: corba_cdr
 -------------------------------------------------
$ <source_dir>/OpenRTM-aist/examples/SimpleIO/ConsoleInComp -f ~/RTCwork/rtc.conf
Start ConsoleOutComp
In the same way, start ConsoleOutComp.
 $ /usr/share/OpenRTM-aist/examps/ConsoleOutComp -f rtc.conf
 succeed.
 =================================================
  Component Profile
 -------------------------------------------------
 InstanceID:     ConsoleOut0
 Implementation: ConsoleOut
 Description:    Console output component
 Version:        1.0
 Maker:          Noriaki Ando, AIST
 Category:       example
   Other properties
 =================================================
 =================================================
 Port0 (name): in
 -------------------------------------------------
 - properties -
 port.port_type: DataInPort
 dataport.data_type: TimedLong
 dataport.subscription_type: Any
 dataport.dataflow_type: push,pull
 dataport.interface_type: corba_cdr
 -------------------------------------------------
If using the samples directly from a source directory:
$ <source_dir>/OpenRTM-aist/examples/SimpleIO/ConsoleOutComp -f ~rtc.conf
Start RTSystemEditor
You can use RTSystemEditor to connect the two components and activate them. Download the all-in-one Eclipse package from here and extract it.
RTSystemEditor requires Java Development Kit 6. Install it according to the instructions below, or use an equivalent such as OpenJDK as provided by your distribution. Refer to this page for details on starting RTSystemEditor.
Browsing the name server
Connect to the name server and browse the registered components. You can connect to a name server using the Name Service View on the left side of RTSystemEditor. Click the plug icon to connect to a name server and enter its address (localhost or localhost:2809) in the dialog box. The default port for omniNames is 2809.
Drag the RT Components registered on the name server into the system editor. In the name service view, select the ConsoleIn0 and ConsoleOut0 items and drag them into the editor in the middle. Now click and drag between the small boxes at the side of each component, dragging from one component to the other and releasing. The connection dialog will appear. Accept it with all defaults to make a connection between the components.
Click the green "Play" button in the toolbar to activate all components in the system editor.
Confirming data transfer
After connecting the ports of ConsoleInComp and ConsoleOutComp, the terminal for ConsoleInComp will display:
Please input number:
Enter a number and press enter. This number should fit within a short int. Look at the ConsoleOutComp terminal. The number you entered should have been printed out. If this is the case, OpenRTM-aist is functioning correctly.
How to use the system environment variable setting tool
VCVerChanger
(G)Overview
This tool is included in the installer of OpenRTM-aist version 1.2.0 or later and corresponds to the following cases.- I want to change the version of Visual Studio used with OpenRTM-aist
- Both 32-bit version and 64-bit version of OpenRTM-aist are installed, but I want to use it by switching.
OpenRTM-aist uses the system environment of the same name for both 32-bit version and 64-bit version. Also added to PATH to pass through. Therefore, installing both 32-bit version and 64-bit version or uninstalling one of them may require rewriting the system environment variables.
In such a case, activate this tool and click the [Confirm] button to correct it to the correct system environment variable.
(G)The log of this tool is output to the destination shown on the startup screen. Since it is overwriting every time, it can check just the last execution content. & br;
(G)Installation and start-up
You can start it from the start menu after installation. You can also start by searching with VCVerChanger.
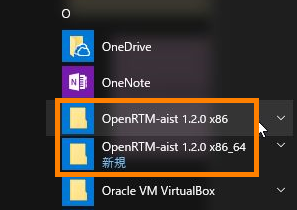 |
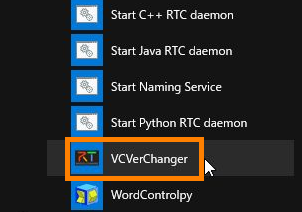 |
| From start to OpenRTM-aist xxx (since 1.2.0) | VCVerChanger |
(G)Visual Studio version update procedure
Activate this tool and click the [Confirm] button. The image shown here is the result in an environment where only OpenRTM-aist 32-bit version is installed.The current system environment variable setting is displayed. Make sure that the topmost Visual Studio version matches the version you have installed.
To change, select it from the list as shown below and click the [Update] button.
The changed setting will be displayed. Confirm that the value of the specified RTM_VC_VERSION is reflected in the path, and click the [Finish] button.
(G)Procedure for switching OpenRTM-aist 32bit, 64bit pass
When installing 32 bit version and 64 bit version in succession, start this tool and click the [Confirmation] button. The setting of the current system environment variable is displayed and you can confirm that both settings are mixed and added to PATH.Select either 32 bit or 64 bit, and click the [Switch] button.
Since the setting after switching is displayed, confirm the path and click the [End] button.
Tool for OpenRTM-aist 1.1.2 version OpenRTMEnvTool
(G)Download
To run this tool, mfc dll is required. To execute the tool without installing this dll separately, two kinds of executable files are prepared. Please download it according to your version of Visual Studio.
| Visual Studio 2008, 2010, 2012 | OpenRTMEnvTool_vc10.exe |
| Visual Studio 2013, 2015 | OpenRTMEnvTool_vc12.exe |
(G)How to use
When executing the downloaded exe file, the following screen is displayed, so click the [Confirmation] button.Since the setting of the current system environment variable is displayed, make sure that the setting of "RTM_VC_VERSION" at the top matches the version of Visual Studio you are installing.
To change the setting of "RTM_VC_VERSION" to vc 14 (for vc 2015), specify it as shown below and click the "Update" button.
The changed setting will be displayed. Confirm that the value of the specified RTM_VC_VERSION is reflected in the path, and click the [Finish] button.


