RT System Development (Advanced)
How to use DDS communication function
Usable Implementation
At the present, the following implementations are supported.
How to use Fast-RTP communication function
※ROS2通信機能がインストール済みの場合、Fast-RTPs通信機能も利用可能になっているため以下の手順は不要です。
C++版のみの対応です。
Windows
Fast-RTPsのインストール
以下のサイトからインストーラーをダウンロードしてインストールしてください。
OpenRTM-aistのビルド
CMake実行時にFASTRTPS_ENABLEのオプションをONにします。
cmake -DOMNI_VERSION=42 -DOMNI_MINOR=3 -DOMNITHREAD_VERSION=41 -DORB_ROOT=C:/workspace/omniORB-4.2.3-win64-vc141 -DCORBA=omniORB -G "Visual Studio 15 2017 Win64" -DFASTRTPS_ENABLE=ON ..
その他の手順は通常と同じです。
適当な場所にインストールしてください。
インストールするディレクトリはCMAKE_INSTALL_PREFIXのオプションで設定します。
 cmake .. -DCMAKE_INSTALL_PREFIX=C:/workspace/OpenRTM-aist/build_omni/install
 cmake --build . --config Release --target install
動作確認
{インストールしたパス}\2.0.0\Components\C++\Examples\vc141のサンプルコンポーネントを実行します。
以下の内容のrtc.confを作成してください。
 manager.modules.load_path: {インストールしたパス}\\2.0.0\\ext\\transport
 manager.modules.preload: FastRTPSTransport.dll
 manager.components.preconnect: ConsoleOut0.in?interface_type=fast-rtps, ConsoleIn0.out?interface_type=fast-rtps
manager.components.preactivation: ConsoleOut0, ConsoleIn0まずFastRTPSTransport.dllのロードが必要になります。 この設定はmanager.modules.preloadのオプションで設定できます。
次にコネクタ生成時にインターフェース型をfast-rtpsに設定する必要があります。 コネクタの生成はmanager.components.preconnectオプションにより設定します。 この例ではConsoleOut0コンポーネントのinのポート、ConsoleIn0コンポーネントのoutのポートにそれぞれコネクタを生成しています。
ConsoleInComp.exe、ConsoleOutComp.exeを実行すると通信ができるようになります。
Ubuntu
執筆中
How to use OpenSplice communication function
C++版
執筆中Windows
OpenSpliceのインストール
OpenRTM-aistのビルド
動作確認
Ubuntu
Python版
Windows
OpenSpliceのインストール
まずはOpenSpliceのPythonラッパーライブラリをインストールする必要があります。
適当な場所にビルド済みのOpenSpliceを展開してください。
次に展開したフォルダのHDE\x86_64.win64\tools\python\srcで以下のコマンドを実行するとインストールされます。
 {OpenSpliceを展開したディレクトリ}\HDE\x86_64.win64\release.bat
 python setup.py build
 python setup.py install
Cythonをインストールしていない場合は以下のコマンドを実行してください。
pip install cython
※上記のsetup.pyによるビルドにはPythonをビルドしたVisual Studioと同じバージョンのVisual Studioがインストールされている必要があります。 Python 2.7ではVisual Studio 2008、Python 3.7ではVisual Studio 2017が必要になります。
OpenRTM-aistのインストール
OpenRTM-aist 1.2等をインストーラーでインストールしておいてください。 OpenRTM-aist Python版のソースコードを入手してください。
以下のコマンドでOpenRTM-aist Python版をインストールしてください。
 python setup.py build
 python setup.py install
動作確認
動作前に以下のコマンドを実行してください。
{OpenSpliceを展開したディレクトリ}\HDE\x86_64.win64\release.bat以下のようなrtc.confを作成し、OpenSpliceTransport.pyをロード後、インターフェース型にopenspliceを指定して起動します。
 manager.modules.load_path: C:\\Python37\\Lib\\site-packages\\OpenRTM_aist\\ext\\transport\\OpenSplice\ manager.modules.preload: OpenSpliceTransport.py
 manager.components.preconnect: ConsoleOut0.in?interface_type=opensplice&marshaling_type=opensplice, ConsoleIn0.out?interface_type=opensplice&marshaling_type=opensplice
またコネクタプロファイルで以下を設定できる。
- QOSXML QOSの設定を記述したXMLファイルのパス
- topic トピック名
Ubuntu
Logging by Fluent Logger
C++版
現在のところUbuntuのみの対応Fluent Bitのインストール
 wget https://github.com/fluent/fluent-bit/archive/v1.0.4.tar.gz
 tar xf v1.0.4.tar.gz
 cd fluent-bit-1.0.4/
 cd build
 cmake ..
 cmake --build . --config Release -- -j$(nproc)
 sudo cmake --build . --target install
各種ライブラリのインストール
 sudo apt install xsltproc
 export FLUENT_LIB_DIR=~/fluent-bit-1.0.4/lib

 cd ${FLUENT_LIB_DIR}/jemalloc-5.1.0
 ./configure
 make
 make dist
 sudo make install

 cd ${FLUENT_LIB_DIR}/monkey
 mkdir build
 cd build
 cmake .. -DMK_SYSTEM_MALLOC=ON -DMK_PLUGIN_AUTH=No -DMK_PLUGIN_CGI=No -DMK_PLUGIN_CHEETAH=No -DMK_PLUGIN_FASTCGI=No -DMK_PLUGIN_LOGGER=No -DWITHOUT_HEADERS=Yes
 cmake --build . --config Release -- -j$(nproc)
 sudo cmake --build . --target install

 cd ${FLUENT_LIB_DIR}/mbedtls-2.14.1
 mkdir build
 cd build
 cmake .. -DENABLE_PROGRAMS=OFF -DENABLE_TESTING=OFF
 cmake --build . --config Release -- -j$(nproc)
 sudo cmake --build . --target install

 cd ${FLUENT_LIB_DIR}/msgpack-3.1.1
 mkdir build
 cd build
 cmake .. -DMSGPACK_BUILD_EXAMPLES=OFF
 cmake --build . --config Release -- -j$(nproc)
 sudo cmake --build . --target install

 cd ${FLUENT_LIB_DIR}/onigmo
 ./configure
 make
 sudo make install
OpenRTM-aistのビルド
CMake実行時にFLUENTBIT_ENABLE、FLUENTBIT_ROOTのオプションを設定する。
cmake -DCORBA=omniORB -DFLUENTBIT_ENABLE=ON -DFLUENTBIT_ROOT=~/fluent-bit-1.0.4/ ..
他の手順は通常のビルド手順と同じである。
以下のコマンドでインストールしてください。
cmake --build . --target install
動作確認
rtc.confで以下のように設定する。tagの名前は適宜変更する。
 logger.plugins: /usr/local/lib/openrtm-2.0/logger/FluentBit.so
 logger.logstream.fluentd.output0.plugin: forward
 logger.logstream.fluentd.output0.match:*

 logger.logstream.fluentd.input0.plugin: lib
 logger.logstream.fluentd.input0.tag: test.simpleio
RTCを実行するとログを送信する。
動作しない場合は/etc/ssl/certsから壊れたリンクを削除する。
Python版
Python版はWindows、Linuxへ対応fluent-logger-pythonのインストール
fluent-logger-pythonのインストールが必要です。
fluent-logger-python-0.9.3.zipを適当な場所に展開して以下のコマンドを実行してください。
python setup.py install
Linuxの場合はsudoで実行してください。
Fluentdのインストール、起動
ほとんど以下のページと手順は同じです。
Fluentdをインストールしてください。
インストール後、Td-agent Command Promptを起動してください。
次にtd-agentをインストールしたフォルダ(C:\opt\td-agent)にconf\td-agent.confというファイルを作成します。
 C:\opt\td-agent
                 |- conf
                       |-td-agent.conf
td-agent.confには以下の内容を記述します。
 <source>
   @type forward
 </source>

 <match test.**>
   @type stdout
 </match>
Td-agent Command Promptで以下のコマンドを入力してfluentdを実行します。
> fluentd -c conf\td-agent.conf
RTCの起動
rtc.confに以下のように記述してRTCを起動するとfluentdにログが送信されます。
 manager.modules.load_path: C:\\Python27\\Lib\\site-packages\\OpenRTM_aist\\ext\\logger\\fluentbit_stream
 logger.plugins: FluentBit.py
 logger.logstream.fluentd.output0.tag: test.simpleio
manager.modules.load_pathはOpenRTM-aistをインストールしたPythonのパスによって適宜変更してください。 Ubuntuの場合は/usr/local/lib/python2.7/dist-packages/OpenRTM_aist/ext/logger/fluentbit_stream等になります。
fluentdでログは以下のように表示される。
2018-12-26 09:06:18.000000000 +0900 test.simpleio: {"message":"exit","time":"2018-12-26 09:06:18,841","name":"fluent.ec_worker","level":"TRACE"}メッセージの内容、名前、ログを送信した時間、ログレベルが送信される。
How to use ROS2 Communication Function
C++版
Windows
Visual Studio 2017がインストール済みの環境で確認してください。
Chocolateyのインストール
以下のページの指示に従いインストールします。
Python3のインストール
以下のコマンドでインストールします。
> choco install -y python
OpenSSLのインストール
以下からWin64OpenSSL-1_0_2r.exeを入手して、それを実行してインストールします。
以下の環境変数を設定します。
| OPENSSL_CONF | C:\OpenSSL-Win64\bin\openssl.cfg |
環境変数PATHにC:\OpenSSL-Win64\binを追加します。
asio、eigen、tinyxml、tinyxml-usestl、log4cxxのインストール
以下のページからNuGetパッケージ(.nupkg)ファイルをダウンロードしてください。
以下のコマンドでインストールします。依存するNugetパッケージが増える場合もあるようなので、適宜変更してください。
> choco install -y -s <'''ダウンロードしたパス'''> asio eigen tinyxml-usestl tinyxml2 log4cxx
Python用パッケージのインストール
以下のコマンドでインストールします。
> python -m pip install -U catkin_pkg empy pyparsing pyyaml setuptools
ROS2のインストール
以下のページからros2-crystal-20190314-windows-release-amd64.zipをダウンロードします。
C:\dev\ros2等に展開して完了です。
OpenRTM-aistのビルド
CMake実行前にROS2の環境を設定するスクリプトを実行します。
> call C:\dev\ros2\local_setup.bat
CMake実行時にFASTRTPS_ENABLE、ROS2_ENABLEのオプションをONにします。
> cmake -DORB_ROOT=C:/workspace/omniORB-4.2.3-win64-vc14 -DCORBA=omniORB -G "Visual Studio 15 2017" -A x64 -DFASTRTPS_ENABLE=ON -DROS2_ENABLE=ON ..
その他の手順は通常と同じです。
適当な場所にインストールしてください。
インストールするディレクトリはCMAKE_INSTALL_PREFIXのオプションで設定します。
 > cmake .. -DCMAKE_INSTALL_PREFIX=C:/workspace/OpenRTM-aist/build_omni/install
 > cmake --build . --config Release --target install
動作確認
<'インストールしたパス'>\2.0.0\Components\C++\Examples\vc14のサンプルコンポーネントを実行します。
以下の内容のrtc.confを作成してください。
 manager.modules.load_path: {インストールしたパス}\\2.0.0\\ext\\transport
 manager.modules.preload: FastRTPSTransport.dll, ROS2Transport.dll
 manager.components.preconnect: ConsoleOut0.in?interface_type=fast-rtps&marshaling_type=ros2:std_msgs/Float32&fastrtps.topic=chatter, ConsoleIn0.out?interface_type=fast-rtps&marshaling_type=ros2:std_msgs/Float32&fastrtps.topic=chatter
manager.components.preactivation: ConsoleOut0, ConsoleIn0- manager.module.load_path
- シリアライザ用モジュール(FastRTPSTransport.dllとROS2Transport.dll)が置かれている場所
- manager.modules.preload
- シリアライザ用モジュールを読み込む順番で指定
- manager.components.preconnect
- コネクタ生成時の設定を記述します。interface_type(インターフェース型)にfast-rtpsを、marshaling_type(マーシャリング型)に対応シリアライザ名を、fastrtps.topic(トピック)に適当な任意の名前を記述します。
ROS/ROS2用のシリアライザと対応するROS/ROS2メッセージ型の関係を以下のリンクで示します。
コネクタの生成はmanager.components.preconnectオプションにより設定します。 この例ではConsoleOut0コンポーネントのinのポート、ConsoleIn0コンポーネントのoutのポートにそれぞれコネクタを生成しています。
実行前に環境変数PATHに以下を追加する必要があります。
- <インストールしたパス>\2.0.0\bin\vc14
- <インストールしたパス>\2.0.0\omniORB\4.2.3_vc14\bin\x86_win32
- C:\dev\ros2\bin
- C:\ProgramData\chocolatey\lib\tinyxml2\lib
- C:\ProgramData\chocolatey\lib\log4cxx\lib
ConsoleInComp.exe、ConsoleOutComp.exeを実行すると通信ができるようになります。
Ubuntu
ROS2のインストール
以下のコマンドでインストールします。
 $ curl http://repo.ros2.org/repos.key | sudo apt-key add -
 $ sudo sh -c 'echo "deb [arch=amd64,arm64] http://repo.ros2.org/ubuntu/main $(lsb_release -cs) main" > /etc/apt/sources.list.d/ros2-latest.list'
 $ export ROS_DISTRO=crystal
 $ sudo apt update
 $ sudo apt install ros-${ROS_DISTRO}-ros-core
ROS2用にbashの設定を以下のように行います。(次回以降のbash起動時の設定と、現在実行中のbashの設定を行います。)
 echo "source /opt/ros/crystal/setup.bash" >> ~/.bashrc
 source ~/.bashrc
OpenRTM-aistのビルド
CMake実行時にFASTRTPS_ENABLE、ROS2_ENABLEのオプションをONにします。
$ cmake -DCORBA=omniORB -DCMAKE_BUILD_TYPE=Release -DFASTRTPS_ENABLE=ON -DROS2_ENABLE=ON ..
その他の手順は通常と同じです。
ビルド後にインストールしてください。
$ cmake --build . --target install
動作確認
以下のrtc.confを作成します。
 manager.modules.load_path: /usr/local/lib/openrtm-2.0/transport/
 manager.modules.preload: FastRTPSTransport.so, ROS2Transport.so
 manager.components.preconnect: ConsoleOut0.in?interface_type=fast-rtps&marshaling_type=ros2:std_msgs/Float32&fastrtps.topic=chatter, ConsoleIn0.out?interface_type=fast-rtps&marshaling_type=ros2:std_msgs/Float32&fastrtps.topic=chatter
 manager.components.preactivation: ConsoleOut0, ConsoleIn0
- manager.module.load_path
- シリアライザ用モジュール(FastRTPSTransport.soとROS2Transport.so)が置かれている場所
- manager.modules.preload
- シリアライザ用モジュールを読み込む順番で指定
- manager.components.preconnect
- コネクタ生成時の設定を記述します。interface_type(インターフェース型)にfast-rtpsを、marshaling_type(マーシャリング型)に対応シリアライザ名を、fastrtps.topic(トピック)に適当な任意の名前を記述します。
OpenRTM-aistのシリアライザが対応しているメッセージ型を以下に示します。
RTCを起動して動作確認します。
それぞれ別のターミナルから起動してください。
/usr/local/share/openrtm-2.0/components/c++/examples/ConsoleInComp
/usr/local/share/openrtm-2.0/components/c++/examples/ConsoleOutComp
Python版
Windows
執筆中
Ubuntu
ROS2のインストール
以下のコマンドでインストールします。
 $ curl http://repo.ros2.org/repos.key | sudo apt-key add -
 $ sudo sh -c 'echo "deb [arch=amd64,arm64] http://repo.ros2.org/ubuntu/main $(lsb_release -cs) main" > /etc/apt/sources.list.d/ros2-latest.list'
 $ export ROS_DISTRO=crystal
 $ sudo apt update
 $ sudo apt install ros-${ROS_DISTRO}-desktop
ROS2の環境設定のbashを実行するようにします。
 $ echo "source /opt/ros/crystal/setup.bash" >> ~/.bashrc
 $ source ~/.bashrc
omniORBpy
執筆中
OpenRTM-aistのインストール
OpenRTM-aist Python版のソースコードを入手してください。
以下のコマンドでOpenRTM-aist Python版をビルド/インストールしてください。
 $ python setup.py build
 $ python setup.py install
動作確認
ros2のsetup.bashを実行するとPYTHONPATHが上書きされるようなので以下のコマンドを実行する。
 $ export PYTHONPATH=$PYTHONPATH:/usr/local/lib/python3.6/site-packages
 $ export PATH=$PATH:/usr/local/lib/python3.6/site-packages/
omniORBpyがインストールされているディレクトリにあわせて変更してください。
以下のようなrtc.confを作成し、ROS2Transport.pyをロードし、インターフェース型にros2、シリアライザにros2:std_msgs/Float32を指定して起動するように指定します。
 manager.modules.load_path: /usr/local/lib/python3.6/site-packages/OpenRTM_aist/ext/transport/ROS2Transport/
 manager.modules.preload: ROS2Transport.py
 manager.components.preconnect: ConsoleOut0.in?interface_type=ros2&marshaling_type=ros2:std_msgs/Float32&fastrtps.topic=chatter, ConsoleIn0.out?interface_type=ros2&marshaling_type=ros2:std_msgs/Float32&fastrtps.topic=chatter
- manager.module.load_path
- シリアライザ用モジュール(ROS2Transport.py)が置かれている場所
- manager.modules.preload
- シリアライザ用モジュールを読み込む順番で指定
- manager.components.preconnect
- コネクタ生成時の設定を記述します。interface_type(インターフェース型)にros2を、marshaling_type(マーシャリング型)に対応シリアライザ名を、fastrtps.topic(トピック)に適当な任意の名前を記述します。
OpenRTM-aistのシリアライザが対応しているメッセージ型を以下に示します。
以下のコマンドでRTCを起動して動作確認してください。
$ python /usr/local/share/openrtm-2.0/components/python/SimpleIO/ConsoleIn.py
$ python /usr/local/share/openrtm-2.0/components/python/SimpleIO/ConsoleOut.py
How to use ROS Communication Function
C++版
Windows
ROSのインストール
以下のサイトの手順に従ってRos4WinをUSBメモリにインストールしてください。
以下のコマンドでClinkを起動してください。ここではドライブ"D:"にインストールしたUSBドライブが刺さっている前提でコマンドを示していますが、違うドライブに刺さっている場合は"D:"の部分をそのドライブ名に変更してください。
> D:\opt\start_ros.bat
移行の作業はClink上で実行します。
OpenRTM-aistのビルド
CMake実行時にROS_ENABLEのオプションをONにします。
> cmake -DORB_ROOT=C:/workspace/omniORB-4.2.3-win64-vc14 -DCORBA=omniORB -G "Visual Studio 15 2017" -A x64 -DROS_ENABLE=ON ..
その他の手順は通常と同じです。
動作確認
以下のrtc.confを作成します。
 manager.modules.load_path: C:\\workspace\\openrtm\\build_omni\\devel\\bin\\Release
 manager.modules.preload: ROSTransport.dll
 manager.components.preconnect: ConsoleOut0.in?interface_type=ros&marshaling_type=ros:std_msgs/Float32&ros.topic=chatter, ConsoleIn0.out?interface_type=ros&marshaling_type=ros:std_msgs/Float32&ros.topic=chatter
 manager.components.preactivation: ConsoleOut0, ConsoleIn0
- manager.modules.load_path
- シリアライザーモジュール(ROSTransport.dll)を置く場所を指定します。
- manager.modules.preload
- ROS通信のためのシリアライザーモジュールのの指定をします。Windowsの場合にはROSTransport.dllを指定します。
- manager.components.preconnect
- コネクタ生成に関する設定をしています。interface_type(インターフェース型)にros、marshaling_type(マーシャリング型)に対応シリアライザの名前、ros.topic(トピック名)に適当な任意の名前を設定します。
OpenRTM-aistのシリアライザーモジュール(ROSTransport.dll)が対応しているメッセージ型は以下のようになります。
RTCを起動して動作確認します。 以下のファイルをダブルクリックします。この時上記の変更をしたrtc.confは、VC14等のOpenRTM-aistをインストール時に指定したVisual Studioのバージョンに関連したのフォルダー(デフォルトではExamplesの下のVC14)に実行するexeファイルがありますので、そこと同じディレクトリに置くようにしてください。
 \Program Files\OpenRTM-aist\2.0\Components\C++\Examples\ConsoleIn.bat
 \Program Files\OpenRTM-aist\2.0\Components\C++\Examples\ConsoleOut.bat
Ubuntu
ROSのインストール
以下のコマンドでインストールしてください。
 $ export ROS_DISTRO=melodic
 $ sudo sh -c 'echo "deb http://packages.ros.org/ros/ubuntu $(lsb_release -sc) main" > /etc/apt/sources.list.d/ros-latest.list'
 $ sudo apt-key adv --keyserver hkp://ha.pool.sks-keyservers.net:80 --recv-key 421C365BD9FF1F717815A3895523BAEEB01FA116
 $ sudo apt-get -y update
 $ sudo apt-get -y install ros-${ROS_DISTRO}-ros-base
 $ sudo rosdep init
 $ rosdep update
ROS用にbashの設定を以下のように行います。(次回以降のbash起動時の設定と、現在実行中のbashの設定を行います。)
 $ echo "source /opt/ros/${ROS_DISTRO}/setup.bash" >> ~/.bashrc
 $ source ~/.bashrc
OpenRTM-aistのビルド
CMake実行時にROS_ENABLEのオプションをONにします。
$ cmake -DCORBA=omniORB -DCMAKE_BUILD_TYPE=Release -DROS_ENABLE=ON ..
その他の手順は通常と同じです。
ビルド後にインストールしてください。
$ cmake --build . --target install
動作確認
以下のrtc.confを作成します。このファイルは下記のRTCコンポーネントを起動する時に使うカレントワーキングディレクトリにおいてください。
 manager.modules.load_path: /usr/local/lib/openrtm-2.0/transport/
 manager.modules.preload: ROSTransport.so
 manager.components.preconnect: ConsoleOut0.in?interface_type=ros&marshaling_type=ros:std_msgs/Float32&ros.topic=chatter, ConsoleIn0.out?interface_type=ros&marshaling_type=ros:std_msgs/Float32&ros.topic=chatter
 manager.components.preactivation: ConsoleOut0, ConsoleIn0
- manager.modules.load_path
- シリアライザーモジュール(ROSTransport.so)を置く場所を指定します。
- manager.modules.preload
- ROS通信のためのシリアライザーモジュールのの指定をします。Ubuntuの場合にはROSTransport.soを指定します。
- manager.components.preconnect
- コネクタ生成に関する設定をしています。interface_type(インターフェース型)にros、marshaling_type(マーシャリング型)に対応シリアライザの名前、ros.topic(トピック名)に適当な任意の名前を設定します。
OpenRTM-aistのシリアライザーモジュール(ROSTransport.so)が対応しているメッセージ型は以下のようになります。
ConsoleInComp、ConsoleOutCompを起動して動作確認します。
それぞれ別のターミナルから起動してください。
$ /usr/local/share/openrtm-2.0/components/c++/examples/ConsoleInComp
$ /usr/local/share/openrtm-2.0/components/c++/examples/ConsoleOutComp
Python版
Windows
ROSのインストール
以下のページに従ってROSをUSBメモリにインストールしてください。
OpenRTM-aistのインストール
OpenRTM-aist 1.2等をインストーラーでインストールしておいてください。 OpenRTM-aist Python版のソースコードを入手してください。
以下のコマンドでOpenRTM-aist Python版をインストールしてください。
 > python setup.py build
 > python setup.py install
動作確認
start_ros.batを2回実行して、ROSの環境設定をしたウインドウを2つ開いてください。
> D:\opt\start_ros.bat
片方のウインドウでroscoreを起動します。
> roscore
もう片方のウインドウでOpenRTM-aistをインストールしたディレクトリをPYTHONPATHに設定します。
> set PYTHONPATH=%PYTHONPATH%;C:\Python37\Lib\site-packages;C:\Python37\Lib\site-packages\OpenRTM_aist;C:\Python37\Lib\site-packages\OpenRTM_aist\utils;C:\Python37\Lib\site-packages\OpenRTM_aist\RTM_IDL
以下のrtc.confを作成します。(rtc.confはRTCのexeファイルが実行される時のディレクトリに作成してください。サンプルバッチファイルを使う場合は、バッチファイルから起動されるexeファイルが置かれているディレクトリになります。)
 manager.modules.load_path: C:\\Python37\\Lib\\site-packages\\OpenRTM_aist\\ext\\transport\\ROSTransport
 manager.modules.preload: ROSTransport.py
 manager.components.preconnect: ConsoleOut0.in?interface_type=ros&marshaling_type=ros:std_msgs/Float32&ros.topic=chatter, ConsoleIn0.out?interface_type=ros&marshaling_type=ros:std_msgs/Float32&ros.topic=chatter
 manager.components.preactivation: ConsoleOut0, ConsoleIn0
- manager.modules.load_path
- シリアライザーモジュール(ROSTransport.py)を置く場所を指定します。
- manager.modules.preload
- ROS通信のためのシリアライザーモジュールのの指定をします。Pythonの場合にはROSTransport.pyを指定します。
- manager.components.preconnect
- コネクタ生成に関する設定をしています。interface_type(インターフェース型)にros、marshaling_type(マーシャリング型)に対応シリアライザの名前、ros.topic(トピック名)に適当な任意の名前を設定します。
OpenRTM-aistのシリアライザーモジュール(ROSTransport.py)が対応しているメッセージ型は以下のようになります。
上記のrtc.confを用いてRTCを起動して動作確認してください。
Ubuntu
ROSのインストール
C++版と同じ手順でROSをインストールしてください。
OpenRTM-aistのインストール
以下のパッケージをインストールしてください。
$ sudo apt-get install python-omniorb-omg omniidl-python doxygen
以下のコマンドでOpenRTM-aist Python版をインストールします。
 $ git clone https://github.com/OpenRTM/OpenRTM-aist-Python
 $ cd OpenRTM-aist-Python
 $ python setup.py build
 $ sudo python setup.py install
動作確認
以下のrtc.confを作成します。(rtc.confはRTCを実行する時のカレントワーキングディレクトリに作成してください。)
 manager.modules.load_path: /usr/local/lib/python2.7/dist-packages/OpenRTM_aist/ext/transport/ROSTransport/
 manager.modules.preload: ROSTransport.py
 manager.components.preconnect: ConsoleOut0.in?interface_type=ros&marshaling_type=ros:std_msgs/Float32&ros.topic=chatter, ConsoleIn0.out?interface_type=ros&marshaling_type=ros:std_msgs/Float32&ros.topic=chatter
 manager.components.preactivation: ConsoleOut0, ConsoleIn0
- manager.modules.load_path
- シリアライザーモジュール(ROSTransport.py)を置く場所を指定します。
- manager.modules.preload
- ROS通信のためのシリアライザーモジュールのの指定をします。Pythonの場合にはROSTransport.pyを指定します。
- manager.components.preconnect
- コネクタ生成に関する設定をしています。interface_type(インターフェース型)にros、marshaling_type(マーシャリング型)に対応シリアライザの名前、ros.topic(トピック名)に適当な任意の名前を設定します。
OpenRTM-aistのシリアライザーモジュール(ROSTransport.py)が対応しているメッセージ型は以下のようになります。
以下のコマンドでRTCを起動して動作確認してください。
$ python /usr/local/share/openrtm-2.0/components/python/SimpleIO/ConsoleIn.py
$ python /usr/local/share/openrtm-2.0/components/python/SimpleIO/ConsoleOut.py
Serializer Names and ROS/ROS2 Message Types
When using the ROS and ROS2 communication functions, OpenRTM-aist has a serializers that support the following ROS / ROS2 message types. If you need something other than the following message types, implement your own serializer to convert to that message type.
| Serializer Name | RTM Data Type | ROS,ROS2 Message Type |
| ros:std_msgs/Float32, ros2:std_msgs/Float32 |
TimedState,TimedShort, TimedLong,TimedUShort, TimedULong,TimedFloat, TimedDouble |
std_msgs/Float32 |
| ros:std_msgs/Float64, ros2:std_msgs/Float64 |
TimedState,TimedShort, TimedLong,TimedUShort, TimedULong,TimedFloat, TimedDouble |
std_msgs/Float64 |
| ros:std_msgs/Int8, ros2:std_msgs/Int8 |
TimedState,TimedShort, TimedLong,TimedUShort, TimedULong,TimedFloat, TimedDouble |
std_msgs/Int8 |
| ros:std_msgs/Int16, ros2:std_msgs/Int16 |
TimedState,TimedShort, TimedLong,TimedUShort, TimedULong,TimedFloat, TimedDouble |
std_msgs/Int16 |
| ros:std_msgs/Int32, ros2:std_msgs/Int32 |
TimedState,TimedShort, TimedLong,TimedUShort, TimedULong,TimedFloat, TimedDouble |
std_msgs/UInt8 |
| ros:std_msgs/Int64, ros2:std_msgs/Int64 |
TimedState,TimedShort, TimedLong,TimedUShort, TimedULong,TimedFloat, TimedDouble |
std_msgs/UInt16 |
| ros:std_msgs/UInt32, ros2:std_msgs/UInt32 |
TimedState,TimedShort, TimedLong,TimedUShort, TimedULong,TimedFloat, TimedDouble |
std_msgs/UInt32 |
| ros:std_msgs/UInt64, ros2:std_msgs/UInt64 |
TimedState,TimedShort, TimedLong,TimedUShort, TimedULong,TimedFloat, TimedDouble |
std_msgs/UInt64 |
| ros:std_msgs/Float32MultiArray, ros2:std_msgs/Float32MultiArray |
TimedShortSeq,TimedLongSeq, TimedUShortSeq,TimedULongSeq, TimedFloatSeq,TimedDoubleSeq |
std_msgs/Float32MultiArray |
| ros:std_msgs/Float32MultiArray, ros2:std_msgs/Float32MultiArray |
TimedShortSeq,TimedLongSeq, TimedUShortSeq,TimedULongSeq, TimedFloatSeq,TimedDoubleSeq |
std_msgs/Float32MultiArray |
| ros:std_msgs/Float64MultiArray, ros2:std_msgs/Float64MultiArray |
TimedShortSeq,TimedLongSeq, TimedUShortSeq, TimedULongSeq, TimedFloatSeq,TimedDoubleSeq |
std_msgs/Float64MultiArray |
| ros:std_msgs/Int8MultiArray, ros2:std_msgs/Int8MultiArray |
TimedShortSeq,TimedLongSeq, TimedUShortSeq,TimedULongSeq, TimedFloatSeq,TimedDoubleSeq |
std_msgs/Int8MultiArray |
| ros:std_msgs/Int16MultiArray, ros2:std_msgs/nt16MultiArray |
TimedShortSeq,TimedLongSeq, TimedUShortSeq,TimedULongSeq, TimedFloatSeq,TimedDoubleSeq |
std_msgs/Int16MultiArray |
| ros:std_msgs/Int32MultiArray, ros2:std_msgs/Int32MultiArray |
TimedShortSeq,TimedLongSeq, TimedUShortSeq,TimedULongSeq, TimedFloatSeq,TimedDoubleSeq |
std_msgs/Int32MultiArray |
| ros:std_msgs/Int64MultiArray, ros2:std_msgs/Int64MultiArray |
TimedShortSeq,TimedLongSeq, TimedUShortSeq,TimedULongSeq, TimedFloatSeq,TimedDoubleSeq |
std_msgs/Int64MultiArray |
| ros:std_msgs/UInt8MultiArray, ros2:std_msgs/UInt8MultiArray |
TimedShortSeq,TimedLongSeq, TimedUShortSeq,TimedULongSeq, TimedFloatSeq,TimedDoubleSeq |
std_msgs/UInt8MultiArray |
| ros:std_msgs/UInt16MultiArray, ros2:std_msgs/UInt16MultiArray |
TimedShortSeq,TimedLongSeq, TimedUShortSeq,TimedULongSeq, TimedFloatSeq,TimedDoubleSeq |
std_msgs/UInt16MultiArray |
| ros:std_msgs/UInt32MultiArray, ros2:std_msgs/UInt32MultiArray |
TimedShortSeq,TimedLongSeq, TimedUShortSeq,TimedULongSeq, TimedFloatSeq,TimedDoubleSeq |
std_msgs/UInt32MultiArray |
| ros:std_msgs/UInt64MultiArray, ros2:std_msgs/UInt64MultiArray |
TimedShortSeq,TimedLongSeq, TimedUShortSeq,TimedULongSeq, TimedFloatSeq,TimedDoubleSeq |
std_msgs/UInt64MultiArray |
| ros:std_msgs/String, ros2:std_msgs/String |
TimedString | std_msgs/String |
| ros:geometry_msgs/PointStamped, ros2:geometry_msgs/PointStamped |
TimedPoint3D | geometry_msgs/PointStamped |
| ros:geometry_msgs/QuaternionStamped, ros2:geometry_msgs/QuaternionStamped |
TimedQuaternion | geometry_msgs/QuaternionStamped |
| ros:geometry_msgs/Vector3Stamped, ros2:geometry_msgs/Vector3Stamped |
TimedVector3D | geometry_msgs/Vector3Stamped |
| ros:sensor_msgs/Image, ros2:sensor_msgs/Image |
CameraImage | sensor_msgs/Image |
Acquire the status of RTC (EC)
There are two ways to get the error. It can be easily realized with rtctree (library under rtshell), but first, I will explain from the principle point.
1) Poll the EC Query the current state with get_component_state () for the execution context (EC) attached to an RTC. Since this method is polling, if it is heavily used, the speed of the system will be reduced.
I will explain with pseudocode.
 rtc = <Obtain RTC object reference in some way>
 ec_list = rtc.get_owned_contexts();
 switch (ec_list[0].get_component_state(rtc)) {
  case CREATED_STATE:
    printf("Created state.");
    break;
  case INACTIVE_STATE:
    printf("Inactive state.");
    break;
  case ACTIVE_STATE:
    printf("Active state.");
    break;
  case ERROR_STATE:
    printf("Error state.");
   break;
  default:
     printf("Unknown state");
     break;
 }
We first acquire EC from RTC and obtain state by RTC as argument to that EC. The way of calling like this is from the following way of thinking.
The fact that the status of RTC is Inactive-Active-Error is that the state of the RTC It is not the state when an execution context (EC) is associated with an RTC. (That is, the idea is that the state is on the EC side.) It corresponds to figure 5.6 of http://www.omg.org/spec/RTC/.
Since there is usually only EC of its own, it is not a problem to equate the state of EC and state of RTC, but in fact it is understandable that one RTC may be attached to more than one EC Please give me.
2) Using ComponentObserver The other way is to use ComponentObserver (introduced in 1.1.0 or later). ComponentObserver has the following interface, you implement a servant on the side you want to query, and attach this object to RTC so that it calls back when the state changes.
See @interface ComponentObserver section.
obs_svt = new ComponentOberver_impl(); // servant OpenRTM::ComponentObserver obs_ref = obs_svt._this(); // Object reference SDO::ServiceProfile profile; profile.id = UUID(); profile.interface_type = CORBA_Util::toRepositoryId<OpenRTM::ComponentObserver>(); // rtm/Typename.h CORBA_SeqUtil.push_back(profile.properties, NVUtil::newNV("observed_status", "RTC_STATUS")); CORBA_SeqUtil.push_back(profile.properties, NVUtil::newNV("heartbeat.enable", "YES")); CORBA_SeqUtil.push_back(profile.properties, NVUtil::newNV("heartbeat.interval", "1.0")); profile.service = obs_ref;
rtc = <Obtain RTC object reference in some way> SDO::Configuration conf = rtc.get_configuration(); // SDO::get_configuration() conf.add_service_profile(profile);
When the status changes to ACTIVE, the above ovs_svt ComponentOberver_impl::update_status("RTC_STATUS", "ACTIVE:0"); When the state changes to INACTIVE, ComponentOberver_impl::update_status("RTC_STATUS", "INACTIVE:0"); When the status changes to ERROR, ComponentOberver_impl::update_status("RTC_STATUS", "ERROR:0"); Is called.
By the way, in rtctree under rtshell, for example in the constructor of RTCTree When dynamic = True is set, when the tree object acquires the state of RTC We will use ComponentObserver to get state.
https://github.com/gbiggs/rtctree/blob/master/rtctree/tree.py
Also, using TreeNode :: add_callback () seems to be able to hook events.
https://github.com/gbiggs/rtctree/blob/master/rtctree/node.py
The event name is defined at the bottom of this file. https://github.com/gbiggs/rtctree/blob/master/rtctree/component.py
Original Interface types implementation procedure for a Data port
FSM Component creating procedure
RTCBuilderでのコード生成
まずは通常のRTC作成手順と同じくプロジェクトの作成、モジュール名の設定、言語の設定(C++)を行います。
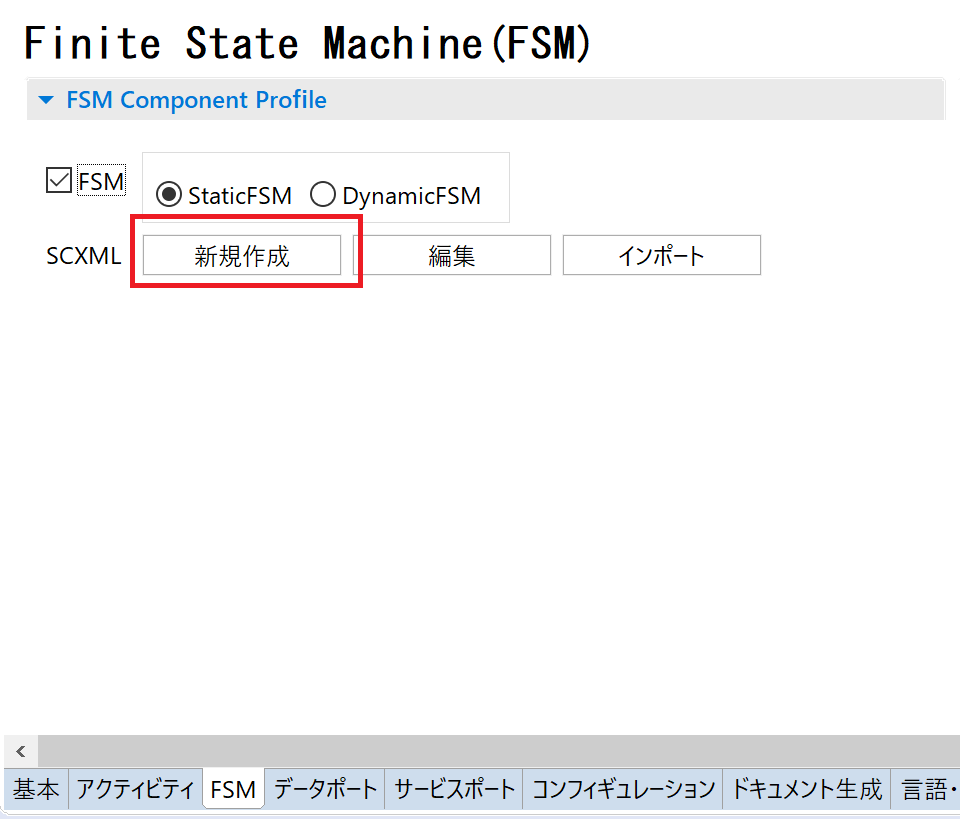
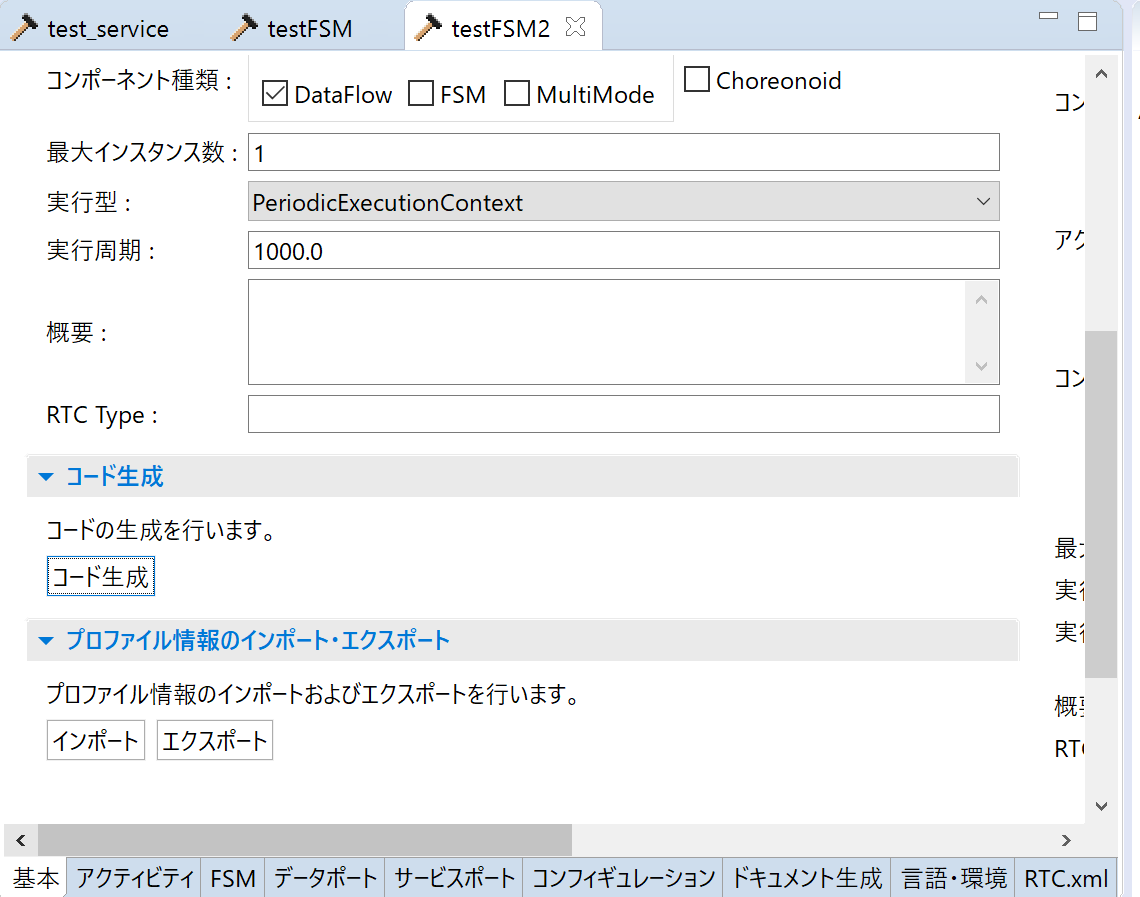
次にFSMタブからFSMのチェックボックスをオンにします。 さらに新規作成ボタンを押してGUIエディタを起動します。
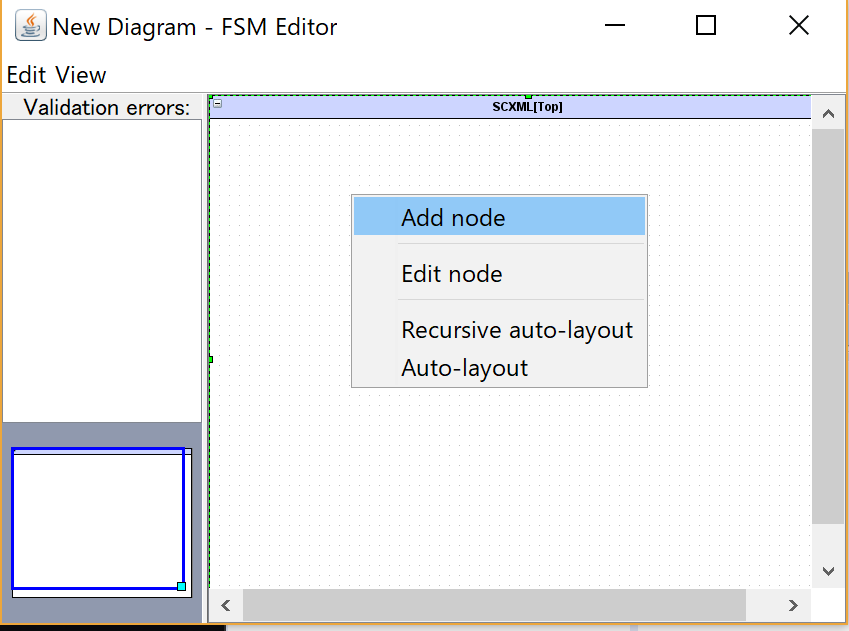
起動したエディタで右クリックしてAdd nodeを選択する。
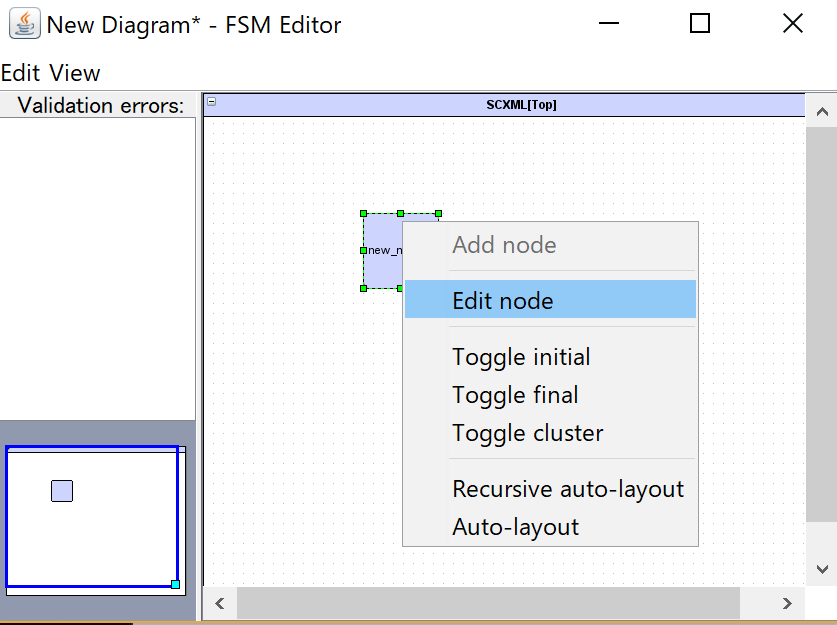
作成したノードを右クリックしてEdit nodeを選択します。
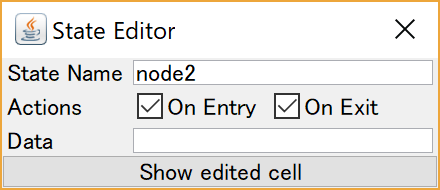
State Nameを適当な名前に変更します。
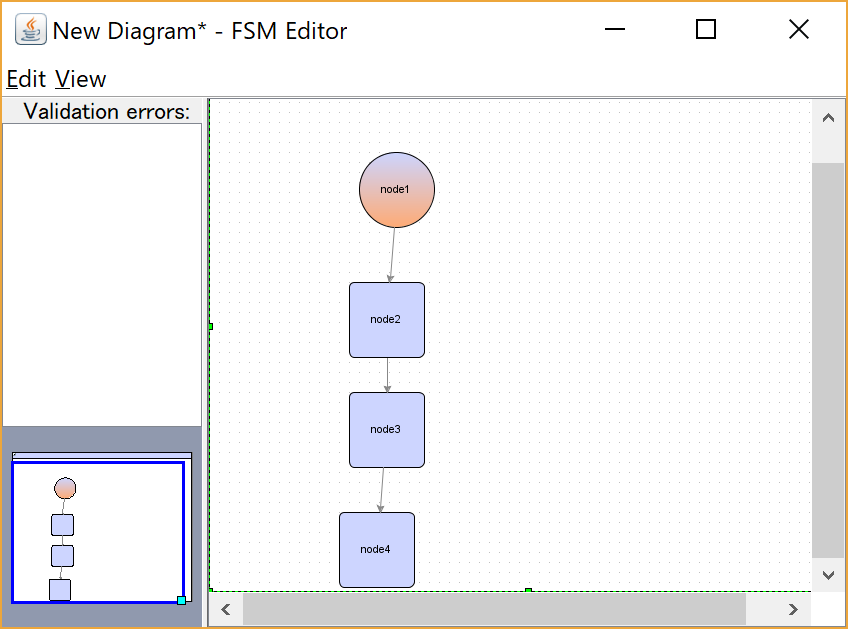
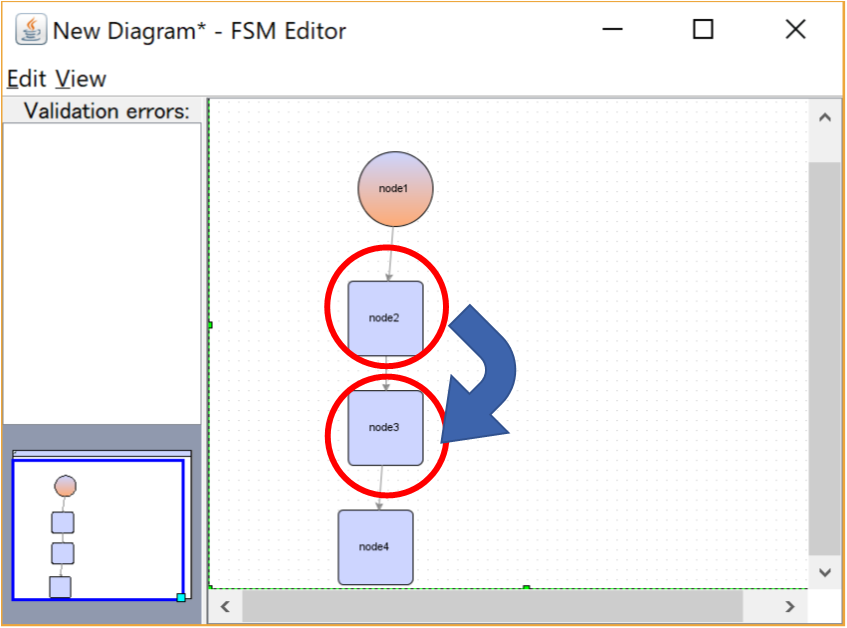
同様の手順でノードを複数作成します。 以下の図ではToggle Initial、Toggle finalを設定しているノードがありますが、この設定により生成するコードは変化しないようです。
一部のノードはOn Entry、On Exitをオンにしてください。
またノードからノードへドラッグアンドドロップすることで状態遷移を定義します。
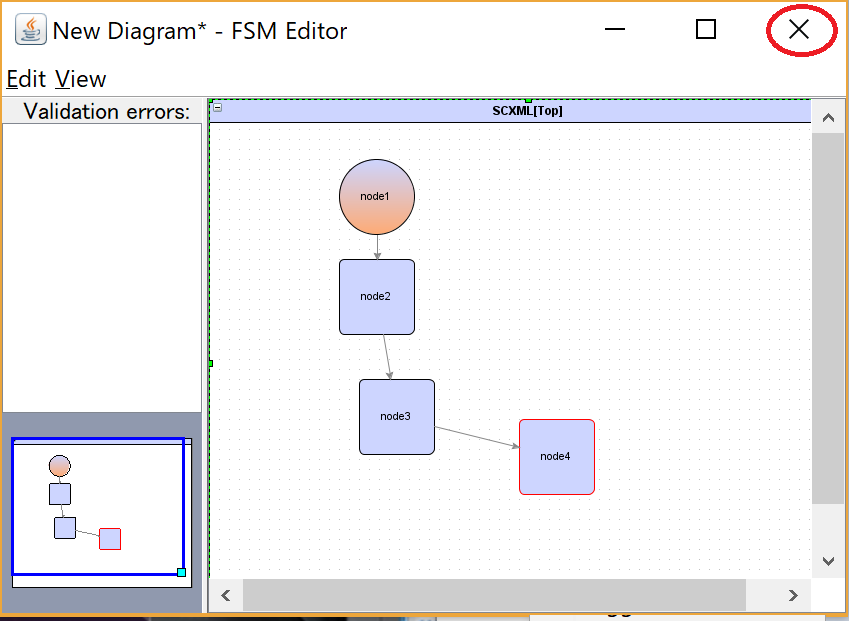
エディタを閉じます。
その後、コード生成を行います。
RTCのビルド
ビルドにはOpenRTM-aist 2.0が必要です。 以下の手順でOpenRTM-aistでビルドしてください。
その後、INSTALLのプロジェクトをビルドして適当な場所にインストールしてください。 インストールする場所を変更するためにはCMAKE_INSTALL_PREFIXのオプションを変更します。
RTCのコードを生成したフォルダで以下のコマンドを実行します。
 mkdir build
 cd build
 set OPENRTM_DIR={OpenRTM-aistをインストールしたディレクトリ}\2.0.0\cmake cmake -G "Visual Studio 15 2017" -A x64 ..
 cmake --build . --config Release
コードの編集
執筆中
動作確認手順
About the calling order of the callback functions when a connector is generated
Original serializer implement procedure
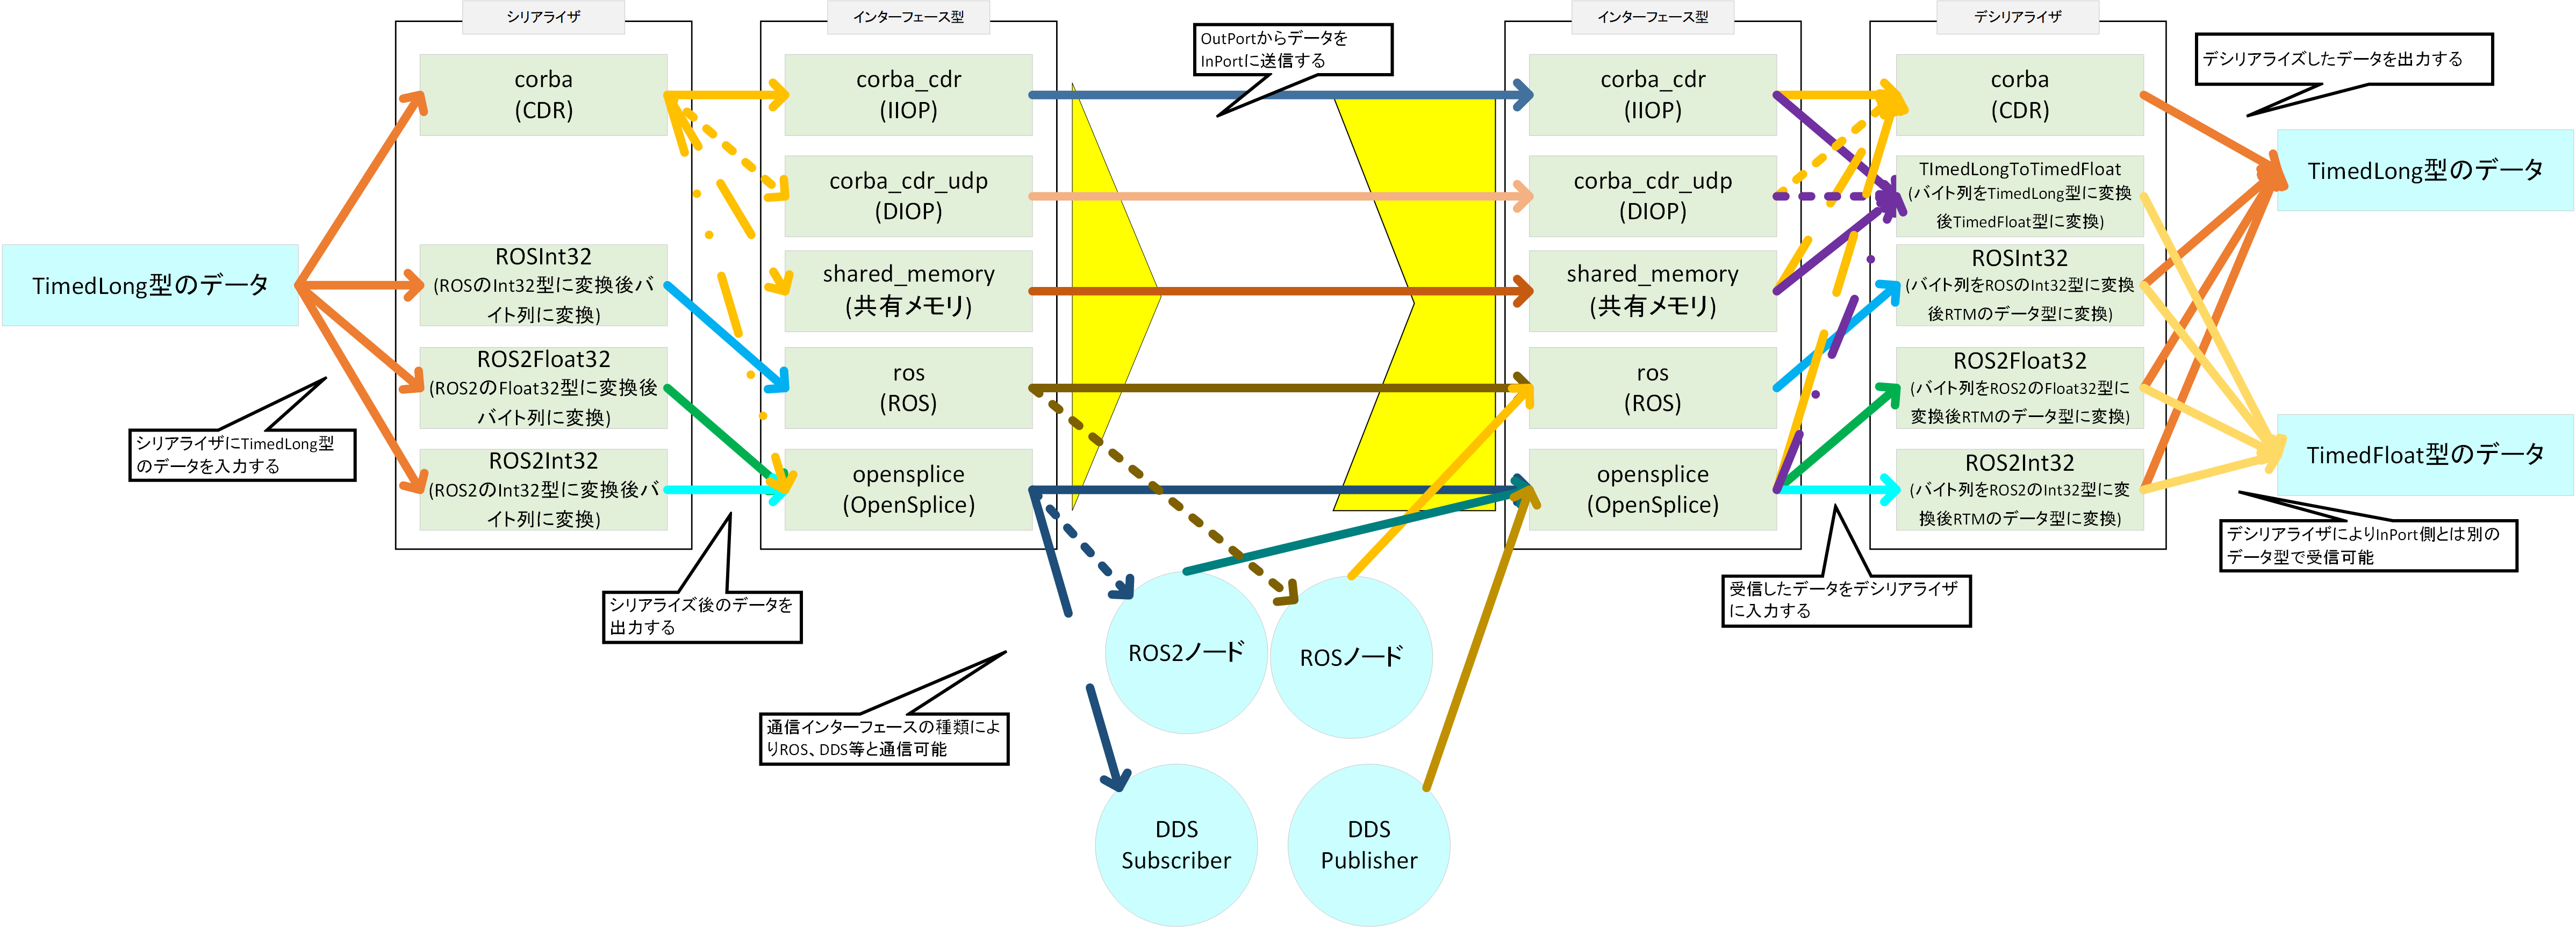
OpenRTM-aistのデータポートでは以下のようにデータをバイト列に変換するシリアライザ、データを送信する通信インターフェースの種類については複数の実装から選択可能です。
インターフェース型が選択可能のためRTC同士だけではなく、ROSのノード、あるいはROS2のようにDDSにより通信を行うプロセスとデータのやり取りが可能になります。 またシリアライザが選択可能のため、図のようにTimedLong型をTimedLong型のような別のデータ型に変換して様々なデータ型のポートと柔軟に接続することができます。
現在はC++版、Python版で使用可能です。
以下に独自シリアライザの作成手順を記載します。
Implement Original Serializer (C++)
Installing OpenRTM-aist
OpenRTM-aist 2.0以上が必要なため、以下の手順でソースコードからビルドを行う必要がある。
ビルド終了後、特定の場所にインストールする。
cmake-guiでCMake_INSTALL_PREFIXを設定するか、cmake実行時のコマンドで設定する。
cmake -DOMNI_VERSION=42 -DOMNI_MINOR=3 -DOMNITHREAD_VERSION=41 -DORB_ROOT=C:/workspace/omniORB-4.2.3-win64-vc141 -DCORBA=omniORB -G "Visual Studio 15 2017" -A x64 .. -DCMake_INSTALL_PREFIX=C:/workspace/openrtm_install
ビルド後に、以下のコマンドでインストールする。
cmake --build .. --target INSTALL --config Release
Visual Studio上でINSTALLのプロジェクトをビルドしてもインストールできる。
独自シリアライザの作成
独自シリアライザの実装には以下のファイルを作成する必要がある。
- C++ソースファイル(今回はTestSerializer.cppとする)
- CMakeLists.txt
CMakeLists.txtの作成
CMakeLists.txtにはOpenRTM-aistのパッケージの検出、動的ライブラリを生成するようにコマンドを記述します。
 cmake_minimum_required (VERSION 3.0.2)

 project (TestSerializer
     VERSION 1.0
     LANGUAGES CXX)

 message(STATUS ${MSVC_TOOLSET_VERSION})

 #OpenRTM-aistの検出
 find_package(OpenRTM)

 #インクルードディレクトリ、リンクディレクトリ、コンパイル時のフラグの設定
 include_directories(${PROJECT_SOURCE_DIR}/include)
 include_directories(${PROJECT_SOURCE_DIR}/include/${PROJECT_NAME})
 include_directories(${PROJECT_BINARY_DIR})
 include_directories(${PROJECT_BINARY_DIR}/idl)
 include_directories(${OPENRTM_INCLUDE_DIRS})
 add_definitions(${OPENRTM_CFLAGS})

 link_directories(${OPENRTM_LIBRARY_DIRS})

 #動的リンクライブラリの生成
 add_library(${PROJECT_NAME} SHARED TestSerializer.cpp)
 #生成するライブラリ名をTestSerializer.dll(もしくは.so)に設定
 set_target_properties(${PROJECT_NAME} PROPERTIES PREFIX "")
 #OpenRTM-aistのライブラリとリンク
 target_link_libraries(${PROJECT_NAME} ${OPENRTM_LIBRARIES})
CPPファイルの作成
TestSerializer.cppを以下のように作成します。
 #include <rtm/ByteDataStreamBase.h>
 #include <rtm/idl/BasicDataTypeSkel.h>
 #include <coil/Factory.h>
 #include <rtm/Manager.h>

 //以下はシリアライザの実装
 template <class DataType>
 class TestSerializer : public RTC::ByteDataStream<DataType>
 {
 public:
     TestSerializer():m_buffer(NULL), m_length(0){};

     void writeData(const unsigned char* buffer, unsigned long length) override
     {
         delete m_buffer;
         m_buffer = new unsigned char[length];
         memcpy(m_buffer, buffer, length);
         m_length = length;
     }
     void readData(unsigned char* buffer, unsigned long length) const override
     {
         if (m_buffer)
         {
             memcpy(buffer, m_buffer, length);
         }
     }
     unsigned long getDataLength() const override
     {
         return m_length;
     }
     bool serialize(const DataType& data) override
     {
         delete m_buffer;
         m_buffer = new unsigned char[1];
         m_buffer[0] = static_cast<unsigned char>(data.data);
         m_length = 1;
         return true;
     }
     bool deserialize(DataType& data) override
    {
        if (m_buffer)
        {
            data.data = static_cast<long>(m_buffer[0])+1;
            return true;
        }
        return false;
    }
 };

 extern "C"
 {
     //以下はモジュールロード時に呼び出される関数
     DLL_EXPORT void TestSerializerInit(RTC::Manager* manager)
     {
         //以下のファクトリはデータ型ごとに登録する必要がある
         coil::GlobalFactory <::RTC::ByteDataStream<RTC::TimedLong>>::
             instance().addFactory("test",  //addFactory関数の第1引数で登録名を設定。以下で独自シリアライザを利用するときはこの名前を使用する。
                 ::coil::Creator< ::RTC::ByteDataStream<RTC::TimedLong>,
                 TestSerializer<RTC::TimedLong>>,
                 ::coil::Destructor< ::RTC::ByteDataStream<RTC::TimedLong>,
                 TestSerializer<RTC::TimedLong>>);
     };
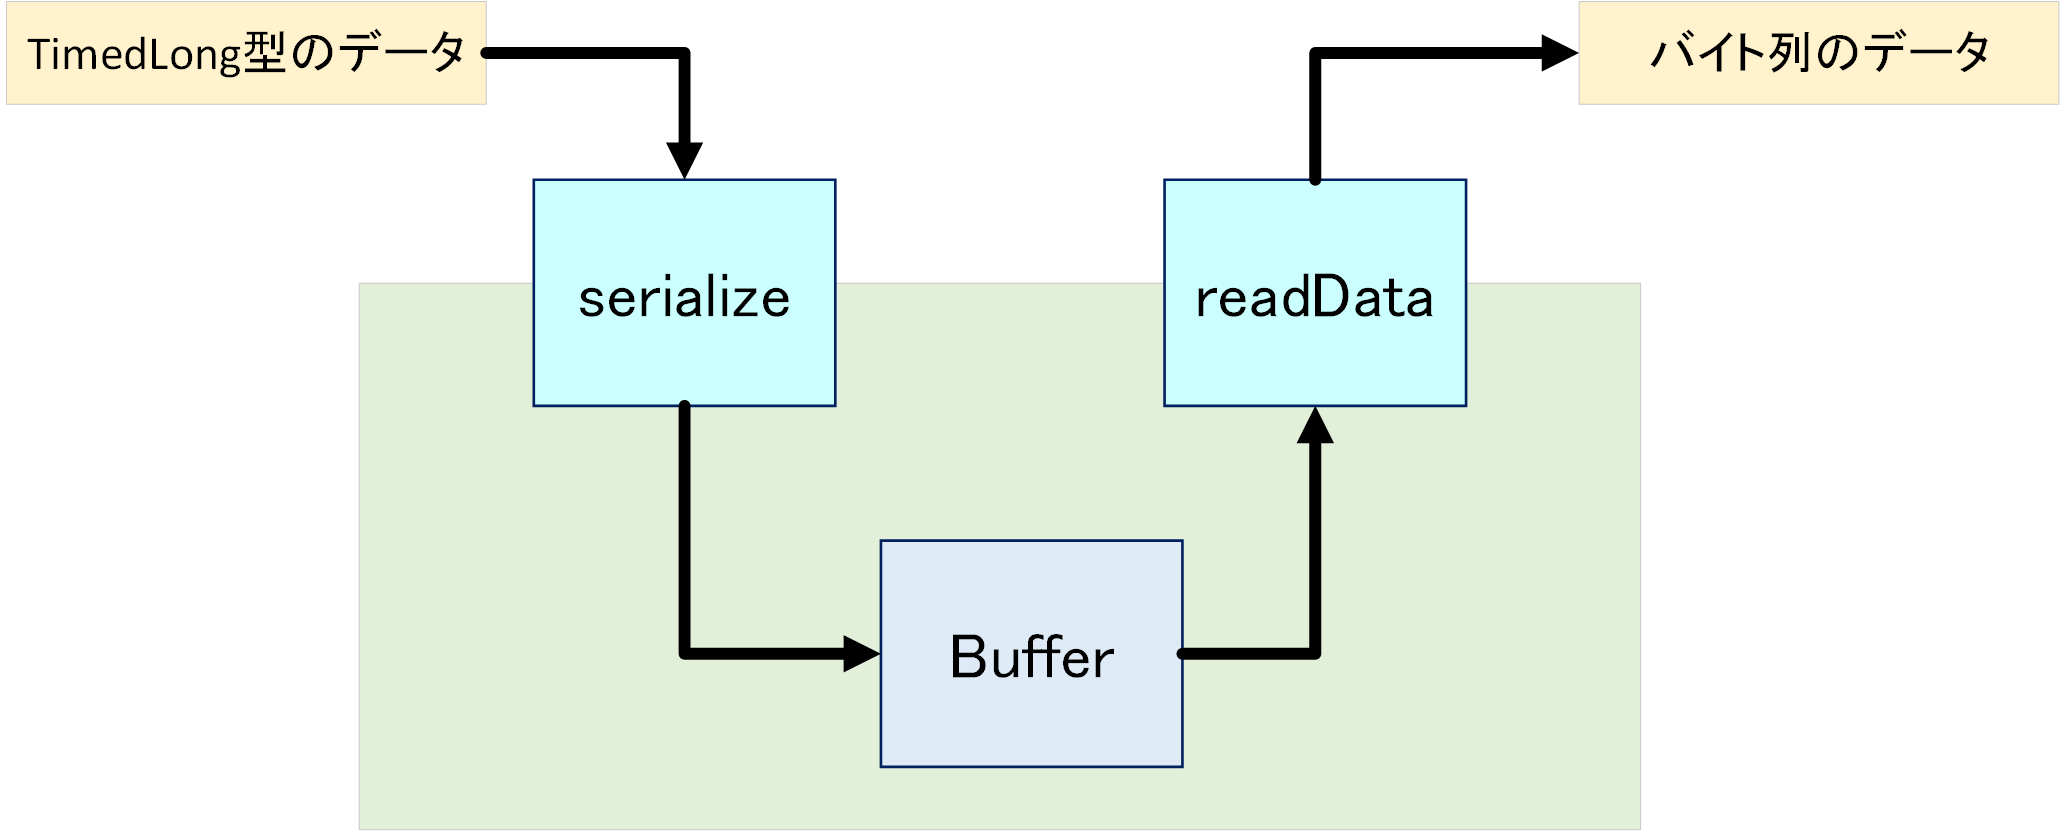
}シリアライザにはwriteData関数、readData関数、getDataLength関数、serialize関数、deserialize関数を実装する必要がある。 serialize関数はRTMのデータをunsigned char型に変換して内部のバッファに保存する。 保存したデータはreadData関数で取り出すことができる。 このため、データ送信時の処理は以下のようになっている。
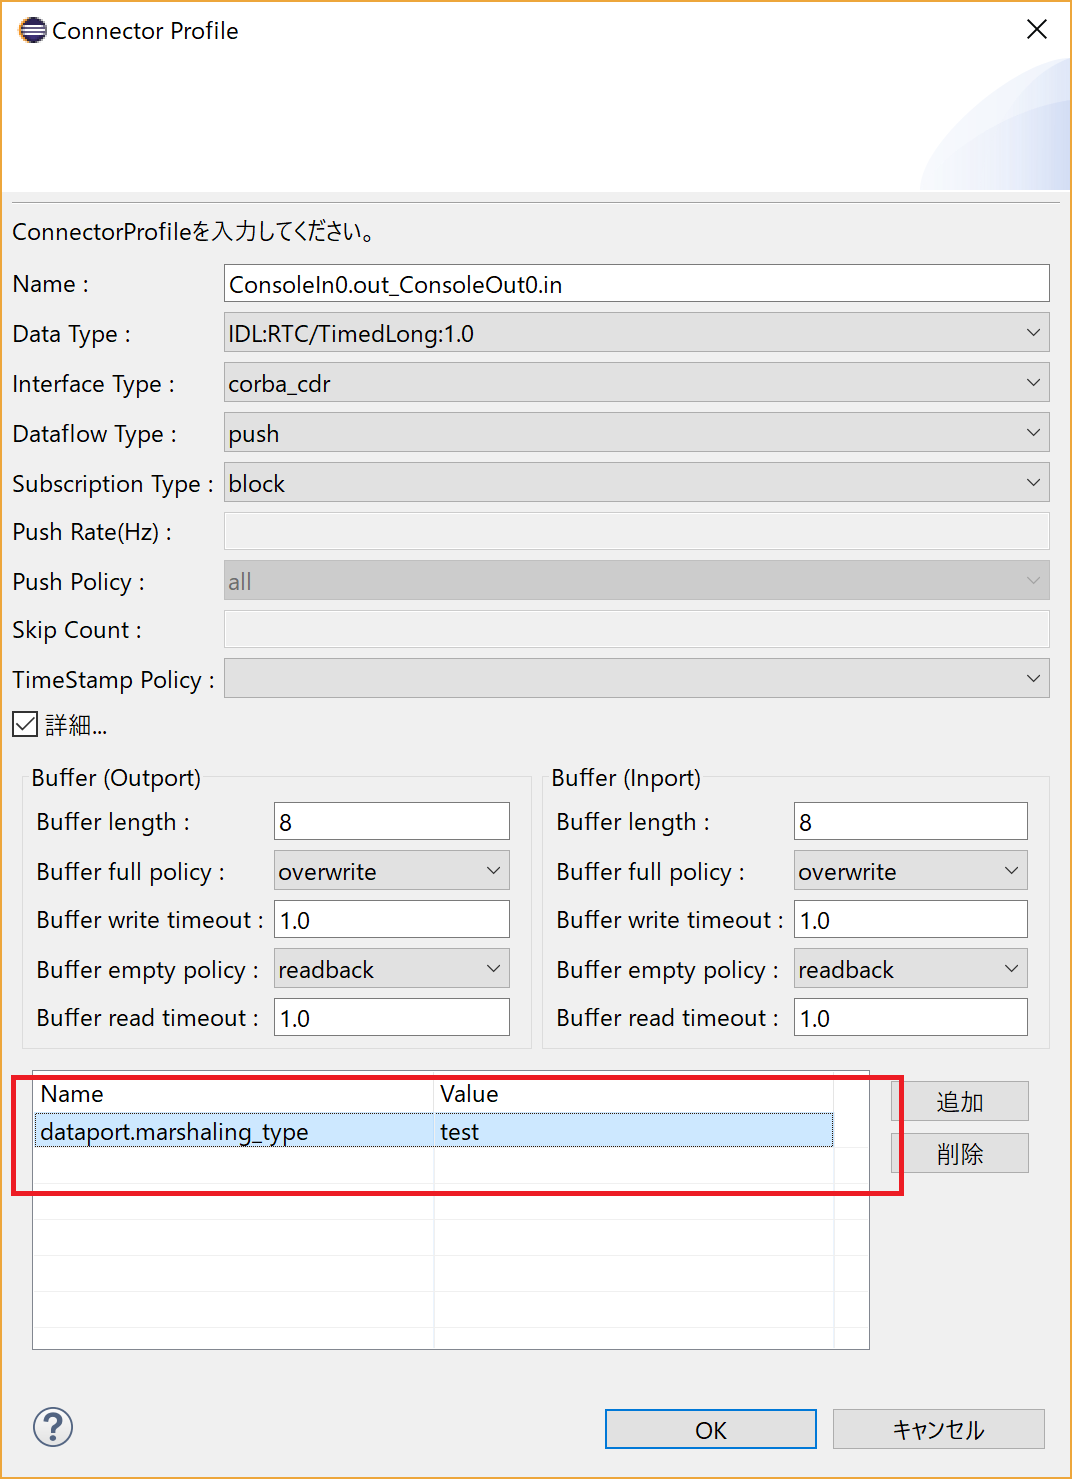
writeData関数は内部のバッファにバイト列のデータを書き込む関数である。 deserialize関数は内部のバッファのデータをRTMのデータ型に変換して外部の変数に渡す。 このため、データ受信時の処理は以下のようになっている。
getDataLengthは内部で保持しているデータの長さを取得する関数である。
ビルド
OpenRTM-aistをソースコードからビルド、インストールした場合は環境変数が設定されていないためcmake実行時にOpenRTMConfig.cmakeの場所を指定する必要がある。
cmake -G "Visual Studio 15 2017" -A x64 .. -DOpenRTM_DIR=C:/workspace/openrtm1/build/install/2.0.0/cmake
この後Visual Studio等でビルドを行う。
独自シリアライザの利用
上記の作業でTestSerializer.dllが生成されているはずのため、TestSerializer.dllをRTC実行時にロードして利用できるようにする。
rtc.confに以下のように記述することでロードできる。モジュール探索パスは適宜変更する。
 manager.modules.load_path: .
 manager.modules.preload: TestSerializer.dll
データポート接続時にmarshaling_typeのオプションでシリアライザを設定できる。
manager.components.preconnect: ConsoleOut0.in?port=ConsoleIn0.out&marshaling_type=test
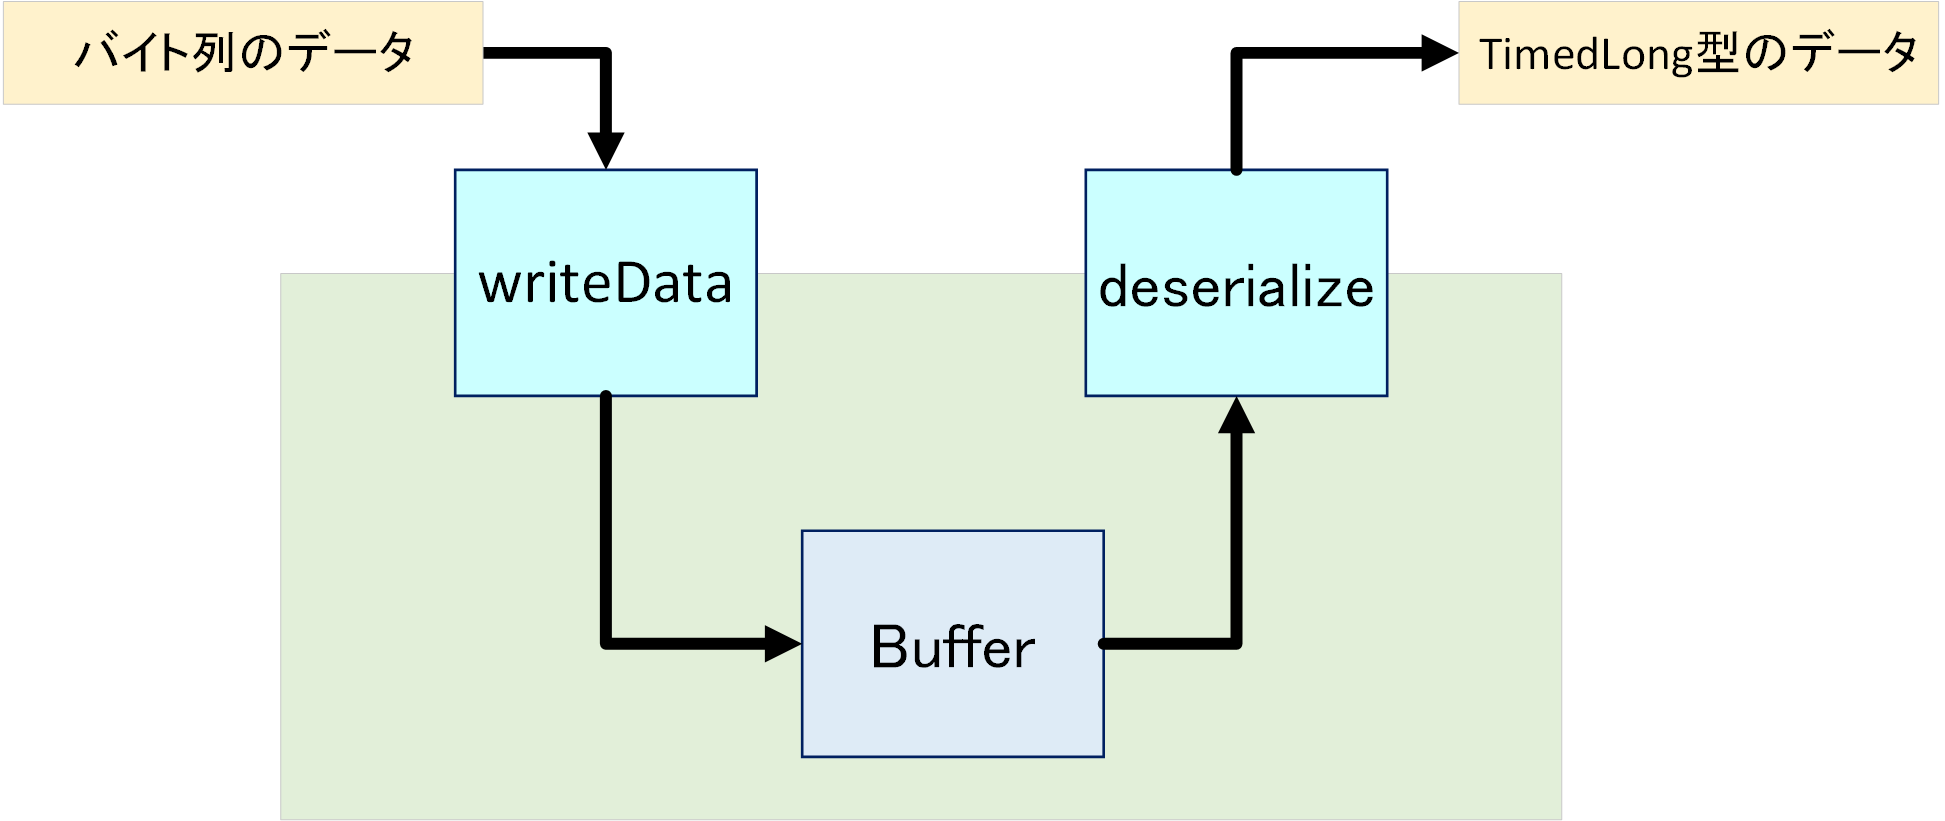
RT System Editorで設定する場合はdataport.marshaling_typeといパラメータで設定する。
これで独自シリアライザ(TestSerializer)が使用可能になったため、ConsoleInとConsoleOutで通信すると標準入力した数値に1を足した数値が表示される。
以下はConsoleInとConsoleOutのデータポートを接続してアクティベートするrtc.confの例。
 manager.modules.load_path: .
 manager.modules.preload: TestSerializer.dll, ConsoleOut.dll
 manager.components.precreate: ConsoleOut
 manager.components.preconnect: ConsoleOut0.in?port=ConsoleIn0.out&marshaling_type=test
 manager.components.preactivation: ConsoleOut0, ConsoleIn0
Implement Original Serializer (Python)
OpenRTM-aistのインストール
OpenRTM-aist 2.0以上が必要なため、以下の手順でソースコードからビルドを行う必要がある。
独自シリアライザの作成
独自シリアライザの実装には以下のファイルを作成する必要がある。
- Pythonソースファイル(今回はTestSerializer.pyとする)
Pythonファイルの作成
TestSerializer.pyを以下のように作成します。
#!/usr/bin/env python # -*- coding: euc-jp -*-
import OpenRTM_aist import RTC
 #以下はシリアライザの実装
 class TestSerializer(OpenRTM_aist.ByteDataStreamBase):

   def __init__(self):
     pass


   def __del__(self):
    pass

   def serialize(self, data):
     if data._NP_RepositoryId == RTC.TimedLong._NP_RepositoryId:
         bdata = str(data.data)
         return OpenRTM_aist.ByteDataStreamBase.SERIALIZE_OK, bdata
     else:
         return OpenRTM_aist.ByteDataStreamBase.SERIALIZE_ERROR, ""


   def deserialize(self, cdr, data_type):
     if data_type._NP_RepositoryId == RTC.TimedLong._NP_RepositoryId:
         data_type.data = int(cdr)+1
         return OpenRTM_aist.ByteDataStreamBase.SERIALIZE_OK, data_type
     else:
         return OpenRTM_aist.ByteDataStreamBase.SERIALIZE_ERROR, data_type


 #以下はモジュールロード時に呼び出される関数
 def TestSerializerInit(mgr):
   OpenRTM_aist.SerializerFactory.instance().addFactory("test", #addFactory関数の第1引数で登録名を設定。以下で独自シリアライザを利用するときはこの名前を使用する。
                                                       TestSerializer,
OpenRTM_aist.Delete)シリアライザにはserialize関数、deserialize関数を実装する必要がある。 serialize関数はRTMのデータをバイト列のデータ等に変換してリターンコードと変換後のデータを返す。
deserialize関数はバイト列のデータなどをRTMのデータに変換してリターンコードと返還後のデータを返す。
独自シリアライザの利用
TestSerializer.pyをRTC実行時にロードして利用できるようにする。
rtc.confに以下のように記述することでロードできる。モジュール探索パスは適宜変更する。
 manager.modules.load_path: .
 manager.modules.preload: TestSerializer.py
データポート接続時にmarshaling_typeのオプションでシリアライザを設定できる。
manager.components.preconnect: ConsoleOut0.in?port=ConsoleIn0.out&marshaling_type=test
RT System Editorで設定する場合はdataport.marshaling_typeといパラメータで設定する。
これで独自シリアライザ(TestSerializer)が使用可能になったため、ConsoleInとConsoleOutで通信すると標準入力した数値に1を足した数値が表示される。
以下はConsoleInとConsoleOutのデータポートを接続してアクティベートするrtc.confの例。
 manager.modules.load_path: .
 manager.modules.preload: TestSerializer.py, ConsoleOut.py
 manager.components.precreate: ConsoleOut
 manager.components.preconnect: ConsoleOut0.in?port=ConsoleIn0.out&marshaling_type=test
 manager.components.preactivation: ConsoleOut0, ConsoleIn0
